Custom Size Constraints
- 3 minutes to read
The default size constraints limit a layout item’s size. This topic describes how to override the default size constraints by imposing custom size limitations at design time and runtime.
Customize Size Constraints via the Menu
A layout item’s Context Menu contains commands to apply and remove size constraints:

Tip
This context menu is available at design time and in runtime customization mode. To invoke runtime customization mode, an end-user can activate the Customization Form.
Example - Lock a layout item’s size at design time
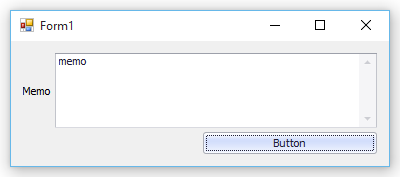
Assume that a form is filled with a LayoutControl that contains three layout items:
- an item that displays a memo editor
- an item that contains a button
- an Empty Space Item (to the left of the button)

When the form is resized, all the items are resized proportionally:
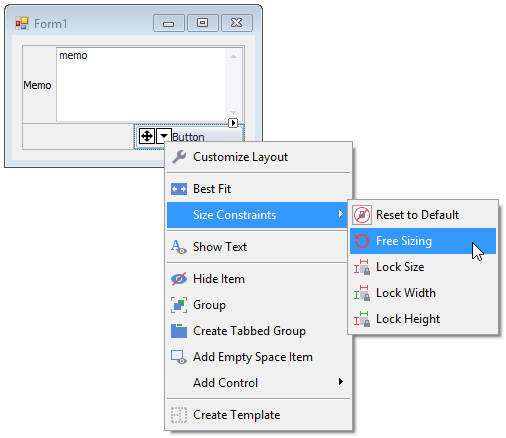
The steps below show how to lock the size of the layout item that hosts the button.
Apply the Free Sizing command to the target layout item.
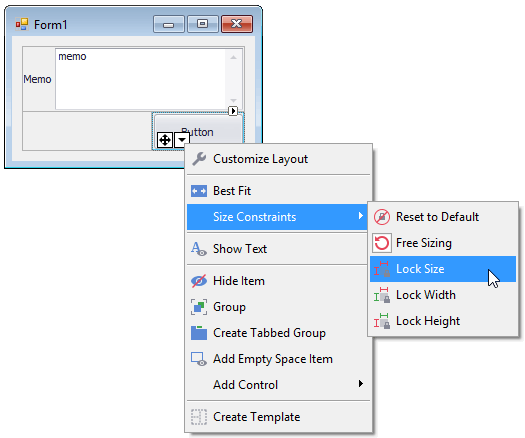
Resize this layout item on the form, so that it takes the required size.

Apply the Lock Size command.
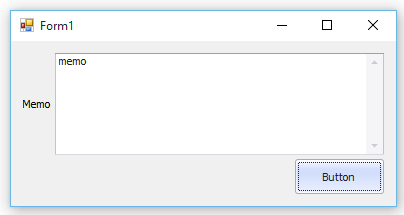
Now when the form is resized, the button retains its original size:
The following table describes commands available in the Size Constraints menu.
Command | Description |
|---|---|
| Applies the default size constraints to the item, as described in the Default Size Constraints topic. This command sets the layout item’s LayoutControlItem.SizeConstraintsType to Default. |
| Unlocks the upper limits of the item’s width and height that are specified by the MaxSize properties. This command sets the layout item’s LayoutControlItem.SizeConstraintsType to Custom. The MaxSize.Width and MaxSize.Height properties are set to 0. The MinSize property is set to the default minimum (the same value as in the Default size constraints mode). |
| Locks the layout item’s current size, so the layout item can no longer be resized. This command sets the LayoutControlItem.SizeConstraintsType to Custom. The MaxSize and MinSize properties are set to the value specified by the layout item’s BaseLayoutItem.Size property. |
| Locks the layout item’s current width. This command sets the LayoutControlItem.SizeConstraintsType to Custom. The MaxSize.Width and MinSize.Width properties are set to the value specified by the layout item’s Size.Width property. The MaxSize.Height and MinSize.Height properties remain unchanged. |
| Locks the layout item’s current height. This command sets the LayoutControlItem.SizeConstraintsType to Custom. The MaxSize.Height and MinSize.Height properties are set to the current height specified by the layout item’s Size.Height property. The MaxSize.Width and MinSize.Width properties remain unchanged. |
 Reset to default
 Free sizing
 Lock Size
 Lock Width
 Lock Height
Custom Size Constraints
To provide custom size constraints for a layout item in code, do the following:
- Set the LayoutControlItem.SizeConstraintsType property to SizeConstraintsType.Custom.
- Use the LayoutControlItem.MinSize and LayoutControlItem.MaxSize properties to specify custom constraints.
Tip
Set the MaxSize.Width/MaxSize.Height attribute to 0 to remove limits on the item’s maximum width/height.
Demo
Example - Lock a layout item’s size
DevExpress.XtraLayout.LayoutControlItem item = layoutControlItemButton;
item.SizeConstraintsType =  DevExpress.XtraLayout.SizeConstraintsType.Custom;
Size newSize = new Size(105, 41);
item.MaxSize = newSize;
item.MinSize = newSize;
Apply size constraints to embedded controls
You can apply size constraints to a control that hosts within a layout item. This can be helpful when you need to custom align the control within the client area. See Aligning Controls Within Layout Items for more information.