Reference Dashboard Parameters in WinForms
- 12 minutes to read
This topic describes how to reference a dashboard parameter in filter string, condition format expressions, calculated fields, and window calculations. You can also bind a dashboard parameter to a query parameter to filter the SQL data source dynamically.
SQL Queries and Stored Procedures
You can filter the SQL data sources dynamically if you bind a query parameter to a dashboard parameter.
You can access the query parameter settings in the second page of the Query Editor or in the Query Builder by clicking the Edit Parameters button.
Select the Expression checkbox and in the Value column, select the dashboard parameter, or specify an expression with a dashboard parameter in Expression Editor.

Refer to the following article for more information about query parameters: Use Query Parameters.
Tip
You can also create cascading parameters in the WinForms Dashboard Designer. For more information, refer to the following topic: Cascading Parameters.
Example 1 - How to Pass a Dashboard Parameter to a Custom SQL Query
The following example shows how to pass dashboard parameters to a custom SQL query in code:
Example 2 - How to Pass a Hidden Dashboard Parameter to a Custom SQL Query
The example below shows how to pass a hidden dashboard parameter to a custom SQL query and change the parameter value before it is passed to the query:
Example 3 - How to Pass a Dashboard Parameter to a Stored Procedure
This example shows how to pass a multi-value dashboard parameter to a stored procedure and change the parameter value before it is passed to the stored procedure:
EF Data Source - Stored Procedures
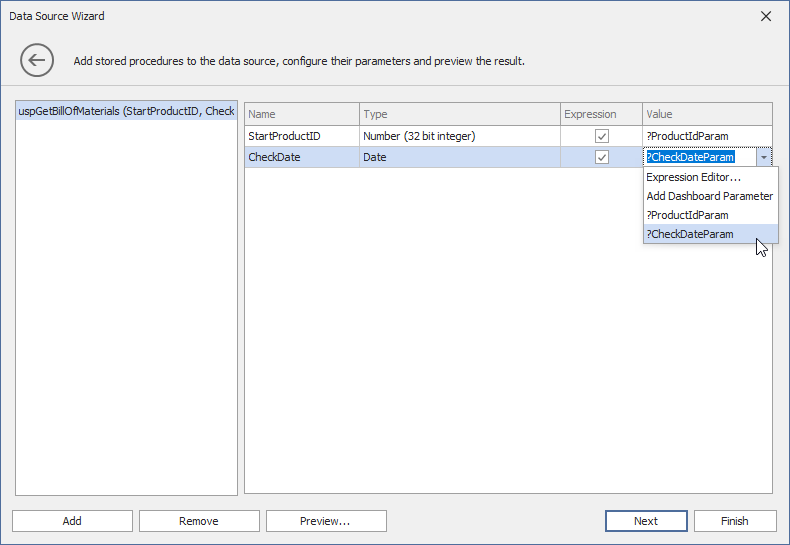
You can map a dashboard parameter to a parameter of a stored procedure from the Entity Framework Data Source.
To do this, add a stored procedure. Then, in the Data Source Wizard, specify the settings for stored procedure parameters. Select the Expression check box and in the Value column select/create a dashboard parameter or specify an expression with a dashboard parameter in Expression Editor.
Tip
For more information on Entity Framework data sources, refer to the following article: Entity Framework Data Source in WinForms.
Data Source Filtering
You can use dashboard parameters to filter Excel, Object, and Extract data sources.
To apply filtering to a data source, click the Filter button in the Data Source Ribbon tab.

In the invoked Filter Editor, specify the filter criteria. To compare a field value with a parameter value, click the  button and then the
  button. Then, click the second operand’s placeholder to invoke the list of available parameters and select the required parameter:

The  icon will be displayed next to the selected parameter.
Click OK to save the created filter criteria. Now, when you change the dashboard parameter value, the data source is filtered according to the parameter value.
The following code snippet shows how to filter an Object data source in code depending on the dashboard parameter value:
using DevExpress.DashboardCommon;
using DevExpress.DataAccess.ObjectBinding;
//...

Dashboard dashboard = new Dashboard();
dashboard.LoadFromXml(@"Dashboards\dashboard1.xml");

// Create an Object Data Source.
DashboardObjectDataSource objectDataSource = new DashboardObjectDataSource();
objectDataSource.DataSource = typeof(Invoices);
objectDataSource.DataMember = "GetData";
objectDataSource.Constructor = ObjectConstructorInfo.Default;
objectDataSource.Fill();

// Create the Country dashboard parameter.
StaticListLookUpSettings settings = new StaticListLookUpSettings();
settings.Values = new string[] { "Germany", "USA"};
DashboardParameter parameter1 = new DashboardParameter("Country", typeof(string), "USA", "Country:", true, settings);
dashboard.Parameters.Add(parameter1);

// Displays only rows where the Country field's value is equal to
// the Country dashboard parameter's values.
objectDataSource.Filter = "[Country] = ?Country";

// Add the Object Data Source to the dashboard.
dashboard.DataSources.Add(objectDataSource);
dashboardDesigner.Dashboard = dashboard;
Dashboard Item Filters
WinForms Dashboard allows you to use the following data filters in dashboard items:
- Dashboard Item Filter
- Filters individual dashboard items independently.
- Measure Filter
- Filters only the specified measure in the dashboard item.
- Visible Data Filter
- Hides a part of the calculated data from the view. This filter type does not filter underlying data used in calculations or intermediate level aggregations.
To apply filtering based on a dynamic value, you need to use a dashboard parameter in a filter criteria. The following example describes how to filter a dashboard item according to a dashboard parameter value.
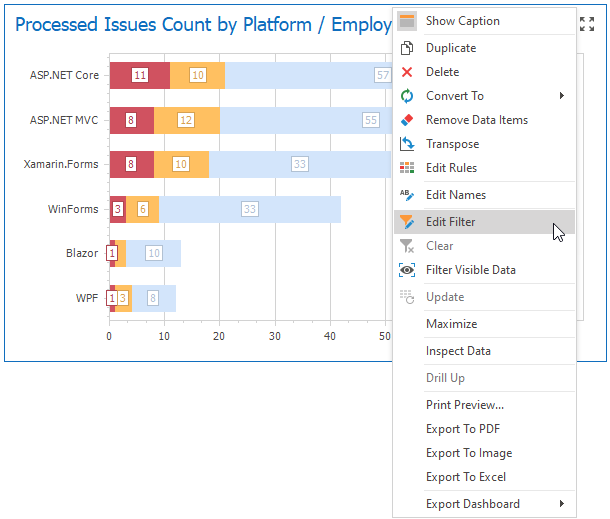
To add a dashboard item filter, right-click a dashboard item and select Edit Filter from its context menu (or click the Edit Filter button in the Data tab in the Ribbon menu):
In the invoked Filter Editor, specify the filter criteria. To compare a field value with a parameter value, click the  button and then the
  button. Then, click the second operand’s placeholder to invoke the list of available parameters and select the required parameter.
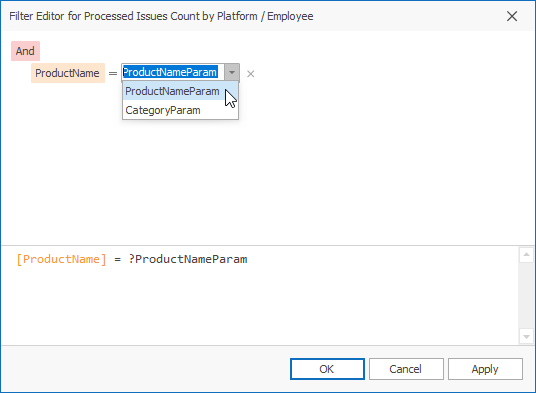
The  icon will be displayed next to the selected parameter.
Click OK to save the created filter criteria. Now, when you change the dashboard parameter value, the dashboard item is filtered according to the parameter value.
Tip
For more information on filtering in WinFroms Dashboard, refer to the following article: Filtering.
Example 1 - How to Pass a Dashboard Parameter to a Filter String
The following example demonstrates how to create a new dashboard parameter and pass it to a dashboard item filter string.
In this example, the dashboard data source contains two queries:
- The SalesPerson query is used for data visualization
- The Categories query supplies values for the dashboard parameter
The dashboard items display data according to the selected values of the dashboard parameter.
using DevExpress.XtraEditors;
using DevExpress.DashboardCommon;

namespace Dashboard_Parameters {
    public partial class Form1 : XtraForm {
        public Form1() {
            InitializeComponent();
            Dashboard dashboard = new Dashboard();
            dashboard.LoadFromXml(@"..\..\Data\Dashboard.xml");

            // Obtain dashboard items and specify identifiers for data items.
            GridDashboardItem grid = (GridDashboardItem)dashboard.Items[0];
            PieDashboardItem pie = (PieDashboardItem)dashboard.Items[1];
            ((GridDimensionColumn)grid.Columns[0]).Dimension.UniqueId = "categoryColumn";
            pie.SeriesDimensions[0].UniqueId = "categorySeries";

            // Obtain the dashboard data source used to provide parameter values.
            DashboardSqlDataSource parameterDataSource =
                (DashboardSqlDataSource)dashboard.DataSources[0];

            // Create a new parameter that obtains its values from the Categories query.
            DynamicListLookUpSettings settings = new DynamicListLookUpSettings();
            settings.DataSource = parameterDataSource;
            settings.DataMember = "Categories";
            settings.ValueMember = "CategoryName";
            DashboardParameter parameter = new DashboardParameter("categoryParameter",
                typeof(string), "Beverages", "Select categories:", true, settings);
            // Enable multi-selection for the created parameter.
            parameter.AllowMultiselect = true;

            // Add the created parameter to a collection of dashboard parameters.
            dashboard.Parameters.Add(parameter);

            // Include the created parameter in filter strings as an operand value.
            grid.FilterString = "categoryColumn in (?categoryParameter)";
            pie.FilterString = "categorySeries in (?categoryParameter)";

            dashboardViewer1.Dashboard = dashboard;
        }
    }
}
Example 2 - How to Use the Pivot Dashboard Item as a Master Filter Item
The example below demonstrates how to make the Pivot dashboard item behave like a single-selection Master Filter item. You can filter other dashboard items by dashboard parameters related to the Pivot Item.

Conditional Formatting
You can apply conditional formatting to a dashboard item according to the current parameter value. It allows you to format dashboard item elements dynamically.
To reference a dashboard parameter in a format rule, click the menu button of the required data item and select Add Format Rule | Expression:

In the invoked Expression dialog, specify the format rule and other settings. To compare a field value to a parameter value, click the  button of the second operand, and then click the
  button. After that, click the operand’s placeholder and select the dashboard parameter.
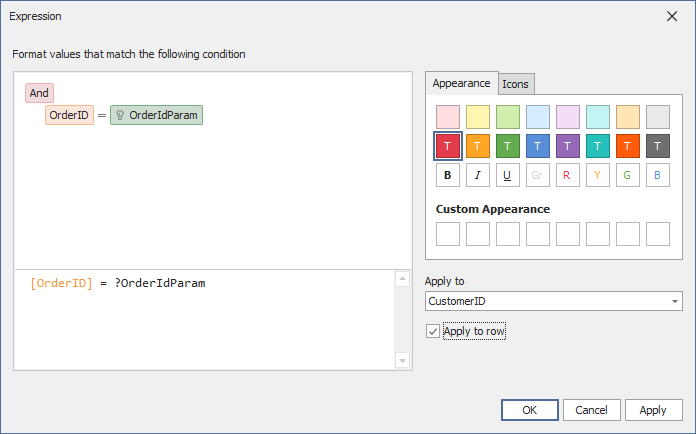
The  icon will be displayed next to the selected parameter.
Click OK to save the created format rule. Now, when you change the dashboard parameter value, the dashboard item is formatted according to the parameter value.
Tip
For more information on conditional formatting, refer to the following article: Conditional Formatting.
Example - How to Use Dashboard Parameters with the Expression Format Rule
The format rule allows you to create complex conditions for conditional formatting.
This example demonstrates how to create a dashboard parameter in code and pass it to a format rule. The dashboard item is formatted according to the parameter value.
using DevExpress.DashboardCommon;

namespace Grid_ExpressionCondition {
    public partial class Form1 : DevExpress.XtraEditors.XtraForm {
        public Form1() {
            InitializeComponent();
            Dashboard dashboard = new Dashboard(); dashboard.LoadFromXml(@"..\..\Data\Dashboard.xml");
            dashboardViewer1.Dashboard = dashboard;
            GridDashboardItem grid = (GridDashboardItem)dashboard.Items["gridDashboardItem1"];
            GridMeasureColumn extendedPrice = (GridMeasureColumn)grid.Columns[1];
            extendedPrice.Measure.UniqueId = "extendedPrice";

            DashboardParameter priceParameter = new DashboardParameter();
            priceParameter.LookUpSettings = null;
            priceParameter.Name = "priceParameter";
            priceParameter.Type = typeof(decimal);
            priceParameter.Value = 150000;
            priceParameter.Description = "Format values that are greater than";
            dashboard.Parameters.Add(priceParameter);

            GridItemFormatRule greaterThanRule = new GridItemFormatRule(extendedPrice);
            FormatConditionExpression greaterThanCondition = new FormatConditionExpression();
            greaterThanCondition.Expression = "extendedPrice > [Parameters.priceParameter]";
            greaterThanCondition.StyleSettings =
                new AppearanceSettings(FormatConditionAppearanceType.PaleGreen);
            greaterThanRule.ApplyToRow = true;
            greaterThanRule.Condition = greaterThanCondition;

            grid.FormatRules.AddRange(greaterThanRule);
        }
    }
}
Calculated Fields
You can use parameters when you construct expressions for calculated fields. This allows you to dynamically evaluate values of the calculated field depending on the current parameter value.
To reference a dashboard parameter in the calculated field expression, add or edit a calculated field. In the invoked Expression Editor, select the dashboard parameter from the Parameters section.
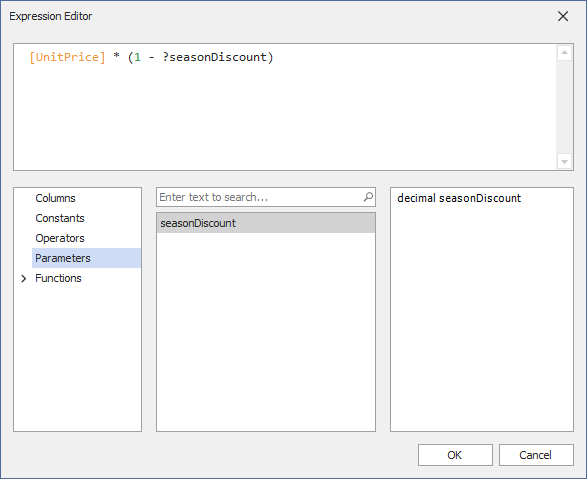
Click OK to save the expression. Now, when you change the dashboard parameter value, the calculated field values are changed according to the specified expression.
Tip
For more information on calculated fields in WinForms Dashboard, refer to the following article: Calculated Fields.
Example - How to Pass a Dashboard Parameter to a Calculated Field’s Expression
The following example demonstrates how to create a dashboard parameter and pass it to a calculated field‘s expression.
In this example, a new calculated field evaluated at a summary level returns TRUE or FALSE depending on whether the average discount exceeds the selected parameter value.
using DevExpress.DashboardCommon;
using DevExpress.XtraEditors;

namespace Dashboard_ParametersAndCalculatedFields
{
    public partial class Form1 : XtraForm {
        public Form1() {
            InitializeComponent();

            Dashboard dashboard = new Dashboard();
            dashboard.LoadFromXml(@"..\..\Data\Dashboard.xml");
            DashboardSqlDataSource dataSource = (DashboardSqlDataSource)dashboard.DataSources[0];
            GridDashboardItem grid = (GridDashboardItem)dashboard.Items[0];

            // Create a new dashboard parameter.
            StaticListLookUpSettings settings = new StaticListLookUpSettings();
            settings.Values = new string[] { "0.01", "0.05", "0.1" };
            DashboardParameter discountValue = new DashboardParameter("discountValue",
                typeof(double), 0.05, "Select discount:", true, settings);
            dashboard.Parameters.Add(discountValue);

            // Create a new calculated field and pass the created dashboard parameter
            // to a calculated field expression.
            CalculatedField isGreater = new CalculatedField();
            isGreater.DataMember = "SalesPerson";
            isGreater.Name = "IsGreater";
            isGreater.Expression = "ToStr(Iif(Avg([Discount]) >= [Parameters.discountValue], 'TRUE', 'FALSE'))";
            dataSource.CalculatedFields.Add(isGreater);

            grid.Columns.Add(new GridMeasureColumn(new Measure("IsGreater")));
            dashboardViewer1.Dashboard = dashboard;
        }
    }
}
Window Calculations
You can use dashboard parameters in window calculations. This allows you to apply specific computations to measure values depending on the current parameter value.
To reference the dashboard parameter value in a window calculation, create a window calculation of the Custom type:

Then, select the calculation type and click the Edit in Expression Editor button:

In the invoked Expression Editor window, construct an expression. To reference a dashboard parameter, select the Parameters category and double-click the required parameter from the list of the available dashboard parameters.
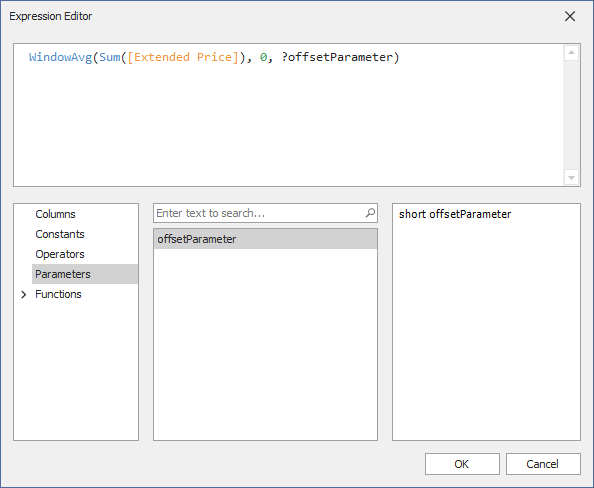
Click OK to apply the specified settings. Now, when you change the dashboard parameter value, the calculation values are changed according to the specified expression.
Tip
For more information on window calculations in WinForms Dashboard, refer to the following article: Window Calculations.