How to: Build Non-Linear Layout via LayoutControl
- 2 minutes to read
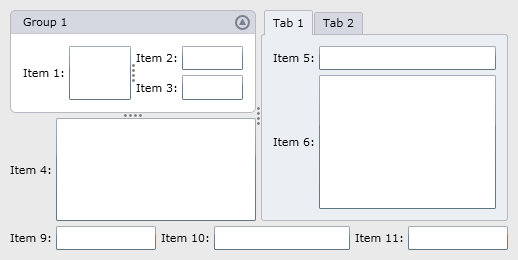
This example shows how to arrange items within a LayoutControl, forming a non-linear layout. To create a layout, items are combined into groups and the groups are combined into other groups. Various group visual styles are demonstrated. Group 1 is rendered using the GroupBox visual style (the View property is set to GroupBox), which allows a header to be displayed. There is also a group that represents items as tabs (its View property is set to Tabs). Other groups are painted without a header and borders. For Group 1, the collapsing feature is enabled via the LayoutGroup.IsCollapsible property, allowing an end-user to collapse the group’s contents. For the tabbed group and the group that displays Item 2 and Item 3, horizontal sizing is enabled via the LayoutControl.AllowHorizontalSizing attached property. Vertical sizing is enabled for Item 4 via the LayoutControl.AllowVerticalSizing attached property. For items 1, 2, 3, 4 and 6, the VerticalAlignment property is set to Stretch. These items are stretched when the LayoutControl’s height is changed. For Item 9 and Item 11, the HorizontalAlignment property is set to Left and Right, respectively. These items have a fixed width and are not stretched when the LayoutControl’s width is changed.
The following image shows the result:
Note
A complete sample project is available at https://github.com/DevExpress-Examples/how-to-build-non-linear-layout-via-layoutcontrol-e2257.
<Window x:Class="LayoutControl_Ex.MainWindow"
        xmlns="http://schemas.microsoft.com/winfx/2006/xaml/presentation"
        xmlns:x="http://schemas.microsoft.com/winfx/2006/xaml"
        xmlns:lc="http://schemas.devexpress.com/winfx/2008/xaml/layoutcontrol"
        Title="MainWindow" Height="300" Width="572">
    <Grid x:Name="LayoutRoot" Background="White">
        <lc:LayoutControl Orientation="Vertical" Background="#FFEAEAEA">
            <lc:LayoutGroup Orientation="Horizontal">
                <lc:LayoutGroup Orientation="Vertical">
                    <lc:LayoutGroup Orientation="Horizontal" View="GroupBox" Header="Group 1" IsCollapsible="True">
                        <lc:LayoutItem Label="Item 1:" VerticalAlignment="Stretch">
                            <TextBox/>
                        </lc:LayoutItem>
                        <lc:LayoutGroup Orientation="Vertical" lc:LayoutControl.AllowHorizontalSizing="True">
                            <lc:LayoutItem Label="Item 2:" VerticalAlignment="Stretch">
                                <TextBox/>
                            </lc:LayoutItem>
                            <lc:LayoutItem Label="Item 3:" VerticalAlignment="Stretch">
                                <TextBox/>
                            </lc:LayoutItem>
                        </lc:LayoutGroup>
                    </lc:LayoutGroup>
                    <lc:LayoutItem Label="Item 4:"  VerticalAlignment="Stretch" lc:LayoutControl.AllowVerticalSizing="True">
                        <TextBox/>
                    </lc:LayoutItem>
                </lc:LayoutGroup>
                <lc:LayoutGroup View="Tabs" lc:LayoutControl.AllowHorizontalSizing="True">
                    <lc:LayoutGroup Header="Tab 1" Orientation="Vertical">
                        <lc:LayoutItem Label="Item 5:">
                            <TextBox/>
                        </lc:LayoutItem>
                        <lc:LayoutItem Label="Item 6:" VerticalAlignment="Stretch">
                            <TextBox/>
                        </lc:LayoutItem>
                    </lc:LayoutGroup>
                    <lc:LayoutGroup Header="Tab 2" Orientation="Vertical">
                        <lc:LayoutItem Label="Item 7:">
                            <TextBox/>
                        </lc:LayoutItem>
                        <lc:LayoutItem Label="Item 8:">
                            <TextBox/>
                        </lc:LayoutItem>
                    </lc:LayoutGroup>
                </lc:LayoutGroup>
            </lc:LayoutGroup>
            <lc:LayoutGroup Orientation="Horizontal">
                <lc:LayoutItem Label="Item 9:" HorizontalAlignment="Left">
                    <TextBox Width="100"/>
                </lc:LayoutItem>
                <lc:LayoutItem Label="Item 10:">
                    <TextBox/>
                </lc:LayoutItem>
                <lc:LayoutItem Label="Item 11:" HorizontalAlignment="Right">
                    <TextBox Width="100"/>
                </lc:LayoutItem>
            </lc:LayoutGroup>
        </lc:LayoutControl>
    </Grid>
</Window>