Lesson 3 - Implement Check As You Type Mode
- 3 minutes to read
This document provide you with step-by-step instructions on how to implement check-as-you-type functionality in a simple project that uses the SpellChecker component.
Tip
This lesson will start from a project created in Lesson 1 - TextEdit Control with Spell Checking.
Follow the steps below.
- Step 1. Specify SpellingSettings in XAML
- Step 2. Provide SpellChecker Binding
- Step 3. Switch the Check-As-You-Type Mode On
- Step 4. Run the Application
Step 1. Specify SpellingSettings in XAML
Add the required namespace:
xmlns:dxspch="http://schemas.devexpress.com/winfx/2008/xaml/spellchecker"
Specify the following values for the SpellingSettings attributes:
Note
A complete sample project is available at https://github.com/DevExpress-Examples/dxspellchecker-getting-started-e2631.
<dxspch:SpellingSettings.SpellChecker>
    <Binding Path="SpellChecker"/>
</dxspch:SpellingSettings.SpellChecker>
<dxspch:SpellingSettings.CheckAsYouType>True</dxspch:SpellingSettings.CheckAsYouType>
<dxspch:SpellingSettings.ShowSpellCheckMenu>True</dxspch:SpellingSettings.ShowSpellCheckMenu>
<dxspch:SpellingSettings.UnderlineColor>Red</dxspch:SpellingSettings.UnderlineColor>
<dxspch:SpellingSettings.UnderlineStyle>WavyLine</dxspch:SpellingSettings.UnderlineStyle>
Note
If you use Rich Text Editor, the color (red) and appearance (wavy) of the underline are predefined and cannot be changed.
You can also use the SpellingSettings.DictionarySourceCollection property to add dictionaries to spell checker. Add the desired dictionary as shown in the code below:
Note
A complete sample project is available at https://github.com/DevExpress-Examples/dxspellchecker-getting-started-e2631.
<dxspch:SpellingSettings.DictionarySourceCollection>
    <dxspch:DictionarySourceCollection>
        <dxspch:SpellCheckerOpenOfficeDictionarySource Culture="pl-PL"
                                                   DictionaryUri="pack://siteoforigin:,,,/Dictionaries/pl_PL.dic"
                                                   GrammarUri="pack://siteoforigin:,,,/Dictionaries/pl_PL.aff"/>
    </dxspch:DictionarySourceCollection>
</dxspch:SpellingSettings.DictionarySourceCollection>
Step 2. Provide SpellChecker Binding
Implement a property that provides access to a spell checker component created in the application so that the SpellingSettings.SpellChecker property can be bound to it. Set the data context to enable binding.
Step 3. Switch the Check-As-You-Type Mode On
Use the SpellChecker.SpellCheckMode property to specify the SpellCheckMode.AsYouType mode.
The resulting code is shown below:
Note
A complete sample project is available at https://github.com/DevExpress-Examples/dxspellchecker-getting-started-e2631.
Imports System.Windows
Imports System.Globalization
Imports DevExpress.Xpf.SpellChecker

Namespace WpfApplication1
    Partial Public Class MainWindow
        Inherits Window

        Private checker As SpellChecker

        Public Sub New()
            checker = New SpellChecker()
            InitializeComponent()
            checker.Culture = New CultureInfo("pl-PL")
            SpellChecker = checker
        End Sub

        Public Property SpellChecker() As SpellChecker
            Get
                Return checker
            End Get
            Private Set(ByVal value As SpellChecker)
                checker = value
            End Set
        End Property

        Private Sub button1_Click(ByVal sender As Object, ByVal e As RoutedEventArgs)
            ' Start checking the text within a text edit control.
            checker.Check(textEdit1)
        End Sub
    End Class
End Namespace
Step 4. Run the Application
When SpellChecker encounters a word that is not found within available dictionaries or a duplicated word, it marks it with a red wavy line.
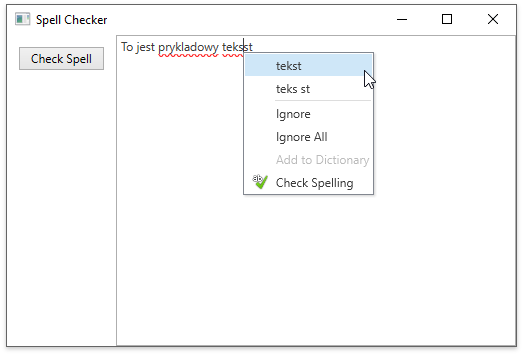
Right-click the misspelled word to invoke a menu where you can choose from suggested replacements or select other actions to handle the mistake.