Providing Data
- 3 minutes to read
The Web Dashboard allows you to bind dashboard items to data in a uniform and similar manner. See the Bind Dashboard Items to Data in the Web Dashboard’s UI topic for common information.
The difference is in the data sections that the specific dashboard item has. This topic describes how to bind the Range Filter dashboard item to data.
Binding to Data in the Web Dashboard
The image below shows a sample Range Filter dashboard item that is bound to data.
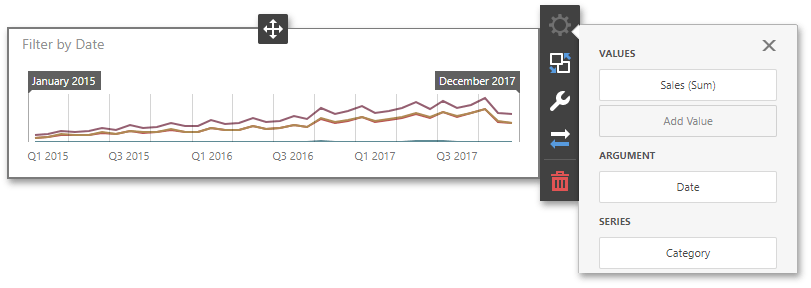
To bind the Range Filter dashboard item to data, click a placeholder contained in one of the available data sections and select the required data source field in the Binding section of the invoked data item menu.
The table below lists and describes the Range Filter’s data sections.
Section | Processed as | Description |
|---|---|---|
Values | Contains data items against which the Y-coordinates of data points are calculated. | |
Arguments | Contains data items that provide values displayed along the horizontal axis of the Range Filter. These values are used for filtering. You can use only continuous Date and Numeric values as arguments (for example, DateTime, DateOnly, Decimal and others). Discrete types like String or TimeOnly are not supported. Note Note that the Custom Periods section in the Options menu allows you to create predefined ranges used to select the required date-time interval. | |
Series | Contains data items whose values are used to create chart series. |
Example
The following example shows how to create the Range Filter item, bind it to data and add to the existing dashboard.
Create data items (measures and dimensions) and use the DataItem.dataMember property to bind them to the existing data source’s columns. Then use the created measures and dimensions in the dashboard item to bind it to data.
Create a DateTimePeriod instance and add it to the RangeFilterItem.dateTimePeriods collection to create predefined ranges.
After you add the created dashboard item to the Dashboard.items collection, call the Dashboard.rebuildLayout method to rebuild the dashboard layout and display changes.
// Use the line below for a modular approach:
// import * as Model from 'devexpress-dashboard/model'
// Use the line below for an approach with global namespaces:
// var Model = DevExpress.Dashboard.Model;

// ...
public createRangeFilter() {
    // Create data items for the Range Filter.
    var rangeFilterCountry = new Model.Dimension();
    rangeFilterCountry.dataMember("Country");
    var rangeFilterUnitPrice = new Model.Measure();
    rangeFilterUnitPrice.dataMember("UnitPrice");
    var rangeFilterExtendedPrice = new Model.Measure();
    rangeFilterExtendedPrice.dataMember("ExtendedPrice");
    var rangeFilterQuantity = new Model.Measure();
    rangeFilterQuantity.dataMember("Quantity");
    var rangeFilterOrderDate = new Model.Dimension();
    rangeFilterOrderDate.dataMember("OrderDate");
    rangeFilterOrderDate.dateTimeGroupInterval("Year");

    // Create the Range Filter and bind it to data.
    var rangeFilterItem = new Model.RangeFilterItem();
    rangeFilterItem.name('rangeFilter');
    rangeFilterItem.dataSource(sqlDataSource.componentName());
    rangeFilterItem.dataMember(sqlDataSource.queries()[0].name());

    var rangeSeries = new Model.SimpleSeries(rangeFilterItem);
    rangeSeries.seriesType("Line");
    rangeSeries.value(rangeFilterUnitPrice);
    rangeFilterItem.series.push(rangeSeries);
    rangeFilterItem.argument(rangeFilterOrderDate);
    rangeFilterItem.seriesDimensions.push(rangeFilterCountry);

    // Create a custom period for predefined ranges.
    var monthToDayPeriod = new Model.DateTimePeriod();
    monthToDayPeriod.name("Month to Date");
    monthToDayPeriod.start.flow.interval("Month").offset(0);
    monthToDayPeriod.start.mode("Flow");
    monthToDayPeriod.end.flow.interval("Day").offset(1);
    monthToDayPeriod.end.mode("Flow");

    rangeFilterItem.dateTimePeriods.push(monthToDayPeriod);

    control.dashboard().items.push(rangeFilterItem);
    // ...
    control.dashboard().rebuildLayout();
}