Master Filtering in the Web Dashboard
- 6 minutes to read
The Dashboard allows you to use a data-aware dashboard item[1] as a filter for other dashboard items. This feature is called Master Filtering. End-users can select elements in a Master Filter item (grid records, chart bars, pie segments, etc.) to filter data in other dashboard items by the selected values.

Enable Master Filtering in the UI
To enable master filtering, go to the dashboard item’s Interactivity menu and use the Master Filtering Mode option.
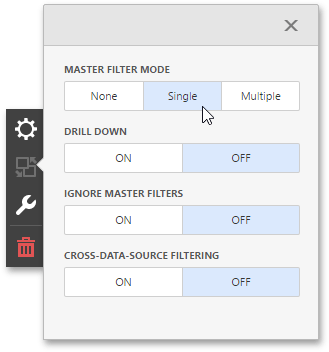
You can select from the following modes:
- None
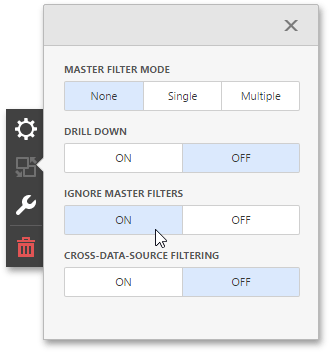
- Disables master filtering.
- Multiple
- Allows you to select multiple elements in the Master Filter item. To reset filtering, use the Clear Master Filter button (the
 icon) in the dashboard item’s caption.
 - Single
- Allows you to select only one element in the Master Filter item. When this mode is enabled, the default selection will be set to a Master Filter element. You can change this selection, but cannot clear it.
Filtering Across Data Sources
When different items in a dashboard are bound to different data sources, a Master Filter item can filter data across data sources.
The Master Filter item applies filters to fields across data sources when the following conditions are met:
- The field names must match the name of the field in the current data source. For example,
StateandStatesare different fields. - The fields must belong to the same hierarchy level so that their full names also match. For instance,
Customer.CityandCustomer.Address.Cityare not treated as matching fields.
If the data sources contain fields with the same data, but the field names are different, you can use a calculated field. In the first data source, create a calculated field with the same name as the field from the other data source, and display the field values from the first data source. As a result, you get two fields with the same data and matching names.
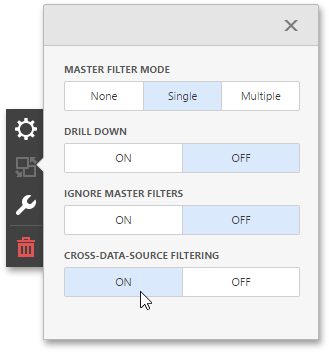
To filter data across data sources, enable master filtering and click Cross-Data-Source Filtering in the dashboard item’s Interactivity menu.
Note
Make sure that the matching field is visible in the dashboard item. You cannot use a hidden field to filter across data sources.
Prevent Items from Being Filtered
You can prevent specific dashboard items from being affected by Master Filters. To do this, enable the Ignore Master Filters option in the dashboard item’s Interactivity menu.
If an item is in a container (in the Dashboard Item Group or Tab Page), the container’s settings affect the master filter’s scope. If an item in a group or a tab page has the Ignore Master Filters option enabled, the item ignores master filters from items in the same container and applies master filters from items outside the container, including items from other groups or tab pages.
Specify Filter Values in the Dashboard State
The dashboard state stores the state of individual dashboard items and dashboard parameter values. It can be master filter and drill-down values, active tab page, selected parameter values, and other results of user actions in a dashboard on the client.
Refer to the following topic for information on how to set filter values in code:
- Manage Dashboard State in JavaScript Applications
- Manage Dashboard State in ASP.NET Core Applications
- Manage Dashboard State in ASP.NET MVC Applications
- Manage the Dashboard State in ASP.NET Web Forms Applications
Apply Master-Filtering in Code
Apply Master-Filtering
You can use the following methods to specify master-filtering values in code:
- ViewerApiExtension.canSetMasterFilter(itemName)
- Returns whether master filtering can be applied in the current state of the specified master filter item.
- ViewerApiExtension.setMasterFilter(itemName, values)
- Selects required elements by their values in the specified master filter item.
- ViewerApiExtension.setRange(itemName, range)
- Selects the required range in the specified Range Filter / Date Filter dashboard item.
- ViewerApiExtension.setPredefinedRange(itemName, dateTimePeriodName)
- Selects a predefined range in the Range Filter dashboard item.
Obtain Master-Filtering Values
Use the following methods to get available or current master-filtering values:
- ViewerApiExtension.getAvailableFilterValues(itemName)
- Returns elements that can be selected in the master filter item’s current state (except Range Filter or Date Filter items).
- ViewerApiExtension.getCurrentFilterValues(itemName)
- Returns axis point tuples identifying currently selected elements in the master filter item.
- ViewerApiExtension.getCurrentSelection(itemName)
- Returns currently selected elements in the master filter item.
- ViewerApiExtension.getEntireRange(itemName)
- Returns the visible range for the specified Range Filter dashboard item.
- ViewerApiExtension.getCurrentRange(itemName)
- Returns the currently selected range in the specified Range Filter dashboard item.
Clear Master-Filtering Values
Call the following methods to clear values:
- ViewerApiExtension.canClearMasterFilter(itemName)
- Returns whether the specified master filter can be cleared in the current state.
- ViewerApiExtension.clearMasterFilter(itemName)
- Clears the specified master filter item.
React to the Master-Filtering State Changes
The ViewerApiExtensionOptions.onItemMasterFilterStateChanged event occurs when filtering is applied or the state of the master filter item changes. Its e.values property allows you to obtain the selected values for the dashboard item that causes the event.
For instance, for the dashboard in the image below, the e.values property returns the following objects for the Grid dashboard item:
[['UK', 'Anne Dodsworth'], ['USA', 'Andrew Fuller']]
For the Range Filter dashboard item, the e.values property returns the Date objects for minimum and maximum values in the selected range. The minimum is Sun Feb 01 2015 and the maximum is Sun Jan 31 2016.
The ViewerApiExtensionOptions.onItemActionAvailabilityChanged event occurs after the available interactivity actions are changed for the specific dashboard item.
Custom Item Interactivity
You can implement a master filter and drill-down for custom dashboard items. Refer to the following topic for details: Implement a Custom Item Interactivity.
Examples
Apply Master Filtering Values on the Client
The following code snippet shows how to apply a master filter in the Web Dashboard on the client:
- The ViewerApiExtension.setMasterFilter applies the Master Filter values to the Grid item.
- The ViewerApiExtension.setRange applies the range to the Range Filter item.

function applyFilters() {
    var selectedValues = [['UK', 'Anne Dodsworth'], ['USA', 'Andrew Fuller']];
    var selectedRange = { minimum: new Date(2015, 1, 1), maximum: new Date(2015, 12, 31) };

    if (viewerApiExtension.canSetMasterFilter('gridDashboardItem1')) {
        viewerApiExtension.setMasterFilter('gridDashboardItem1', selectedValues);
    }
    if (viewerApiExtension.canSetMasterFilter('rangeFilterDashboardItem1')) {
        viewerApiExtension.setRange('rangeFilterDashboardItem1', selectedRange);
    }
}
-
A Pivot, Bound Image, and Text Box dashboard items cannot be used as a Master Filter.