Add RichEdit to an Angular Application
- 10 minutes to read
This topic describes how to add the client-side RichEdit control to an Angular application.
Tip
You can import RichEdit types from modules or access them from a global namespace.
Code samples in this documentation use the global namespace approach. RichEdit types are accessed via the following prefix:
[window.]DevExpress.RichEdit. (for instance, DevExpress.RichEdit.DocumentFormat)
To use the modular approach, do the following.
- Remove the
DevExpress.RichEdit.prefix from type references. Import the types from the RichEdit npm package, for instance:
import { DocumentFormat } from 'devexpress-richedit';Note, the public RichEdit API is contained in the
devexpress-richeditmodule. The sub-modules contain the private API.
Prerequisites
- Make sure you have Node.js and npm installed on your machine.
In the command prompt, install the Angular CLI (command line interface tool) globally:
npm install -g @angular/cliRefer to the following Angular page for information on the application structure and the purpose of the newly created file: Build your first Angular app.
Requirements
- To use the RichEdit control in an Angular application, you need to have a Universal, DXperience, or ASP.NET subscription.
- Versions of the devexpress npm packages should be identical (their major and minor versions should be the same).
How to Create Application with RichEdit
Create Angular Application
In the command prompt, create an Angular application and navigate to the newly created folder:
ng new richedit-angular-app --no-standalone
cd richedit-angular-app
Install RichEdit Package
The devexpress-richedit npm package references devextreme as peerDependencies. The peerDependencies packages should be installed manually. This allows developers to control the peerDependencies package version and guarantees that the devextreme package is installed once.
Install a RichEdit package with required peerDependencies:
npm install devextreme devexpress-richedit --save
You can find all libraries in the node_modules folder after installation is complete.
Create New RichEdit Component
In the console window, use the ng generate component command to generate a new RichEdit component:
ng generate component richedit
Configure Component Class
Replace the content of the richedit.component.ts file with the code below to import the required decorators and modules, and configure the RichEdit component:
import { Component, ElementRef, OnDestroy, AfterViewInit } from '@angular/core';
import { create, createOptions, RichEdit } from 'devexpress-richedit';

@Component({
  selector: 'app-richedit',
  template: '<div></div>',
  styleUrls: ['./richedit.component.css']
})
export class RicheditComponent implements AfterViewInit, OnDestroy {
  private rich: RichEdit | null = null;

  constructor(private element: ElementRef) { }

  ngAfterViewInit(): void {
    const options = createOptions();
    // set options
    options.width = '1700px';
    options.height = '800px';
    this.rich = create(this.element.nativeElement.firstElementChild, options);
  }

  ngOnDestroy() {
    if (this.rich) {
      this.rich.dispose();
      this.rich = null;
    }
  }
}
Configure Project Settings
In the angular.json file, increase the maximum size budget and add global style references as follows:
"options": {
  // ...
  "styles": [
    "node_modules/devextreme-dist/css/dx.light.css",
    "node_modules/devexpress-richedit/dist/dx.richedit.css",
    "src/styles.css"
  ],
},
"configurations": {
  "production": {
    "budgets": [{
      "type": "initial",
      "maximumWarning": "7mb",
      "maximumError": "8mb"
    },
      // ...
    ],
  },
}
Register Application Component
To add a component reference, insert the following code at the beginning of the src/app/app.component.html file:
<app-richedit></app-richedit>
<!-- ... -->
Run the Application
Run the application.
ng serve --open
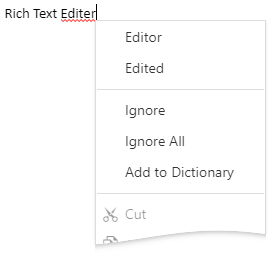
Spell Check
The RichEdit control includes API to implement spell check based on third-party tools. The API includes the following members that are available via the spellCheck option.
| Property | Description |
|---|---|
| enabled | Specifies whether spell check is enabled. |
| checkWordSpelling | A function that checks the spelling of a word. |
| suggestionCount | The maximum number of suggested words that can be displayed in the context menu. |
| addWordToDictionary | A function that is called when a user clicks the Add to Dictionary context menu command. |
Create an Nspell Bundle for the RichEdit
The RichEdit npm package includes a webpack configuration file that allows you to compile the nspell library and required dictionaries into a package bundle. The English dictionary is included by default.
Follow the steps below to compile the bundle.
Run the following command within the node_modules/devexpress-richedit directory:
npm i --save-devIf you require additional dictionaries, install them as follows. (Note that the command below installs a French dictionary.)
npm i dictionary-frAdd the
exportandimportdirectives for each additional dictionary to the node_modules/devexpress-richedit/bin/nspell-index.js file.Run the following command that builds an NSpell bundle according to the node_modules/devexpress-richedit/bin/nspell.webpack.config.js configuration file.
npm run build-nspellThis command creates the node_modules/devexpress-richedit/dist/custom/nspell.js file. A script within the file adds the NSpell object to the JavaScript window object.
Use Nspell with a Web Worker
To create a web worker, run the following code in the application folder.
ng generate web-worker spellcheckerReplace the content of the newly created src\app\spellchecker.worker.ts file with the code below.
/// <reference lib="webworker" />
import 'devexpress-richedit/dist/custom/nspell';
declare const NSpell: any;

let checkers: any[];

function checkWord(word: string) {
  for (const checker of checkers) {
    if (checker.correct(word)) {
      return true;
    }
  }
  return false;
}

addEventListener('message', ({ data }) => {
  if (!checkers) {
    checkers = [];
    NSpell.dictionaries.forEach((dic: any) => {
      checkers.push(new NSpell.nspell(dic));
    });
  }
  switch (data.command) {
    case 'checkWord': {
      const isCorrect = checkWord(data.word);
      postMessage({
        id: data.id,
        isCorrect,
        suggestions: isCorrect ? undefined : checkers[0].suggest(data.word),
      });
      break;
    }
    case 'addWord': {
      checkers[0].add(data.word);
      break;
    }
  }
});
Generate a spell checker service.
ng generate service spellcheckerReplace the content of the newly created src\app\spellchecker.service.ts file with the code below.
import { Injectable } from '@angular/core';

export type RichEditSpellcheckerCallback = (correct: boolean, suggestions: string[]) => void;

@Injectable({
  providedIn: 'root'
})
export class SpellcheckerService {
  private spellCheckerWorker?: Worker;
  private spellCheckerCallbacks: Record<number, RichEditSpellcheckerCallback> = {};
  private spellCheckerWorkerCommandId = 0;

  constructor() { }

  checkWordSpelling(word: string, callback: RichEditSpellcheckerCallback) {
    if (!this.spellCheckerWorker) {
      const myDictionary = JSON.parse(localStorage.getItem('myDictionary')!) || [];
      this.spellCheckerWorker = new Worker('./spellchecker.worker', { type: 'module' });
      myDictionary.forEach((word: any) =>  {
        this.spellCheckerWorker!.postMessage({
          command: 'addWord',
          word,
        });
      });
      this.spellCheckerWorker!.onmessage = e => {
        const savedCallback = this.spellCheckerCallbacks[e.data.id];
        delete this.spellCheckerCallbacks[e.data.id];
        savedCallback(e.data.isCorrect, e.data.suggestions);
      };
    }
    const currId = this.spellCheckerWorkerCommandId++;
    this.spellCheckerCallbacks[currId] = callback;
    this.spellCheckerWorker.postMessage({
      command: 'checkWord',
      word,
      id: currId,
    });
  }

  addWordToDictionary(word: string) {
    const myDictionary = JSON.parse(localStorage.getItem('myDictionary')!) || [];
    myDictionary.push(word);
    localStorage.setItem('myDictionary', JSON.stringify(myDictionary));
    this.spellCheckerWorker!.postMessage({
      command: 'addWord',
      word,
    });
  }
}
Add the following code to the RichEdit component.
// Import the SpellcheckerService class to the Rich Edit component.
import { SpellcheckerService } from '../spellchecker.service';
// ...
// Update the RichEdit constructor to the following:
constructor(private element: ElementRef, private spellcheckerService: SpellcheckerService) { }
// ...
// Add the following options to the component:
options.spellCheck!.enabled = true;
options.spellCheck!.suggestionCount = 5;
options.spellCheck!.checkWordSpelling = (word, callback) => this.spellcheckerService.checkWordSpelling(word, callback);
options.spellCheck!.addWordToDictionary = (word) => this.spellcheckerService.addWordToDictionary(word);
Localization
This section describes how to localize the ASP.NET Core RichEdit in an Angular application.
Download translated resources from the DevExpress Localization Service. To learn more, see the following help topic: Localization Service.
Unpack the self-extracting archive to get a folder with the localization resources.
Copy the extracted resource file ~\DevExpressLocalizedResources_26.1_{lang}\json resources\dx-rich.{lang}.json to the node_modules\devexpress-richedit\localization folder.
Add the following options in the compilerOptions section of the tsconfig.json file:
{
  // ...
  "compilerOptions": {
    // ...
    "resolveJsonModule": true,
    "allowSyntheticDefaultImports": true,
  }
}
Add the following code in the src/app/app.component.ts file. Note that the code sample below imports the French localization.
import { loadMessages, locale } from 'devextreme/localization';
import RELocalization from 'devexpress-richedit/localization/dx-rich.fr.json';
// ...
// load localized messages and specify the locale identifier in the constructor of the AppComponent class
export class AppComponent {
    constructor() {
        loadMessages({ fr: RELocalization });
        locale("fr");
    }
    // ...
}
Custom Localization Strings
Rich Text Editor allows you to display custom localization strings for its UI elements. Use the localizationId property to specify an element’s identifier for localization. Note that if an element’s text is specified, the localization string is not applied.
// creates a custom button item with localization identifier
var sendEmailButton = new RibbonButtonItem("sendEmail", "", {
    icon: "email", showText: true, localizationId: "CustomStrings.SendEmailCommand"
});
// creates a custom tab with localization identifier
options.ribbon.insertTab(new RibbonTab("", "customTab", [sendEmailButton],"CustomStrings.CustomTab"), 1);
Declare custom localization strings in a separate JSON file:
{
  "CustomStrings.SendEmailCommand":"Envoyer un e-mail",
  "CustomStrings.CustomTab":"Onglet personnalisé"
}
Import the custom localization strings to your project.
import { loadMessages, locale } from 'devextreme/localization';
import RELocalization from 'devexpress-richedit/localization/dx-rich.fr.json';
import RELocalizationCustom from 'devexpress-richedit/localization/dx-rich-custom.fr.json';
...
export class AppComponent {
  constructor(){
    loadMessages({ fr: RELocalization });
    loadMessages({ fr: RELocalizationCustom });
    locale("fr");
    ...
Examples
How to Set RichEdit Options
The code sample below demonstrates how you can set RichEdit options.
import { create, createOptions, RichEdit, Interval, ViewType, RichEditUnit } from 'devexpress-richedit';
// ...
// the createOptions() method creates an object that contains RichEdit options initialized with default values
const options = createOptions();

options.bookmarks!.visibility = true;
options.bookmarks!.color = '#ff0000';

options.confirmOnLosingChanges!.enabled = true;
options.confirmOnLosingChanges!.message = 'Are you sure you want to perform the action? All unsaved document data will be lost.';

options.fields!.updateFieldsBeforePrint = true;
options.fields!.updateFieldsOnPaste = true;

options.mailMerge!.activeRecord = 2;
options.mailMerge!.viewMergedData = true;
options.mailMerge!.dataSource = [
    { Name: 'Indy', age: 32 },
    { Name: 'Andy', age: 28 },
];

// events
options.events.activeSubDocumentChanged = () => { };
options.events.autoCorrect = () => { };
options.events.calculateDocumentVariable = () => { };
options.events.characterPropertiesChanged = () => { };
options.events.contentInserted = () => { };
options.events.contentRemoved = () => { };
options.events.documentChanged = () => { };
options.events.documentFormatted = () => { };
options.events.documentLoaded = () => { };
options.events.gotFocus = () => { };
options.events.hyperlinkClick = () => { };
options.events.keyDown = () => { };
options.events.keyUp = () => { };
options.events.paragraphPropertiesChanged = () => { };
options.events.lostFocus = () => { };
options.events.pointerDown = () => { };
options.events.pointerUp = () => { };
options.events.saving = () => { };
options.events.saved = () => { };
options.events.selectionChanged = () => { };
options.events.customCommandExecuted = (s, e) => {
    switch (e.commandName) {
    case 'insertEmailSignature':
        s.document.insertParagraph(s.document.length);
        s.document.insertText(s.document.length, '_________');
        s.document.insertParagraph(s.document.length);
        s.document.insertText(s.document.length, 'Best regards,');
        s.document.insertParagraph(s.document.length);
        s.document.insertText(s.document.length, 'John Smith');
        s.document.insertParagraph(s.document.length);
        s.document.insertText(s.document.length, 'john@example.com');
        s.document.insertParagraph(s.document.length);
        s.document.insertText(s.document.length, '+1 (818) 844-0000');
        break;
    }
};

options.unit = RichEditUnit.Inch;

options.view!.viewType = ViewType.PrintLayout;
options.view!.simpleViewSettings!.paddings = {
  left: 15,
  top: 15,
  right: 15,
  bottom: 15,
};

options.autoCorrect = {
    correctTwoInitialCapitals: true,
    detectUrls: true,
    enableAutomaticNumbering: true,
    replaceTextAsYouType: true,
    caseSensitiveReplacement: false,
    replaceInfoCollection: [
        { replace: "wnwd", with: "well-nourished, well-developed" },
        { replace: "(c)", with: "©" }
    ],
};
// capitalize the first letter at the beginning of a new sentence/line
options.events.autoCorrect = function (s, e) {
    if (e.text.length == 1 && /\w/.test(e.text)) {
        var prevText = s.document.getText(new Interval(e.interval.start - 2, 2));
        if (prevText.length == 0 || /^(\. |\? |\! )$/.test(prevText) || prevText.charCodeAt(1) == 13) {
            var newText = e.text.toUpperCase();
            if (newText != e.text) {
                s.beginUpdate();
                s.history.beginTransaction();
                s.document.deleteText(e.interval);
                s.document.insertText(e.interval.start, newText);
                s.history.endTransaction();
                s.endUpdate();
                e.handled = true;
            }
        }
    }
};

options.exportUrl = 'https://siteurl.com/api/';

options.readOnly = false;
options.width = '800px';
options.height = '1200px';
How to Customize the Ribbon
The code sample below modifies the built-in ribbon.
import { create, createOptions, RichEdit, Options, RibbonTabType, FileTabItemId, HomeTabItemId, RibbonItem,
    RibbonSubMenuItem, RibbonMenuItem, RibbonButtonItem, FirstLevelRibbonItem, RibbonTab } from 'devexpress-richedit';

ribbonCustomization(options: Options) {
    // remove items
    const fileTab = options.ribbon.getTab(RibbonTabType.File);
    fileTab!.removeItem(FileTabItemId.OpenDocument);

    const homeTab = options.ribbon.getTab(RibbonTabType.Home);
    homeTab!.removeItem(HomeTabItemId.Copy);
    homeTab!.removeItem(HomeTabItemId.Cut);
    homeTab!.removeItem(HomeTabItemId.Paste);

    homeTab!.removeItem(HomeTabItemId.DecreaseFontSize);
    homeTab!.removeItem(HomeTabItemId.IncreaseFontSize);

    homeTab!.removeItem(HomeTabItemId.ChangeStyle);

    // remove an element from a drop-down list
    // fileTab!.removeItem(FileTabItemId.DownloadRtf);
    // fileTab!.removeItem(FileTabItemId.DownloadTxt);

    // create an item based on the default item options to allow users to download documents in docx format only
    const downloadDocxItem = fileTab!.getItem(FileTabItemId.DownloadDocx) as RibbonSubMenuItem;
    const downloadItem = fileTab!.getItem(FileTabItemId.Download) as RibbonMenuItem;
    fileTab!.removeItem(FileTabItemId.Download);
    // icons: https://js.devexpress.com/Documentation/Guide/Themes_and_Styles/Icons/
    fileTab!.insertItem(new RibbonButtonItem(downloadDocxItem.id, downloadItem.text, {icon: downloadItem.icon, showText: true}), 2);

    // move items to new tab
    const findElem: RibbonItem = homeTab!.getItem(HomeTabItemId.Find)!;
    const replaceElem: RibbonItem = homeTab!.getItem(HomeTabItemId.Replace)!;
    homeTab!.removeItem(findElem);
    homeTab!.removeItem(replaceElem);

    // remove tab
    options.ribbon.removeTab(RibbonTabType.References);

    // insert tab
    const findTabId = 'FindTabId';
    const newFindTab = options.ribbon.insertTab(new RibbonTab('Find', findTabId, [findElem as FirstLevelRibbonItem, replaceElem as FirstLevelRibbonItem]), 2);

    // add custom item
    const findInGoogleId = 'FindInGoogleId';
    newFindTab.insertItem(new RibbonButtonItem(findInGoogleId, 'Find in Google', { beginGroup: true }));
    options.events.customCommandExecuted = (s, e) => {
      if (e.commandName === findInGoogleId) {
        const selectedInterval = s.selection.intervals[0];
        if (selectedInterval.length > 0) {
          const selectedText = s.selection.activeSubDocument.getText(selectedInterval);
          window.open(`https://www.google.com/search?q=${selectedText}`, '_blank');
        }
      }
    };
}