Allow an Administrator to Create Custom Persistent Fields in an XPO-Based Application
- 4 minutes to read
You can allow an application administrator to create custom persistent fields and display the added fields’ data in the UI without recompiling the application. In this example, the SkypeID field will be added to the Contact business object in the Employee Management Demo application.

Prerequisites
Ensure that your application does not contradict the following conditions. Otherwise, creating new persistent fields is impossible at runtime.
- WinForms and ASP.NET Core Blazor applications should be based on the XPO data model.
The following features should not be used together.
- SecuredObjectSpaceProvider or XPObjectSpaceProvider created using the constructor with the
threadSafeparameter set totrue(this parameter enables ThreadSafeDataLayer). - An Administrator’s Model Differences stored in the database using the XafApplication.CreateCustomModelDifferenceStore event (you can still store the User’s differences in the database using the XafApplication.CreateCustomUserModelDifferenceStore event).
- Custom Persistent Fields declared in the Administrator’s Model Differences.
With this configuration, your application loads information on custom persistent fields from the database and then updates the database schema. However, a thread-safe data layer does not support altering the data model after the database connection is established.
- SecuredObjectSpaceProvider or XPObjectSpaceProvider created using the constructor with the
Middle Tier Security or any other application that creates and configures a XafApplication cannot access custom fields added in the client XAF application project (in code or in XAFML), or by customizing the application model at runtime. You should add a custom field in a common module and reference it in all applications where you are going to use it.
Setup the Application
Apply the following changes in the application code to allow application administrators to create and display custom persistent field data in the UI.
Set the static ModelMemberReadOnlyCalculator.AllowPersistentCustomProperties property to
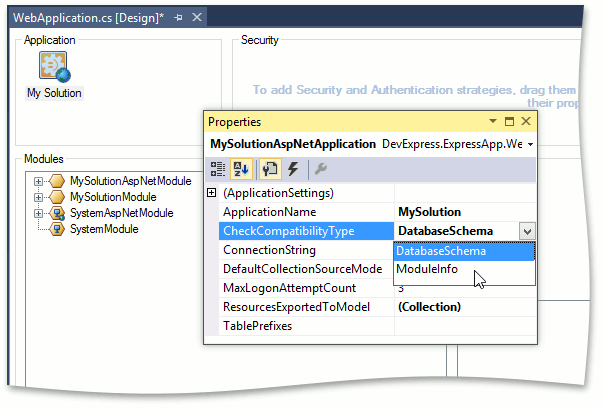
trueto allow creating persistent fields at runtime. Open the Module.cs file and add the following code to the module’s constructor.DevExpress.ExpressApp.Model.Core.ModelMemberReadOnlyCalculator.AllowPersistentCustomProperties = true;Set the IObjectSpaceProvider.CheckCompatibilityType property to CheckCompatibilityType.DatabaseSchema to catch the database changes and update the database if the schema is modified.
- To allow the database schema updates, set the XafApplication.DatabaseUpdateMode property to DatabaseUpdateMode.UpdateDatabaseAlways or DatabaseUpdateMode.UpdateOldDatabase.
- Copy the DBUpdater.v26.1.exe and DBUpdater.v26.1.config files from the %PROGRAMFILES%\DevExpress 26.1\Components\Tools\eXpressAppFramework\DBUpdater\ folder to the application’s installation folder.
Implement the Persistent Field and Display It
Follow the steps below to add a custom persistent field at an end-user workstation.
Invoke the built-in Model Editor using the Tools | Edit Model command at runtime or close the application and start the standalone Model Editor by running the DevExpress.ExpressApp.ModelEditor.v26.1.exe executable file.
If you use the standalone Model Editor, specify the path to the application configuration file (MainDemo.Win.exe.config for Windows or MySolution.Blazor.Server.dll for Blazor) and click Open in the Open Model dialog.

Navigate to the BO_Model | Contact node in the tree on the left. Right-click the OwnMembers child node and choose Add… | Member.

Set the Name property of the newly added node to “SkypeID”. Then, set the IsCalculated property to “False”, Type to “System.String”, Size to “32”, and Caption to “Skype ID”.

Copy the differences that you have introduced in the administrator’s layer using the Merge Differences command.

- Save changes using the Save button or the CTRL+S shortcut and restart the Model Editor.
Navigate to the Views | Contact_DetailView node in the tree on the left. Right-click the Items child node and choose Add… | PropertyEditor.

Set PropertyName and Id to “SkypeID”.

Focus the Layout node. Right-click the empty space within the form preview displayed on the right and select Customize Layout.

Drag the Skype ID item from the invoked Customization window to an appropriate position within the form.

You can also add the Skype ID column to the
ContactList View using a similar approach (see List View Columns Customization).- Merge the differences as described at the forth step.
- Save the changes and close the Model Editor.
- Update your database schema as described in the Apply Changes to the Database section.
- Restart the application and open the
ContactDetail View to see the result demonstrated in the introduction of this topic.
Important
If the application is installed on multiple PCs and the Administrator’s Model Differences are stored in the Model.xafml file, copy it from the application’s working folder to each PC. Otherwise, the created field is available only on the workstation where you added it.
Access a Custom Persistent Field in Code
To access custom persistent fields in code, use the solution from the following topic: Access a Custom Field in Code
Apply Changes to the Database
Launch a command line interpreter, for instance, Command Prompt, and run your application with the -updateDatabase command.
C:\Users\Public\MyApplication\MySolution.Blazor.Server.exe -updateDatabase -silent -forceUpdate
For additional information, refer to the following topic: Production Database and Application Updates