Middle Tier Security with XPO
- 13 minutes to read
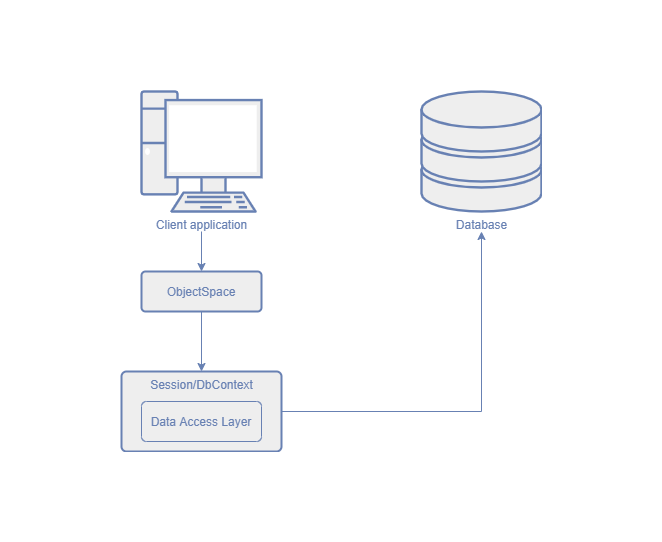
If you use client-side security mode in a WinForms application, a user can find the connection string in the application’s configuration file and access the database directly. This means that the user can bypass the Security System implemented in your application. To prevent this, you can implement the Middle Tier application server that is a WCF (.NET Framework) or an ASP.NET Core (.NET) service between the client application and the database server. This Middle Tier Server filters out the secured data. In this case, clients cannot access the database server directly. The diagram below illustrates this configuration.
General Information
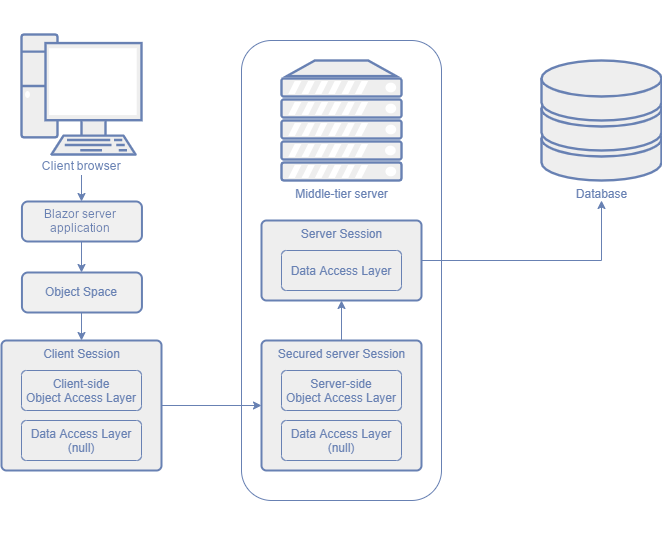
The following image shows how a WinForms application with the Middle Tier Security interacts with the database:
Load Data From the Database
- The unsecure server-side Session loads data from the database according to the criteria based on Security permissions.
- The secured server-side Session copies objects from the unsecure server-side Session. If a field value does not meet the permission criterion, it is replaced with the default value in the copied objects. The copied objects are serialized and passed to the client-side Session.
- The client-side Session deserializes these objects. The deserialized objects are available to users.
Save Data to the Database
- The client-side Session serializes objects and passes them to the secure server-side Session.
- The secure server-side Session deserializes objects and copies their values that meet the Security permissions to the unsecure server-side Session.
- The unsecure server-side Session saves the passed values into original objects in the database.
Implement the Middle Tier Security (WCF) in WinForms Applications (.NET Framework)
Important
The Solution Wizard generates the code shown in this help topic when you create an application. Follow this article if you want to implement the demonstrated functionality in an existing XAF solution.
Create and Configure the Server
Create a Console Application Server Project
Follow the steps below to add a console application server project to your XAF solution:
- Right-click the solution in the Solution Explorer.
- In the invoked context menu, choose Add | New Project….
- Choose the DevExpress v24.1 XAF Template Gallery template.
- Specify the project name (for example, MySolution.AppServer) and click OK.
- Select the Application Server Project in the Solution Wizard and click Next.
- Specify what type of authentication you use (Standard or Active Directory) and click Finish.
The created application server connects to your application’s database or creates a new database if it does not exist, and updates the database.
Note
You can convert this console application to a Windows Service and deploy it in the production environment. For more information, refer to the following help topic: Run the Application Server as a Windows Service (.NET Framework).
Configure the Application Server
Follow the steps below to specify the client application name, Security System settings, modules used in the client application, and the database connection string in the application server.
In the Program.cs (Program.vb) File
- Set the ServerApplication.ApplicationName property to the client application’s name (see XafApplication.ApplicationName).
- Add a reference to the platform-dependent Modules to the Application Server project. To do this, right-click this project and choose Add reference…. In the invoked dialog, switch to the Projects tab, select Module projects, and click OK.
- Populate the ServerApplication.Modules collection with modules referenced in your client application. Refer to the InitializeComponent method of your WinApplication descendant to find these modules.
static class Program {
[STAThread]
static void Main(string[] args) {
try {
// ...
ServerApplication serverApplication = new ServerApplication();
serverApplication.ApplicationName = "MySolution";
serverApplication.Modules.BeginInit();
serverApplication.Modules.Add(new DevExpress.ExpressApp.Security.SecurityModule());
serverApplication.Modules.Add(new MySolution.Module.Win.MySolutionWindowsFormsModule());
serverApplication.Modules.EndInit();
// ...
}
}
}
In the App.config File
Specify the connection string to access your database server in the App.config file.
<?xml version="1.0"?>
<configuration>
<connectionStrings>
<add name="ConnectionString" connectionString=
"Integrated Security=SSPI;Pooling=false;
Data Source=(localdb)\mssqllocaldb;Initial Catalog=MySolution" />
</connectionStrings>
<!-- ... -->
</configuration>
Configure the Client Application
Follow the steps below to configure your Windows Forms application.
- Add a reference to System.ServiceModel.dll and DevExpress.ExpressApp.Security.v24.1.dll assemblies to the application project.
Open the Program.cs (Program.vb) file and apply the following changes:
- Initialize the MiddleTierClientSecurity instance and set its IsSupportChangePassword property to true if AuthenticationStandard authentication is used on the server. If the AuthenticationActiveDirectory is in use, do not change the default IsSupportChangePassword value (false).
- Set the Security property to the newly created MiddleTierClientSecurity instance.
- Handle the CreateCustomObjectSpaceProvider event to create MiddleTierServerObjectSpaceProvider.
- Set the application’s DatabaseUpdateMode property to Never.
using System.ServiceModel; using DevExpress.ExpressApp.Security.ClientServer.Wcf; // ... static class Program { [STAThread] static void Main() { // ... string connectionString = "net.tcp://localhost:1451/DataServer"; winApplication.DatabaseUpdateMode = DatabaseUpdateMode.Never; WcfSecuredClient wcfSecuredClient = new WcfSecuredClient(WcfDataServerHelper.CreateNetTcpBinding(), new EndpointAddress(connectionString)); MiddleTierClientSecurity security = new MiddleTierClientSecurity(wcfSecuredClient); security.IsSupportChangePassword = true; winApplication.Security = security; winApplication.CreateCustomObjectSpaceProvider += delegate(object sender, CreateCustomObjectSpaceProviderEventArgs e) { e.ObjectSpaceProvider = new MiddleTierServerObjectSpaceProvider(wcfSecuredClient); }; // comment or remove the following line // winApplication.GetSecurityStrategy().RegisterXPOAdapterProviders(); // ... winApplication.Setup(); winApplication.Start(); wcfSecuredClient.Dispose(); // ... } }
Note that the IsSupportChangePassword property only enables the ChangePasswordByUser and ResetPasswords Actions and does not grant write permission to the user’s StoredPassword property. Specify the corresponding Member Permission to allow non-administrative users to change their passwords.
In the example above, the server hostname is hardcoded. Alternatively, you can use the ConfigurationManager object to read the connection string from the configuration file.
Unconditionally throw an exception when the DatabaseVersionMismatch event occurs while the compatibility check is performed on the server. To do this, modify the event handler in the WinApplication.cs (WinApplication.vb) file, as shown below:
public partial class MySolutionWindowsFormsApplication : WinApplication { //... private void MySolutionWindowsFormsApplication_DatabaseVersionMismatch( object sender, DevExpress.ExpressApp.DatabaseVersionMismatchEventArgs e) { throw new InvalidOperationException( "The application cannot connect to the specified database " + "because the latter does not exist or its version is older " + "than that of the application."); } } }
In the platform-agnostic Module, register the Security System types:
- Reference the DevExpress.ExpressApp.Security.v24.1 and DevExpress.Persistent.BaseImpl.Xpo.v24.1 assemblies in the Module project.
- Open the Module.cs (Module.vb) file and override the GetDeclaredExportedTypes method, as shown below:
using DevExpress.Persistent.BaseImpl.PermissionPolicy; // ... public sealed partial class MySolutionModule : ModuleBase { // ... protected override IEnumerable<Type> GetDeclaredExportedTypes() { List<Type> result = new List<Type>(base.GetDeclaredExportedTypes()); result.AddRange(new Type[] { typeof(PermissionPolicyUser), typeof(PermissionPolicyRole) }); return result; } }
Important
The application server does not pass the role type to the client, and the Role navigation item is not available in the Navigation System. The following help topic describes how to add this item: Add an Item to the Navigation Control. (The List View identifier is “PermissionPolicyRole_ListView”.)
Run the Server and Client Applications
Set the Application Server project as a startup project in the Solution Explorer and run the server. The console window displays the following output:
Setup... CheckCompatibility... Starting server... Server is started. Press Enter to stop.
Note
If a Windows Security Alert dialog is also displayed, click Allow access within this dialog.
To run the client application, right-click the application project in the Solution Explorer and choose Debug | Start new instance.
The image below shows the server and client applications.
Display Server-Side Exception Details in the Client Application (.NET Framework)
You can pass server errors (for example, “The server was unable to process the request due to an internal error“) to the client application during the debug process. To do this, modify the WcfXafServiceHost object initialization, as shown below:
static class Program {
[STAThread]
static void Main(string[] args) {
try {
// ...
WcfXafServiceHost serviceHost = new WcfXafServiceHost(connectionString, dataServerSecurityProvider);
ServiceDebugBehavior debug = serviceHost.Description.Behaviors.Find<ServiceDebugBehavior>();
if(debug == null) {
serviceHost.Description.Behaviors.Add(
new ServiceDebugBehavior() { IncludeExceptionDetailInFaults = true });
}
else {
if(!debug.IncludeExceptionDetailInFaults) {
debug.IncludeExceptionDetailInFaults = true;
}
}
// ...
}
}
}
Remove this code before you deploy your service in the production environment. For more information, refer to the following article: ServiceBehaviorAttribute.IncludeExceptionDetailInFaults Property.
Troubleshooting (.NET Framework)
If the error “The application cannot connect to the specified database“ occurs on the client, ensure that the client and server applications have the same module set. If the set is different for these applications, the Visual Studio Output window and client application log (eXpressAppFramework.log) shows the following message:
module 'SystemWindowsFormsModule' (DevExpress.ExpressApp.Win.v24.1). Local version: 24.1.5.0, Version on DB: 0.0.0.0
This message indicates that the server’s Modules collection does not include the SystemWindowsFormsModule module. (The missing module version is displayed as “0.0.0.0”.)
To fix the issue, add this module to the ServerApplication.Modules collection as shown in the Create and Configure the Server section of this topic.
Implement the Middle Tier Security in WinForms Applications (.NET)
In WinForms Applications for .NET, you can use the ASP.NET Core Middle Tier Server. See the following topics for details:
- Create a WinForms Application (.NET) with the Middle Tier Security
- Add the Middle Tier Server to an Existing WinForms Application (.NET)
Important Notes
Common Notes
- ASP.NET Web Forms and ASP.NET Core Blazor applications use the client-server model. You do not need to implement the additional Middle Tier server in these applications.
- The Middle Tier service and database can be installed on the same server. The application server can also be installed on a user workstation with the application, but this configuration does not improve security.
- The Security System displays the default property value instead of its actual value if access to a property is denied. These values may match. Use the SecuritySystem.IsGranted method to determine which value is displayed.
- The
OnSaving
andOnDeleting
methods of a business class can be called multiple times because Integrated Mode and Middle Tier Security use more than oneSession
/DbContext
object. If you implement custom logic in these methods, check whether a new value is already assigned to a property. This helps you avoid incorrect results. The following article describes how to do this with XPO: XPO Best Practices. Detail Views do not display changes made to an object within a transaction (for example, an auto-generated sequential number for an XPO business object) even if you saved this object in a View. These changes are made on the server only and are not automatically passed to the client application. To show these changes, reload the object. If you want to reload the object on each Save operation, override the business class’s
OnSaved
method. The following example demonstrates how to override this method to reload an object on the client:The Session.DataLayer property is null in the secured
Session
. Instead ofDataLayer
, we recommend that you use the View.ObjectSpace property to query and change data from the database. This technique is also recommended for non-secure applications.If this recommendation does not apply to your scenario, use the Session.ObjectLayer property instead of
DataLayer
.You can also execute different code on the server and client depending on the
DataLayer
andObjectLayer
property values. The following example demonstrates how to do it:using DevExpress.ExpressApp.Security.ClientServer; using DevExpress.Persistent.BaseImpl; // ... public class DemoObject : BaseObject { // ... protected override void OnSaving() { if(Session.DataLayer != null && !(Session.ObjectLayer is SecuredSessionObjectLayer)) { // Server-side code } else { // Client-side code } base.OnSaving(); } }
.NET 6-Specific Note
If you use custom permission requests, custom logon parameters, or other types that should be serialized (for example, non-persistent objects), use the static WebApiDataServerHelper.AddKnownType method to register them before a data server is initialized. Register these types on the server and client. Do not use this method to register business classes.
.NET Framework-Specific Notes
- The Middle Tier application server is a WCF service. You can use approaches described in the following topic to secure and deploy it: Programming WCF Security.
- If you use custom permission requests, custom logon parameters, or other types that should be serialized (for example, non-persistent objects), use the static WcfDataServerHelper.AddKnownType method to register them before a data server is initialized. Register these types on the server and client. Do not use this method to register business classes.
- If you want to use a custom Binding object, use a Binding constructor instead of the WcfDataServerHelper.CreateDefaultBinding method to create the object and pass this object to the ServiceHost.AddServiceEndpoint method.
- When you use AuthenticationActiveDirectory, invoke the application server methods in the caller’s context (the Windows account from which the client application is running). In your WCF service, you can modify the ServiceAuthorizationBehavior.ImpersonateCallerForAllOperations property. For more information, refer to the following article: Delegation and Impersonation with WCF. The default WCF server mode is InstanceContextMode.PerSession. In this mode, your server uses a stateful protocol. The environment (the Security System, an application, etc.) is created for each new session (a new session is created for each logged in user). If you want to change the protocol to stateless, change the InstanceContextMode property value to PerCall. To do this, use another WcfXafServiceHost constructor that takes the InstanceContextMode parameter. Note that with this protocol, the environment is created on each call and this can cause performance issues.
- The WCF server uses the InstanceContextMode.PerSession mode. The Security System creates a new session for each login and disposes of it when you log off. If you want to change InstanceContextMode, use another WcfXafServiceHost constructor that takes the InstanceContextMode parameter.