Use DevExpress Blazor Report Viewer in .NET MAUI Blazor Hybrid App
- 5 minutes to read
This topic describes how to create a .NET MAUI Blazor Hybrid application with a Report Viewer.
The following platforms are available:
- Android
- iOS
- macOS
Prerequisites
- Visual Studio 2022 17.3+
- The .NET Multi-platform App UI workload. Refer to the following article for information on how to install this workload: Installation.
- ASP.NET and web development workload.
1. Create a Project
Create a new project in Visual Studio and select the .NET MAUI Blazor App template.
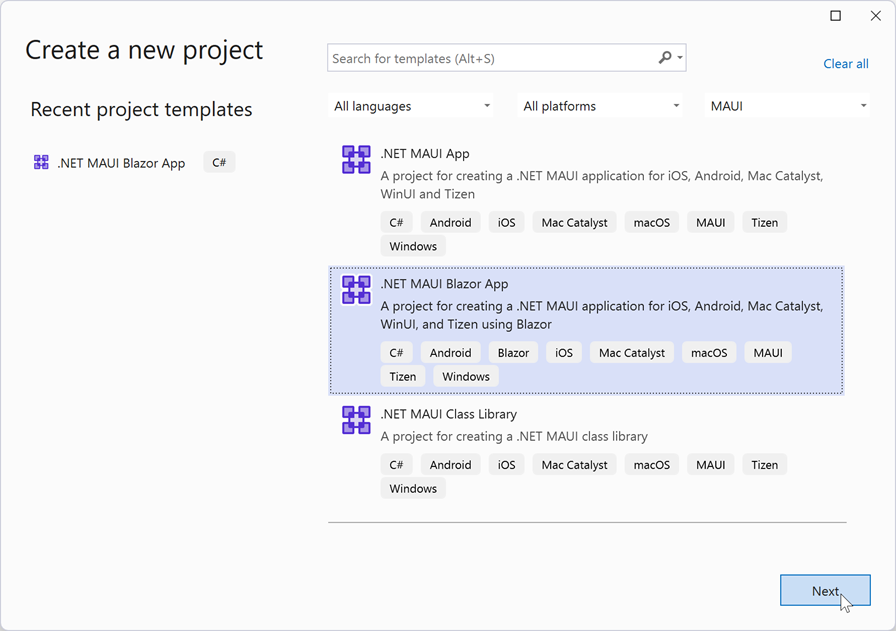
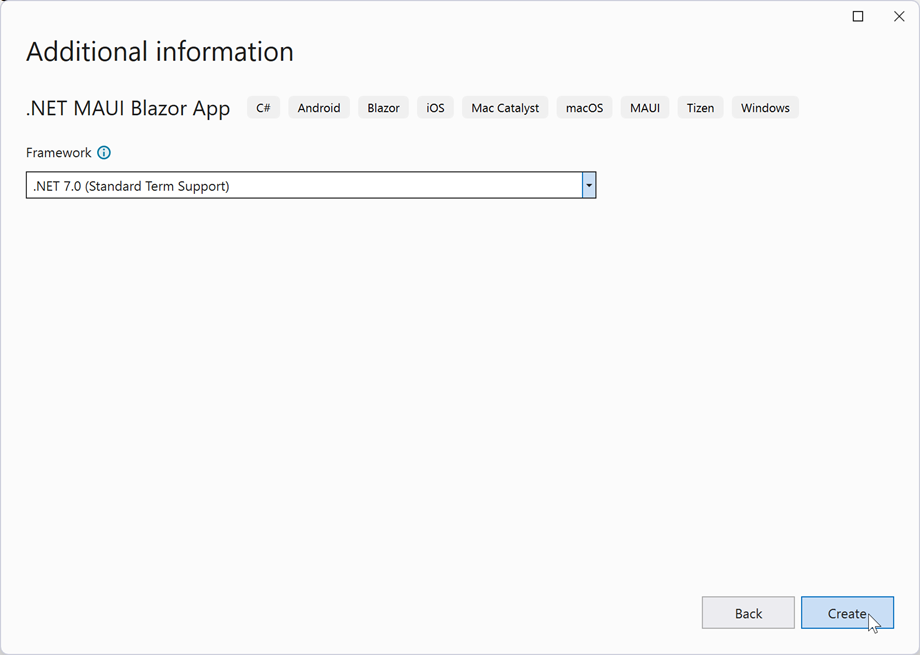
Specify the project name and location in the next window.
Select .NET 8 as the target framework and click Create.
1.1 Additional Set Up and Known Issues
iOS and MacOS require ahead-of-time compilation. Enable the
<UseInterpreter>property. Set this property totruewithin the application’s project file:<PropertyGroup> <UseInterpreter>true</UseInterpreter> </PropertyGroup>Refer to the following article for more information: Introducing the Xamarin.iOS Interpreter.
iOS or MacOS may require MacOS BigSur+.
- Configure your Blazor MAUI project to support browser developer tools.
- Configure Windows to deploy and debug MAUI applications.
2. Add DevExpress Nuget Packages
Install the following packages:
- DevExpress.Blazor.Reporting.Viewer
- This package implements the functionality related to the native Blazor DevExpress Report Viewer component.
- DevExpress.Drawing.Skia
- This package implements the drawing functionality based on the Skia Graphics Library.
For information on how istall DevExpress Producst, refer to the following help article: Install DevExpress Products.
3. Add Graphics Packages
If you need to work with fonts or other graphics entities, make sure that you add the following packages to your project:
- SkiaSharp
- SkiaSharp.Views.Blazor
- SkiaSharp.NativeAssets.Android (or SkiaSharp.NativeAssets.iOS)
- SkiaSharp.HarfBuzz
- HarfBuzzSharp.NativeAssets.Android (or HarfBuzzSharp.NativeAssets.iOS)
4. Select the Target Device
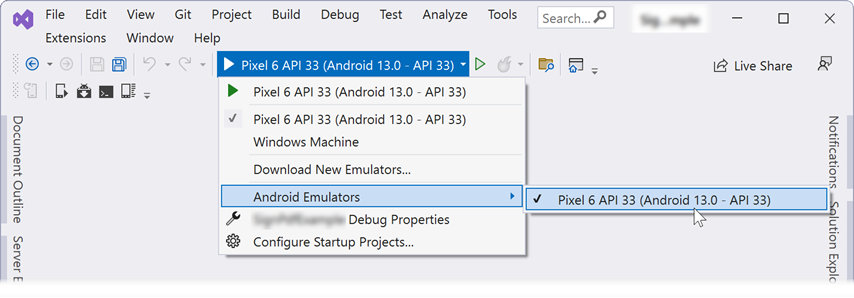
.NET MAUI apps are designed to run on multiple operating systems and devices. While you develop the application, you can select a device/emulator for test and debug runs.
Select a Debug Target in the Visual Studio toolbar. This example uses an Android device.
5. Register Application Resources and Fonts
Register Resources
Register the required namespaces in the _Imports.razor file:
@using <Namespace>
@using <Namespace>.Shared
Open the MauiProgram.cs file and add using <Namespace>.Data. Once added, call the following methods:
Register Fonts
FontsMauiAppBuilderExtensions.ConfigureFonts method in the MauiProgram class and pass fonts used by your application. Refer to the following article for more information on fonts in .NET MAUI: Fonts in .NET MAUI.
Tip
Use the DevExpress.Drawing.DXFontRepository class to register custom fonts. Refer to the following article for more information: Use DXFontRepository to Add Custom Fonts.
The code sample below registers fonts and resources:
public static MauiAppBuilder CreateMauiApp()
{
    var builder = MauiApp.CreateBuilder();
    builder
        .UseMauiApp<App>()
        .ConfigureFonts(fonts =>
        {
            fonts.AddFont("OpenSans-Regular.ttf", "OpenSansRegular");
        });

    builder.Services.AddMauiBlazorWebView();
    builder.Services.AddDevExpressWebAssemblyBlazorReportViewer();
    //...
}
Include Stylesheets
Add the following lines to the wwwwroot/index.html file:
<head>
  <!--...-->
    <link href="_content/DevExpress.Blazor.Themes/blazing-berry.bs5.min.css" asp-append-version="true" rel="stylesheet" />
  <!--...-->
</head>
6. Add Document Viewer
Create Razor Page with the Document Viewer
Add the Report Viewer component to a Razor page (ReportViewer.razor). Use the DxReportViewer.Report property to specify a report to open.
The code below adds the DxReportViewer component to the ReportViewer.razor page. The XtraReport Report field is used to specify a report class to instantiate and display (the XtraReport1 class).
@page "/reportviewer/"

@using DevExpress.Blazor.Reporting
@using DevExpress.Blazor.Reporting.Viewer.Internal.Services;
@using DevExpress.XtraReports.UI
@using DxReportViewerMauiApp.PredefinedReports

<DxReportViewer @ref="reportViewer" Report="Report" SizeMode="DevExpress.Blazor.SizeMode.Small">
</DxReportViewer>

@code {
    DxReportViewer reportViewer;
    XtraReport Report = new XtraReport1();

    protected override async Task OnAfterRenderAsync(bool firstRender)
    {
        if(firstRender)
            await reportViewer.UpdateZoomAsync(0.5);
        await base.OnAfterRenderAsync(firstRender);
    }
}
Add a Navigation Menu Item
Add a navigation menu item to the NavMenu.razor page:
<div class="@NavMenuCssClass" @onclick="ToggleNavMenu">
    <nav class="flex-column">
        <!-- ... -->
        <div class="nav-item px-3">
            <NavLink class="nav-link" href="reportviewer">
                <span class="oi oi-list-rich" aria-hidden="true"></span> Report Viewer
            </NavLink>
        </div>
    </nav>
</div>
7. Add a Report to the Application
Generate a Simple Report in Code
You can create a report in code as described in the following help topic: Create a Report in Code.
Generate a Simple Report in Visual Studio Report Designer
The Visual Studio Report Designer is not available in .NET MAUI applications. Visual Studio IDE may ask you to download the .NET Core and System.Drawing.Common package to invoke the report designer.
Alternatively, you can generate a report in a separate class library and reference it in your project. Review the following help topic for more information: Create a Report in Visual Studio.
Once the report is ready, call the XtraReport.FromFile(String, Boolean) or XtraReport.FromStream(Stream, Boolean) methods to load the created report.
8. Create the Export Service
Create a IExportProcessor implementation to create an export processor. Call the builder.Services.AddScoped method in the MauiProgram class to register the implementation.
The code sample below shows an implementation that shares a file in the selected format.
public class SharedReportExportProcessor : IExportProcessor
{
    public async Task ProcessExportResult(ExportResultItem exportResultItem, bool isPrintOperation)
    {
        var fileName = Path.Combine(FileSystem.CacheDirectory, exportResultItem.FileName);
        using (var file = File.Create(fileName))
        {
            file.Write(exportResultItem.Bytes);
        }

        await Share.Default.RequestAsync(new ShareFileRequest
        {
            Title = "Share a Report",
            File = new ShareFile(fileName)
        });
    }
}
using DevExpress.Blazor.Reporting.Services;
using Microsoft.Extensions.Logging;
`...
public static class MauiProgram {
    public static MauiApp CreateMauiApp() {
        var builder = MauiApp.CreateBuilder();
        // ...
        builder.Services.AddScoped<IExportProcessor, SharedReportExportProcessor>();
        return builder.Build();
    }
}
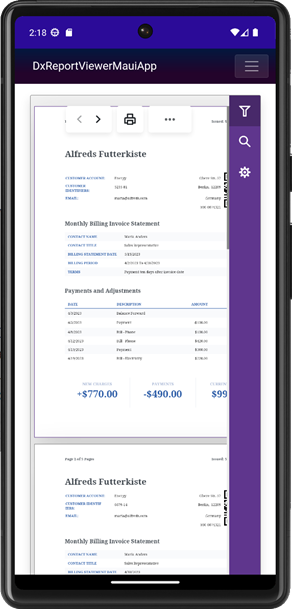
8. View the Result
The application is now ready. Run the project to see the result.