Use Reporting Tools in .NET MAUI Applications (iOS, Android)
- 6 minutes to read
This topic describes how to create a .NET MAUI application that uses DevExpress Reporting tools. Follow the steps below to create an application that generates a simple report, exports it to PDF, and shares the result with other applications.
Use instructions in this topic if you develop an app for one of the following platforms:
- Android
- iOS
To run an application on iOS, refer to the following section: iOS Specifics.
Prerequisites
- Visual Studio 2022 17.3+
- The .NET Multi-platform App UI workload. Refer to the following help topic for information on how to install that workload: Installation.
iOS Specifics
Reporting components do not support native AOT deployment, which is utilized in MAUI applications when executed on iOS.
To address this limitation on iOS, disable the UseInterpreter option and enable the MtouchUseLlvm option in the project file for the release configuration:
<MtouchUseLlvm>true</MtouchUseLlvm>
<UseInterpreter>false</UseInterpreter>
<MtouchInterpreter>all</MtouchInterpreter>
Note
This configuration cannot be used on macOS. The use of Reporting Tools on macOS is currently not supported.
Refer to the following topic for more information on available build settings in .NET MAUI applications: Build Settings.
1. Create a Project
Create a new project in Visual Studio. Select the .NET MAUI App template and click Next.
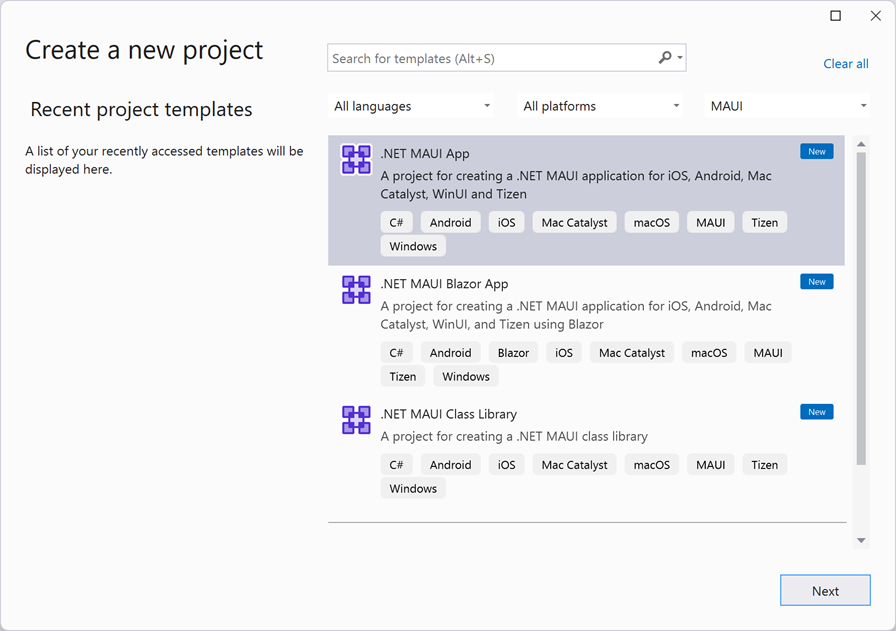
Specify project name and location. Click Next.

Select .NET 8 as the target framework and click Create.
2. Add Graphics Packages
If you need to work with fonts or other graphics entities, make sure that you add the following packages to your project:
- SkiaSharp
- SkiaSharp.NativeAssets.Android (or SkiaSharp.NativeAssets.iOS)
- SkiaSharp.HarfBuzz
- HarfBuzzSharp.NativeAssets.Android (or HarfBuzzSharp.NativeAssets.iOS)
3. Add DevExpress Nuget Packages
Install the following packages:
- DevExpress.Reporting.Core
- This package implements core functionality for DevExpress Reporting.
- DevExpress.Drawing.Skia
- This package implements drawing functionality based on the Skia Graphics Library.
For information on how istall DevExpress Producst, refer to the following help article: Install DevExpress Products.
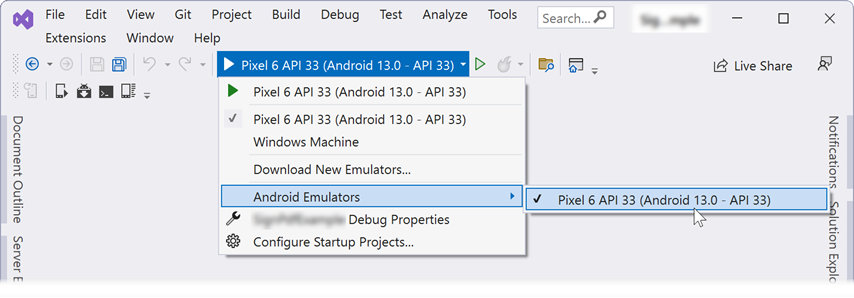
4. Select the Target Device
.NET MAUI apps are designed to run on multiple operating systems and devices. While you develop the application, you can select a device/emulator for test and debug runs.
Select a Debug Target in the Visual Studio toolbar. This example uses an Android device.
5. Customize the App Shell
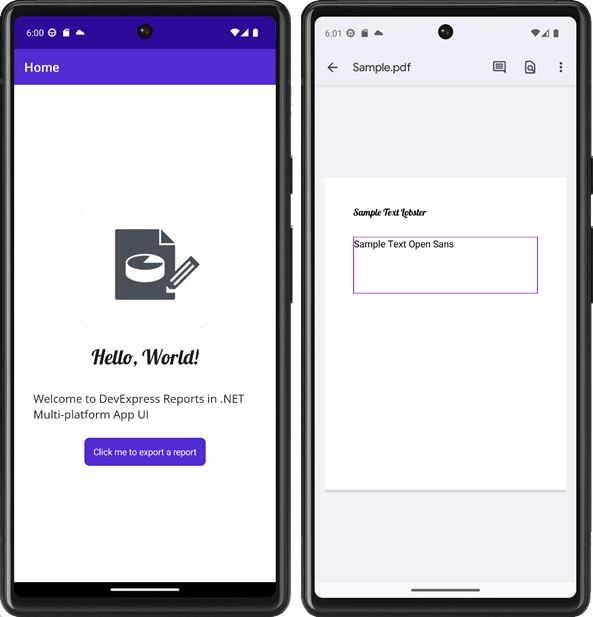
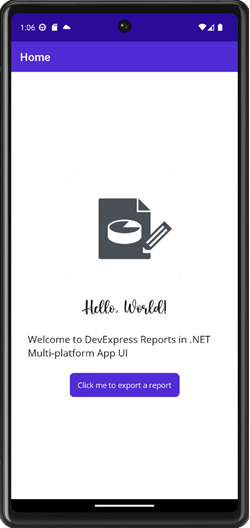
Specify application appearance as required. In this example, the application is made up of one page with a logo and a button. Users can click the button to generate and export the report.
<ContentPage>
        <!---->
        <Button x:Name="reportButton"
                Text="Click me to export a report"
                Clicked="ExportButtonClicked"
                HorizontalOptions="Center"/>
        <!---->
</ContentPage>
6. Add Fonts Used in the Report
Call the FontsMauiAppBuilderExtensions.ConfigureFonts method in the MauiProgram class and pass fonts used by your application. Font files are located in the project’s Resources\Fonts folder. Refer to the following article for more information on fonts in .NET MAUI: Fonts in .NET MAUI
public static MauiApp CreateMauiApp()
{
    var builder = MauiApp.CreateBuilder();
    builder
        .UseMauiApp<App>()
        .ConfigureFonts(fonts =>
        {
            fonts.AddFont("OpenSans-Regular.ttf", "OpenSansRegular");
            fonts.AddFont("OpenSans-Semibold.ttf", "OpenSansSemibold");
            fonts.AddFont("Lobster-Regular.ttf", "Lobster");
        });
}
Use the DevExpress.Drawing.DXFontRepository class to add fonts used in a report. In this example, fonts are registered in Android’s MainApplication class. Refer to the following help topic for more information: Use DXFontRepository to Add Custom Fonts.
using Android.App;
using Android.Runtime;
using DevExpress.Drawing;

namespace MauiReporting {
    [Application]
    public class MainApplication : MauiApplication {
        public MainApplication(IntPtr handle, JniHandleOwnership ownership)
            : base(handle, ownership) {
        }
        protected override MauiApp CreateMauiApp() => MauiProgram.CreateMauiApp();

        public override void OnCreate() {
            using (StreamReader rd = new StreamReader(Assets.Open("OpenSans-Regular.ttf"))) {
                using (var ms = new MemoryStream()) {
                    rd.BaseStream.CopyTo(ms);

                    DXFontRepository.Instance.AddFont(ms);
                }
            }
            using (StreamReader rd = new StreamReader(Assets.Open("OpenSans-Semibold.ttf"))) {
                using (var ms = new MemoryStream()) {
                    rd.BaseStream.CopyTo(ms);

                    DXFontRepository.Instance.AddFont(ms);
                }
            }

            using (StreamReader rd = new StreamReader(Assets.Open("Lobster-Regular.ttf"))) {
                using (var ms = new MemoryStream()) {
                    rd.BaseStream.CopyTo(ms);

                    DXFontRepository.Instance.AddFont(ms);
                }
            }

            base.OnCreate();
        }
    }
}
7. Create, Export, and Share a Report
Handle the Button.Clicked event to generate a simple report, export it to a PDF file, and share the result.
Generate a Simple Report in Code
Generate and customize a report as required. Refer to the following help topic for more information on how to generate a report in code: Create a Report in Code.
The code sample below creates a simple report with two labels and exports the result to PDF:
private async void ExportButtonClicked(object sender, EventArgs e) {

    XtraReport report = new XtraReport() { Name = "Sample" };

    DetailBand detail = new DetailBand();

    // Create a label, apply Lobster font
    XRLabel labelLobster = new XRLabel()
    {
        Text = "Sample Text Lobster",
        Font = new DevExpress.Drawing.DXFont("Lobster", 24f),
        CanGrow = true,
        SizeF = new System.Drawing.SizeF(report.PageWidth - report.Margins.Left - report.Margins.Right, 200),
    };

    // Create a label, apply Open Sans font and border
    XRLabel labelOpenSans = new XRLabel()
    {
        Text = "Sample Text Open Sans",
        Font = new DevExpress.Drawing.DXFont("Open Sans Regular", 24f),
        CanGrow = true,
        Borders = DevExpress.XtraPrinting.BorderSide.All,
        BorderColor = System.Drawing.Color.BlueViolet,
        BorderWidth = 2,
        SizeF = new System.Drawing.SizeF(report.PageWidth - report.Margins.Left - report.Margins.Right, 200),
        LocationF = new System.Drawing.PointF(0, 200)
    };

    // Add both labels to the detail band
    detail.Controls.Add(labelLobster);
    detail.Controls.Add(labelOpenSans);

    report.Bands.Add(detail);

    report.CreateDocument();

    // Export the report to a PDF file
    string resultFile = Path.Combine(FileSystem.Current.AppDataDirectory, report.Name + ".pdf");
    report.ExportToPdf(resultFile);

    // Share the resulting file
    await ShareFile(resultFile);
}
Generate a Simple Report in Visual Studio Report Designer
The Visual Studio Report Designer is not available in .NET MAUI applications. Visual Studio IDE may ask you to download the .NET Core and System.Drawing.Common package to invoke the report designer.
Alternatively, you can generate a report in a separate class library. The Visual Studio Report Designer allows you to export the report to PDF, so you can reference the PDF file in your project. Review the following help topic for more information: Create a Report in Visual Studio.
Share a File
Call the Share.Default.RequestAsync method to share a file with other applications on the device. Use the ShareFileRequest type to share a single file.
using DevExpress.XtraReports.UI;
using MauiReporting.Export;
using DevExpress.Drawing;
using DevExpress.XtraPrinting;
//...


public async Task ShareFile(string filename)
{
    string file = Path.Combine(FileSystem.Current.AppDataDirectory, filename);

    await Share.Default.RequestAsync(new ShareFileRequest
    {
        Title = "Share PDF file",
        File = new ShareFile(file)
    });
}
8. Run the Project
The application is now ready. Run the project to see the result.