This topic describes how to create date range and time range parameters and filter report data by specified values.
Create a Range Parameter in the Report Designer
Follow the steps below to add a range parameter to a report in Visual Studio Report Designer:
- Create a report parameter.
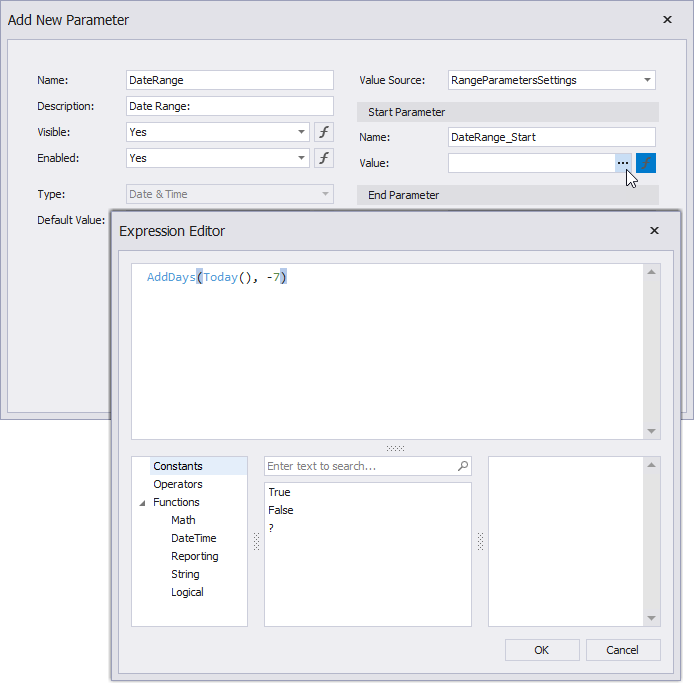
In the Add New Parameter dialog, specify parameter options:
- Parameter type: Date and Time, Date, or Time
- Value Source: Range Parameters
Start Parameter and End Parameter sections appear. They specify range options:

You can change the Name and initial static Value for the Start Parameter and End Parameter. To specify an expression instead of a static value, click the Value option’s ellipsis button and use the Expression Editor dialog:
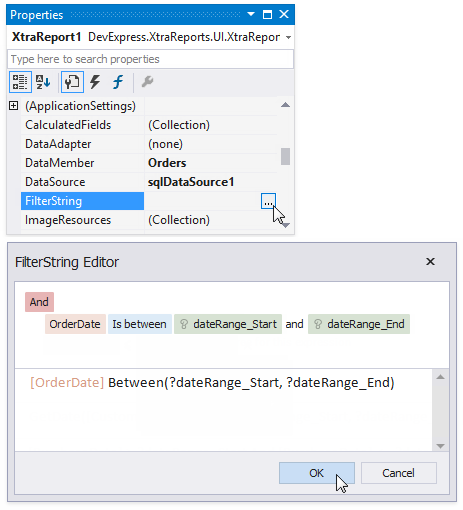
Reference the created range parameter. You can reference this parameter in the report’s filter string, in an expression, or in a control’s Text property. You can also bind control and data source parameters to report parameters.
We recommend that you use the following functions with range parameters in expressions and filter strings:
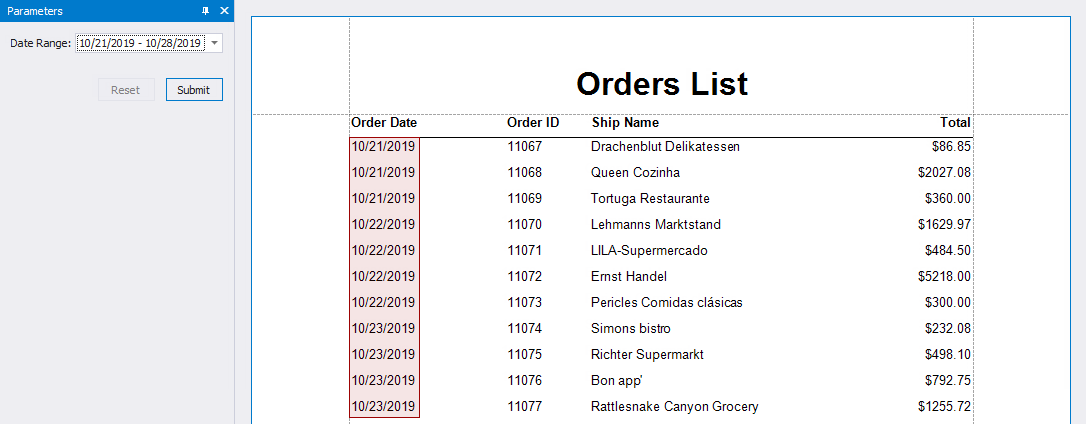
The image below filters report data by the following filter string:
InDateRange([ShippedDate], ?paramDateRange_Start, ?paramDateRange_End)
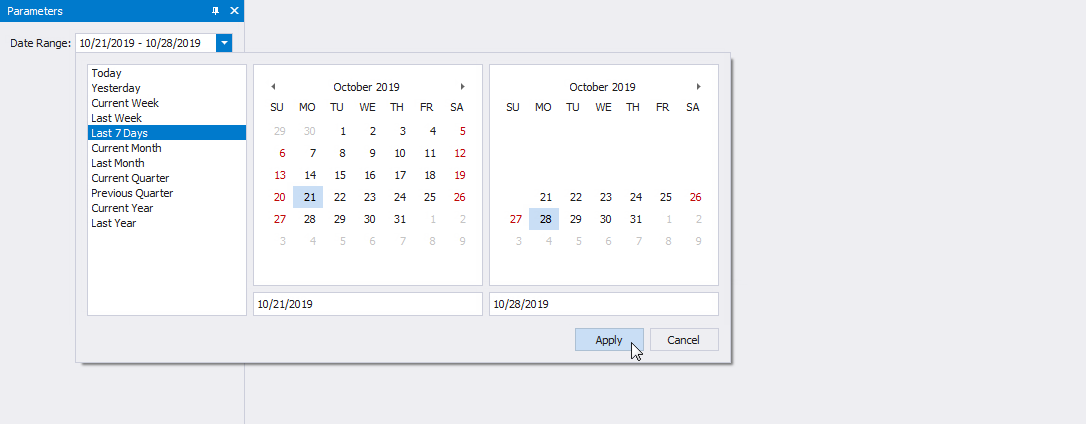
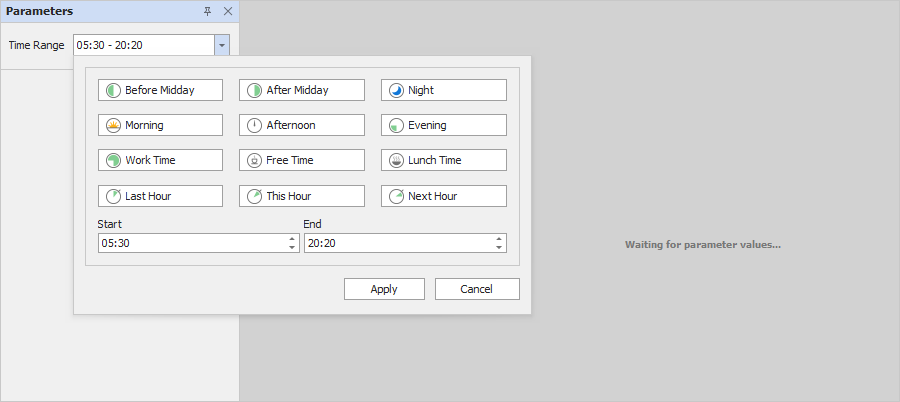
When you switch to the report’s Print Preview tab, the Parameters Panel displays the newly created range parameter. Click the editor to set a range. The editor type depends on the parameter type:
- An editor for “Date” and “Date and Time” range parameters:
- An editor for “Time” range parameters
After you submit start and end values, the report document shows filtered data. The report below shows the ShippedDate field filtered by the date range parameter:
For information on how to add a range parameter to a report in End-User Report Designers, refer to the following topics:
Create a Range Parameter in Code
- Create a parameter and set its Type to a DateTime, DateOnly, or TimeOnly value.
- Initialize a RangeParametersSettings class instance and set up its properties.
- Assign the created
RangeParametersSettings object to the parameter’s ValueSourceSettings property.
- Add the parameter to the report’s Parameters collection.
The following code sample creates a date range parameter in code and uses this parameter to filter report data:
View Example: Create a Date Range Report Parameter
using System;
using System.IO;
using DevExpress.DataAccess.ConnectionParameters;
using DevExpress.DataAccess.Sql;
using DevExpress.XtraReports.Expressions;
using DevExpress.XtraReports.Parameters;
using DevExpress.XtraReports.UI;
// ...
            // Create a date range parameter.
            var dateRangeParam = new Parameter();
            dateRangeParam.Name = "dateRange";
            dateRangeParam.Description = "Date Range:";
            dateRangeParam.Type = typeof(System.DateTime);

            // Create a RangeParametersSettings instance and set up its properties.
            var dateRangeSettings = new RangeParametersSettings();

            // Specify the start date and end date parameters.
            dateRangeSettings.StartParameter.Name = "dateRangeStart";
            dateRangeSettings.StartParameter.ExpressionBindings.Add(
                new BasicExpressionBinding("Value", "AddYears(Today(), -1)")
            );

            dateRangeSettings.EndParameter.Name = "dateRangeEnd";
            dateRangeSettings.EndParameter.ExpressionBindings.Add(
                new BasicExpressionBinding("Value", "AddYears(Today(), 0)")
            );

            // Assign the settings to the parameter's ValueSourceSettings property.
            dateRangeParam.ValueSourceSettings = dateRangeSettings;

            // Create a report instance and add the parameter to the report's Parameters collection.
            var report = new XtraReport1();
            report.Parameters.Add(dateRangeParam);

            // Use the parameter to filter the report's data.
            report.FilterString = "GetDate([UpdatedOrderDate]) Between(?dateRangeStart,?dateRangeEnd)";
Imports System.IO
Imports DevExpress.DataAccess.ConnectionParameters
Imports DevExpress.DataAccess.Sql
Imports DevExpress.XtraReports.Expressions
Imports DevExpress.XtraReports.Parameters
Imports DevExpress.XtraReports.UI
' ...
            ' Create a date range parameter.
            Dim dateRangeParam = New Parameter()
            dateRangeParam.Name = "dateRange"
            dateRangeParam.Description = "Date Range:"
            dateRangeParam.Type = GetType(Date)

            ' Create a RangeParametersSettings instance and set up its properties.
            Dim dateRangeSettings = New RangeParametersSettings()

            ' Specify the start date and end date parameters.
            dateRangeSettings.StartParameter.Name = "dateRangeStart"
            dateRangeSettings.StartParameter.ExpressionBindings.Add(New BasicExpressionBinding("Value", "AddYears(Today(), -1)"))
            dateRangeSettings.EndParameter.Name = "dateRangeEnd"
            dateRangeSettings.EndParameter.ExpressionBindings.Add(New BasicExpressionBinding("Value", "AddYears(Today(), 0)"))

            ' Assign the settings to the parameter's ValueSourceSettings property.
            dateRangeParam.ValueSourceSettings = dateRangeSettings

            ' Create a report instance and add the parameter to the report's Parameters collection.
            Dim report = New XtraReport1()
            report.Parameters.Add(dateRangeParam)

            ' Use the parameter to filter the report's data.
            report.FilterString = "GetDate([UpdatedOrderDate]) Between(?dateRangeStart,?dateRangeEnd)"
Customize Predefined Ranges
The date and time range parameter editor allows you to select a range from a list of predefined ranges. You can remove items from the list or add a custom range.
The set of predefined date ranges is stored in the RangeParameterEditorOptions static class and is available in all date range parameter editors when they are displayed in the Preview tab.
Date Range Parameters
Use the RangeParameterEditorOptions.RegisterDateRange method to add a new predefined date range to the collection.
The following code sample removes all predefined date ranges and creates two new ranges:

using DevExpress.XtraReports.Parameters;
using DevExpress.XtraReports.Expressions;
// ...
// Remove all predefined ranges and add two new date ranges.
RangeParameterEditorOptions.PredefinedDateRanges.Clear();
RangeParameterEditorOptions.RegisterDateRange("September", () => new DateTime(2019,9,1), () => new DateTime(2019,9,30));
RangeParameterEditorOptions.RegisterDateRange("October", () => new DateTime(2019,10,1), () => new DateTime(2019,10,31));
Imports DevExpress.XtraReports.Parameters
Imports DevExpress.XtraReports.Expressions
' ...
' Remove all predefined ranges and add two new date ranges.
RangeParameterEditorOptions.PredefinedDateRanges.Clear()
RangeParameterEditorOptions.RegisterDateRange("September", Function() New Date(2019,9,1), Function() New Date(2019,9,30))
RangeParameterEditorOptions.RegisterDateRange("October", Function() New Date(2019,10,1), Function() New Date(2019,10,31))
Time Range Parameters
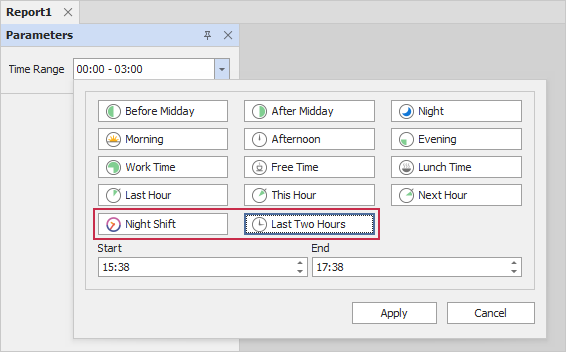
Use the RangeParameterEditorOptions.RegisterTimeRange method to add a new predefined time range to the collection.
The following code adds two new time ranges to the existing collection:
using DevExpress.XtraReports.Parameters;
// ...
// Uncomment the line below if you want to clear the collection before adding new time ranges:
//RangeParameterEditorOptions.PredefinedTimeRanges.Clear();
string timeRangeNightShift = "Night Shift";
if (!RangeParameterEditorOptions.PredefinedTimeRanges.ContainsKey(timeRangeNightShift)) {
    RangeParameterEditorOptions.RegisterTimeRange(timeRangeNightShift,() => new TimeOnly(23,0),() => new TimeOnly(5,0),SvgImage.FromFile("time.svg"));
}
string timeRangeLastTwoHours = "Last Two Hours";
if (!RangeParameterEditorOptions.PredefinedTimeRanges.ContainsKey(timeRangeLastTwoHours)) {
    TimeOnly previousHour = TimeOnly.FromDateTime(DateTime.Now.AddHours(-2));
    TimeOnly currentHour = TimeOnly.FromDateTime(DateTime.Now.AddHours(0));
    RangeParameterEditorOptions.RegisterTimeRange(timeRangeLastTwoHours, () => previousHour,() => currentHour);
}
Imports DevExpress.XtraReports.Parameters
Imports DevExpress.XtraReports.Expressions
' ...
' Uncomment the line below if you want to clear the collection before adding new time ranges:
' RangeParameterEditorOptions.PredefinedTimeRanges.Clear()
Dim timeRangeNightShift As String = "Night Shift"
If Not RangeParameterEditorOptions.PredefinedTimeRanges.ContainsKey(timeRangeNightShift) Then
    RangeParameterEditorOptions.RegisterTimeRange(timeRangeNightShift, Function() New TimeOnly(23, 0), Function() New TimeOnly(5, 0), SvgImage.FromFile("time.svg"))
End If

Dim timeRangeLastTwoHours As String = "Last Two Hours"
If Not RangeParameterEditorOptions.PredefinedTimeRanges.ContainsKey(timeRangeLastTwoHours) Then
    Dim previousHour As TimeOnly = TimeOnly.FromDateTime(DateTime.Now.AddHours(-2))
    Dim currentHour As TimeOnly = TimeOnly.FromDateTime(DateTime.Now.AddHours(0))
    RangeParameterEditorOptions.RegisterTimeRange(timeRangeLastTwoHours, Function() previousHour, Function() currentHour)
End If
Web Document Viewer/Preview
The Document Viewer allows you to access predefined ranges on the client-side. Predefined ranges are available in all date/time range parameter editors when they are displayed in the Preview tab or in the Document Viewer.
Date Range Parameters
Predefined date ranges are stored in the DevExpress.Reporting.Viewer.Widgets.predefinedDateRanges object. Each predefined date range has the following properties:
range- A two-element array of Date objects (startDate, endDate).
displayName- The caption displayed to users.

The following code removes built-in ranges and adds two custom predefined ranges:
<script type="text/javascript" id="script">
    function CustomizePredefinedRanges(s, e) {
        DevExpress.Reporting.Viewer.Widgets.predefinedDateRanges.splice(0,
            DevExpress.Reporting.Viewer.Widgets.predefinedDateRanges.length);

        DevExpress.Reporting.Viewer.Widgets.predefinedDateRanges.push({
            displayName: 'September',
            range: () => [
                new Date(2023, 8, 1),
                new Date(2023, 8, 30)
            ]
        })
        DevExpress.Reporting.Viewer.Widgets.predefinedDateRanges.push({
            displayName: 'October',
            range: () => [
                new Date(2023, 9, 1),
                new Date(2023, 9, 31)
            ]
        })
    }
</script>

@{
    var viewerRender = Html.DevExpress().WebDocumentViewer("DocumentViewer")
        .Height("1000px")
        .ClientSideEvents(configure =>
        {
            configure.BeforeRender("CustomizePredefinedRanges");
        })
        .Bind("XtraReport1");
    @viewerRender.RenderHtml()
}
@* Content of the index.html file *@

<script type="text/javascript">
    window.viewerCustomization = {
        onBeforeRender: function (s, e) {
            DevExpress.Reporting.Viewer.Widgets.predefinedDateRanges.splice(0,
                DevExpress.Reporting.Viewer.Widgets.predefinedDateRanges.length);

            DevExpress.Reporting.Viewer.Widgets.predefinedDateRanges.push({
                displayName: 'September',
                range: () => [
                    new Date(2023, 8, 1),
                    new Date(2023, 8, 30)
                ]
            })
            DevExpress.Reporting.Viewer.Widgets.predefinedDateRanges.push({
                displayName: 'October',
                range: () => [
                    new Date(2023, 9, 1),
                    new Date(2023, 9, 31)
                ]
            })

        }
    };
</script>

@* Content of the DocumentViewer.html file.*@
@page "/documentviewer"

<DxDocumentViewer ReportName="XtraReport1" Height="calc(100vh - 130px)" Width="100%">
    <DxDocumentViewerTabPanelSettings Width="340" />
    <DxDocumentViewerCallbacks BeforeRender="designerCustomization.onBeforeRender" />
</DxDocumentViewer>
<script type="text/javascript" id="script">
    function CustomizePredefinedRanges(s, e) {
        DevExpress.Reporting.Viewer.Widgets.predefinedDateRanges.splice(0,
            DevExpress.Reporting.Viewer.Widgets.predefinedDateRanges.length);

        DevExpress.Reporting.Viewer.Widgets.predefinedDateRanges.push({
            displayName: 'September',
            range: () => [
                new Date(2023, 8, 1),
                new Date(2023, 8, 30)
            ]
        })
        DevExpress.Reporting.Viewer.Widgets.predefinedDateRanges.push({
            displayName: 'October',
            range: () => [
                new Date(2023, 9, 1),
                new Date(2023, 9, 31)
            ]
        })
    }
</script>

@Html.DevExpress().WebDocumentViewer(settings =>
{
    settings.Name = "WebDocumentViewer1";
    settings.ClientSideEvents.BeforeRender = "CustomizePredefinedRanges";
}).Bind("XtraReport1").GetHtml()
<script type="text/javascript" id="script">
    function CustomizePredefinedRanges(s, e) {
        DevExpress.Reporting.Viewer.Widgets.predefinedDateRanges.splice(0,
            DevExpress.Reporting.Viewer.Widgets.predefinedDateRanges.length);

        DevExpress.Reporting.Viewer.Widgets.predefinedDateRanges.push({
            displayName: 'September',
            range: () => [
                new Date(2023, 8, 1),
                new Date(2023, 8, 30)
            ]
        })
        DevExpress.Reporting.Viewer.Widgets.predefinedDateRanges.push({
            displayName: 'October',
            range: () => [
                new Date(2023, 9, 1),
                new Date(2023, 9, 31)
            ]
        })
    }
</script>

<dx:ASPxWebDocumentViewer ClientInstanceName="WebDocumentViewer1" ID="ASPxWebDocumentViewer1" runat="server">
    <ClientSideEvents BeforeRender ="CustomizePredefinedRanges" />
</dx:ASPxWebDocumentViewer>
// Content of the report-viewer.html file.
<div>
    <dx-report-viewer [reportUrl]="reportUrl" height="800px">
        <dxrv-request-options [invokeAction]="invokeAction" [host]="hostUrl">
        </dxrv-request-options>
        <dxrv-callbacks (BeforeRender)="CustomizePredefinedRanges($event)">
        </dxrv-callbacks>
    </dx-report-viewer>
</div>

// Content of the report-viewer.ts file.

import { predefinedDateRanges } from 'devexpress-reporting/dx-webdocumentviewer'

export class ReportViewerComponent {
    // ...

    CustomizePredefinedRanges(event) {
        predefinedDateRanges.splice(0,
            predefinedDateRanges.length);

        predefinedDateRanges.push({
            displayName: 'September',
            range: () => [
                new Date(2023, 8, 1),
                new Date(2023, 8, 30)
            ]
        })
        predefinedDateRanges.push({
            displayName: 'October',
            range: () => [
                new Date(2023, 9, 1),
                new Date(2023, 9, 31)
            ]
        })
    }
    // ...
}
'use client';
import React from 'react';
import ReportViewer, { RequestOptions, Callbacks } from 'devexpress-reporting-react/dx-report-viewer';
import { predefinedDateRanges } from 'devexpress-reporting/dx-webdocumentviewer'


function App() {
    const onBeforeRender = ({ args }: { args: any }) => {
        console.log("onBeforeRender");
        predefinedDateRanges.splice(0,
            predefinedDateRanges.length);

        predefinedDateRanges.push({
            displayName: 'September',
            range: () => [
                new Date(2024, 8, 1),
                new Date(2024, 8, 30)
            ]
        })
        predefinedDateRanges.push({
            displayName: 'October',
            range: () => [
                new Date(2024, 9, 1),
                new Date(2024, 9, 31)
            ]
        })
    };

    return (
        <ReportViewer reportUrl="TestExportReport">
            <RequestOptions host="http://localhost:5000/" invokeAction="DXXRDV" />
            <Callbacks BeforeRender={onBeforeRender} />
        </ReportViewer>
    )
}

export default App;
import { predefinedDateRanges } from 'devexpress-reporting/dx-webdocumentviewer'
import ko from "knockout";


var componentData = {
    name: "WebDocumentViewer",
    mounted() {
    // ...
    var callbacks = {
          BeforeRender: function(){
                predefinedDateRanges.splice(0,
                    predefinedDateRanges.length);

                predefinedDateRanges.push({
                    displayName: 'September',
                    range: () => [
                        new Date(2023, 8, 1),
                        new Date(2023, 8, 30)
                    ]
                })
                predefinedDateRanges.push({
                    displayName: 'October',
                    range: () => [
                        new Date(2023, 9, 1),
                        new Date(2023, 9, 31)
                    ]
                })
                }
            };
        ko.applyBindings({
      // ..
            callbacks: callbacks
        }, this.$refs.viewer);
    },
  // ...
};
export default componentData;
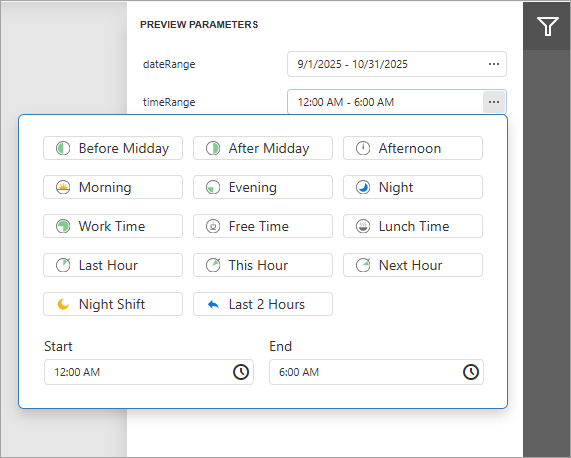
Time Range Parameters
Predefined time ranges are stored in the DevExpress.Reporting.Viewer.Widgets.predefinedTimeRanges object. Each predefined time range has the following properties:
range- A two-element array of Date objects (startDate, endDate).
displayName- The caption displayed to users.
iconTemplate- The name of the HTML template that displays the icon.
The following code adds two custom predefined time ranges:
<script type="text/javascript" id="script">
    function CustomizePredefinedRanges(s, e) {
        // Uncomment the following line to remove all predefined time ranges.
        // DevExpress.Reporting.Viewer.Widgets.predefinedTimeRanges.splice(0,
        //     DevExpress.Reporting.Viewer.Widgets.predefinedTimeRanges.length);

        DevExpress.Reporting.Viewer.Widgets.predefinedTimeRanges.push({
            displayName: 'Night Shift',
            iconTemplate: 'nightShiftIcon',
            range: () => {
                const today = new Date();
                const end = new Date(today);
                end.setHours(5, 0, 0, 0);
                const start = new Date(end);
                start.setDate(end.getDate() - 1);
                start.setHours(23, 0, 0, 0);
                return [start, end];
            }
        });
        DevExpress.Reporting.Viewer.Widgets.predefinedTimeRanges.push({
              displayName: 'Last 2 Hours',
              iconTemplate: 'lastTwoHoursIcon',
              range: () => {
                const end = new Date();
                const start = new Date(end.getTime() - 2 * 60 * 60 * 1000);
                return [start, end];
              }
        });
    }
</script>

<script type="text/html" id="nightShiftIcon">
    <!--...SVG content for nightShiftIcon...-->
</script>
<script type="text/html" id="lastTwoHoursIcon">
    <!--...SVG content for lastTwoHoursIcon...-->
</script>

@{
    var viewerRender = Html.DevExpress().WebDocumentViewer("DocumentViewer")
        .Height("1000px")
        .ClientSideEvents(configure => {
            configure.BeforeRender("CustomizePredefinedRanges");})
        .Bind("XtraReport1");
    @viewerRender.RenderHtml()
}
@* Content of the index.html file *@

<script type="text/javascript">
    window.viewerCustomization = {
        onBeforeRender: function (s, e) {
        // Uncomment the following line to remove all predefined time ranges.
        // DevExpress.Reporting.Viewer.Widgets.predefinedTimeRanges.splice(0,
        //     DevExpress.Reporting.Viewer.Widgets.predefinedTimeRanges.length);

        DevExpress.Reporting.Viewer.Widgets.predefinedTimeRanges.push({
            displayName: 'Night Shift',
            iconTemplate: 'nightShiftIcon',
            range: () => {
                const today = new Date();
                const end = new Date(today);
                end.setHours(5, 0, 0, 0);              // today 05:00
                const start = new Date(end);
                start.setDate(end.getDate() - 1);
                start.setHours(23, 0, 0, 0);           // yesterday 23:00
                return [start, end];
            }
        });
        DevExpress.Reporting.Viewer.Widgets.predefinedTimeRanges.push({
              displayName: 'Last 2 Hours',
              iconTemplate: 'lastTwoHoursIcon',
              range: () => {
                const end = new Date();
                const start = new Date(end.getTime() - 2 * 60 * 60 * 1000);
                return [start, end];
              }
        });
    };
    }
</script>
<script type="text/html" id="nightShiftIcon">
    <!--...SVG content for nightShiftIcon...-->
</script>
<script type="text/html" id="lastTwoHoursIcon">
    <!--...SVG content for lastTwoHoursIcon...-->
</script>

@* Content of the DocumentViewer.html file.*@
@page "/documentviewer"

<DxDocumentViewer ReportName="XtraReport1" Height="calc(100vh - 130px)" Width="100%">
    <DxDocumentViewerTabPanelSettings Width="340" />
    <DxDocumentViewerCallbacks BeforeRender="viewerCustomization.onBeforeRender" />
</DxDocumentViewer>
<script type="text/javascript" id="script">
    function CustomizePredefinedRanges(s, e) {
        // Uncomment the following line to remove all predefined time ranges.
        // DevExpress.Reporting.Viewer.Widgets.predefinedTimeRanges.splice(0,
        //     DevExpress.Reporting.Viewer.Widgets.predefinedTimeRanges.length);

        DevExpress.Reporting.Viewer.Widgets.predefinedTimeRanges.push({
            displayName: 'Night Shift',
            iconTemplate: 'nightShiftIcon',
            range: () => {
                const today = new Date();
                const end = new Date(today);
                end.setHours(5, 0, 0, 0);              // today 05:00
                const start = new Date(end);
                start.setDate(end.getDate() - 1);
                start.setHours(23, 0, 0, 0);           // yesterday 23:00
                return [start, end];
            }
        });
        DevExpress.Reporting.Viewer.Widgets.predefinedTimeRanges.push({
              displayName: 'Last 2 Hours',
              iconTemplate: 'lastTwoHoursIcon',
              range: () => {
                const end = new Date();
                const start = new Date(end.getTime() - 2 * 60 * 60 * 1000);
                return [start, end];
              }
        });
    }
</script>

<script type="text/html" id="nightShiftIcon">
    <!--...SVG content for nightShiftIcon...-->
</script>
<script type="text/html" id="lastTwoHoursIcon">
    <!--...SVG content for lastTwoHoursIcon...-->
</script>

@Html.DevExpress().WebDocumentViewer(settings =>
{
    settings.Name = "WebDocumentViewer1";
    settings.ClientSideEvents.BeforeRender = "CustomizePredefinedRanges";
}).Bind("XtraReport1").GetHtml()
<script type="text/javascript" id="script">
    function CustomizePredefinedRanges(s, e) {
        // Uncomment the following line to remove all predefined time ranges.
        // DevExpress.Reporting.Viewer.Widgets.predefinedTimeRanges.splice(0,
        //     DevExpress.Reporting.Viewer.Widgets.predefinedTimeRanges.length);

        DevExpress.Reporting.Viewer.Widgets.predefinedTimeRanges.push({
            displayName: 'Night Shift',
            iconTemplate: 'nightShiftIcon',
            range: () => {
                const today = new Date();
                const end = new Date(today);
                end.setHours(5, 0, 0, 0);              // today 05:00
                const start = new Date(end);
                start.setDate(end.getDate() - 1);
                start.setHours(23, 0, 0, 0);           // yesterday 23:00
                return [start, end];
            }
        });
        DevExpress.Reporting.Viewer.Widgets.predefinedTimeRanges.push({
              displayName: 'Last 2 Hours',
              iconTemplate: 'lastTwoHoursIcon',
              range: () => {
                const end = new Date();
                const start = new Date(end.getTime() - 2 * 60 * 60 * 1000);
                return [start, end];
              }
        });
    }
</script>
<script type="text/html" id="nightShiftIcon">
    <!--...SVG content for nightShiftIcon...-->
</script>
<script type="text/html" id="lastTwoHoursIcon">
    <!--...SVG content for lastTwoHoursIcon...-->
</script>

<dx:ASPxWebDocumentViewer ClientInstanceName="WebDocumentViewer1" ID="ASPxWebDocumentViewer1" runat="server">
    <ClientSideEvents BeforeRender ="CustomizePredefinedRanges" />
</dx:ASPxWebDocumentViewer>
// Content of the report-viewer.html file.
<div>
    <dx-report-viewer [reportUrl]="reportUrl" height="800px">
        <dxrv-request-options [invokeAction]="invokeAction" [host]="hostUrl">
        </dxrv-request-options>
        <dxrv-callbacks (BeforeRender)="CustomizePredefinedRanges($event)">
        </dxrv-callbacks>
    </dx-report-viewer>
</div>

// Content of the report-viewer.ts file.

import { predefinedTimeRanges } from 'devexpress-reporting/dx-webdocumentviewer'

export class ReportViewerComponent {
    // ...

    CustomizePredefinedRanges() {
        // Uncomment the following line to remove all predefined time ranges.
        // predefinedTimeRanges.splice(0, predefinedTimeRanges.length);

        predefinedTimeRanges.push({
            displayName: 'Night Shift',
            iconTemplate: 'nightShiftIcon',
            range: () => {
                const today = new Date();
                const end = new Date(today);
                end.setHours(5, 0, 0, 0);              // today 05:00
                const start = new Date(end);
                start.setDate(end.getDate() - 1);
                start.setHours(23, 0, 0, 0);           // yesterday 23:00
                return [start, end];
            }
        });
        predefinedTimeRanges.push({
              displayName: 'Last 2 Hours',
              iconTemplate: 'lastTwoHoursIcon',
              range: () => {
                const end = new Date();
                const start = new Date(end.getTime() - 2 * 60 * 60 * 1000);
                return [start, end];
              }
        });
    }
    // ...
}

// Content of the index.html file.

<!doctype html>
<html lang="en">
<head>
  <meta charset="utf-8">
  <title>Angular</title>
  <base href="/">
  <script type="text/html" id="nightShiftIcon">
      <!--...SVG content for nightShiftIcon...-->
  </script>
  <script type="text/html" id="lastTwoHoursIcon">
      <!--...SVG content for lastTwoHoursIcon...-->
  </script>
</head>
'use client';
import React from 'react';
import ReportViewer, { RequestOptions, Callbacks } from 'devexpress-reporting-react/dx-report-viewer';
import { predefinedTimeRanges } from 'devexpress-reporting/dx-webdocumentviewer'


function App() {
    const onBeforeRender = ({ args }: { args: any }) => {
                // Uncomment the following line to remove all predefined time ranges.
        // predefinedTimeRanges.splice(0, predefinedTimeRanges.length);

        predefinedTimeRanges.push({
            displayName: 'Night Shift',
            iconTemplate: 'nightShiftIcon',
            range: () => {
                const today = new Date();
                const end = new Date(today);
                end.setHours(5, 0, 0, 0);              // today 05:00
                const start = new Date(end);
                start.setDate(end.getDate() - 1);
                start.setHours(23, 0, 0, 0);           // yesterday 23:00
                return [start, end];
            }
        });
        predefinedTimeRanges.push({
              displayName: 'Last 2 Hours',
              iconTemplate: 'lastTwoHoursIcon',
              range: () => {
                const end = new Date();
                const start = new Date(end.getTime() - 2 * 60 * 60 * 1000);
                return [start, end];
              }
        });
    };

    return (
        <ReportViewer reportUrl="TestExportReport">
            <RequestOptions host="http://localhost:5000/" invokeAction="DXXRDV" />
            <Callbacks BeforeRender={onBeforeRender} />
        </ReportViewer>
    )
}

export default App;
import { predefinedDateRanges } from 'devexpress-reporting/dx-webdocumentviewer'
import ko from "knockout";


var componentData = {
    name: "WebDocumentViewer",
    mounted() {
    // ...
    var callbacks = {
          BeforeRender: function(){
            // Uncomment the following line to remove all predefined time ranges.
            // predefinedTimeRanges.splice(0, predefinedTimeRanges.length);

            predefinedTimeRanges.push({
                displayName: 'Night Shift',
                iconTemplate: 'nightShiftIcon',
                range: () => {
                    const today = new Date();
                    const end = new Date(today);
                    end.setHours(5, 0, 0, 0);              // today 05:00
                    const start = new Date(end);
                    start.setDate(end.getDate() - 1);
                    start.setHours(23, 0, 0, 0);           // yesterday 23:00
                    return [start, end];
                }
            });
            predefinedTimeRanges.push({
                displayName: 'Last 2 Hours',
                iconTemplate: 'lastTwoHoursIcon',
                range: () => {
                    const end = new Date();
                    const start = new Date(end.getTime() - 2 * 60 * 60 * 1000);
                    return [start, end];
                }
            });
        }
    };
    ko.applyBindings({
    // ..
        callbacks: callbacks
    }, this.$refs.viewer);
},
  // ...
};
export default componentData;
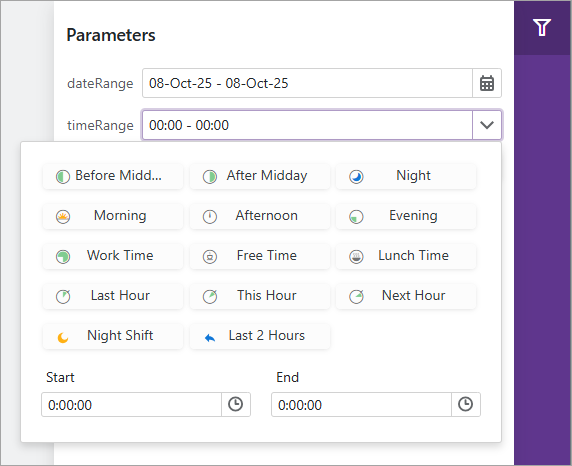
Native Report Viewer for Blazor
To access predefined time ranges in Blazor Report Viewer, use the RangeParameterEditorOptions.PredefinedTimeRanges property. To add a new predefined time range to the collection, use RangeParameterEditorOptions.RegisterTimeRange methods.
The following code adds two new time ranges to the existing collection:
@page "/reportviewer/"

@using DevExpress.Blazor.Reporting
@using DevExpress.Blazor.Reporting.Models
@using DevExpress.Utils.Svg
@using DevExpress.XtraReports.Parameters
@using DevExpress.XtraReports.UI
@using BlazorServer.PredefinedReports

<DxReportViewer @ref="reportViewer" Report="Report" RootCssClasses="w-100 h-100" OnCustomizeParameters="OnCustomizeParameters" />

@code {
    DxReportViewer reportViewer;
    XtraReport Report = new TestReport();

    void OnCustomizeParameters(ParametersModel parametersModel) {
        // Uncomment the following line to remove all predefined time ranges.
        // RangeParameterEditorOptions.PredefinedTimeRanges.Clear();
        var svgMoon = SvgImage.FromFile("moon.svg");
        string timeRangeNightShift = "Night Shift";
        if (!RangeParameterEditorOptions.PredefinedTimeRanges.ContainsKey(timeRangeNightShift)) {
            RangeParameterEditorOptions.RegisterTimeRange(timeRangeNightShift, () => new TimeOnly(23, 0), () => new TimeOnly(5, 0), svgMoon);
        }
        var svgBack = SvgImage.FromFile("back.svg");
        string timeRangeLastTwoHours = "Last 2 Hours";
        if (!RangeParameterEditorOptions.PredefinedTimeRanges.ContainsKey(timeRangeLastTwoHours)) {
            TimeOnly previousHour = TimeOnly.FromDateTime(DateTime.Now.AddHours(-2));
            TimeOnly currentHour = TimeOnly.FromDateTime(DateTime.Now.AddHours(0));
            RangeParameterEditorOptions.RegisterTimeRange(timeRangeLastTwoHours, () => previousHour, () => currentHour, svgBack);
        }
    }

}
See Also