Get Started
- 3 minutes to read
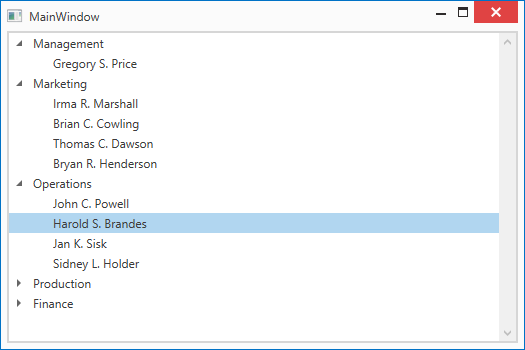
This tutorial demonstrates how to create an application with the TreeViewControl.
Step 1. Add a Data Model
You can bind the TreeViewControl to any object that implements the IEnumerable interface or its descendant (for example, IList, ICollection).
The code sample below demonstrates a data model that is used in this tutorial.
using System.Collections.Generic;
using System.Collections.ObjectModel;

namespace TreeViewGettingStarted {
    public class Employee {
        public Employee(int id, string name) {
            ID = id;
            Name = name;
        }
        public int ID { get; set; }
        public string Name { get; set; }
    }
    public class EmployeeDepartment {
        public string Name { get; set; }
        public ObservableCollection<Employee> Employees { get; }

        public EmployeeDepartment(string name, IEnumerable<Employee> employees) {
            Name = name;
            Employees = new ObservableCollection<Employee>(employees);
        }
    }

    public static class Departments {
        public static List<EmployeeDepartment> GetDepartments() {
            List<EmployeeDepartment> departments = new List<EmployeeDepartment>();
            departments.Add(new EmployeeDepartment("Management", new Employee[] {
                new Employee(0, "Gregory S. Price")
            }));
            departments.Add(new EmployeeDepartment("Marketing", new Employee[] {
                new Employee(1, "Irma R. Marshall"),
                new Employee(2, "Brian C. Cowling"),
                new Employee(3, "Thomas C. Dawson"),
                new Employee(4, "Bryan R. Henderson"),
            }));
            departments.Add(new EmployeeDepartment("Operations", new Employee[] {
                new Employee(5, "John C. Powell"),
                new Employee(6, "Harold S. Brandes"),
                new Employee(7, "Jan K. Sisk"),
                new Employee(8, "Sidney L. Holder"),
            }));
            departments.Add(new EmployeeDepartment("Production", new Employee[] {
                new Employee(9, "Christian P. Laclair"),
                new Employee(10, "James L. Kelsey"),
                new Employee(11, "Howard M. Carpenter"),
                new Employee(12, "Jennifer T. Tapia"),
            }));
            departments.Add(new EmployeeDepartment("Finance", new Employee[] {
                new Employee(13, "Karen J. Kelly"),
                new Employee(14, "Judith P. Underhill"),
                new Employee(15, "Russell E. Belton"),
            }));
            return departments;
        }
    }
}
Steps 2-3. Add a View Model
Create a view model that retrieves data from the data model.
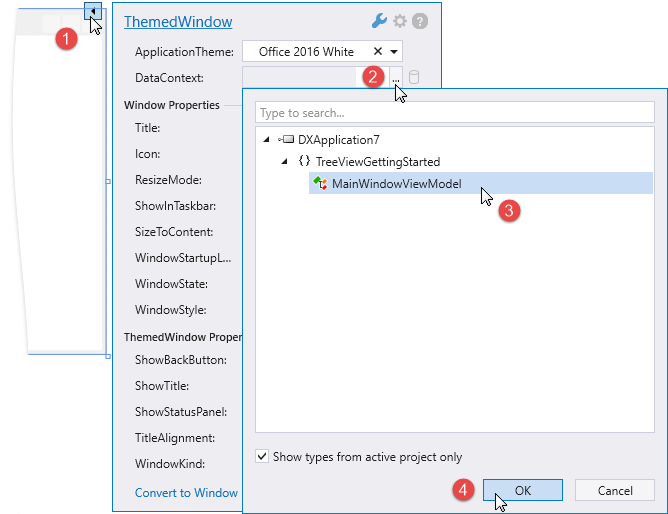
using DevExpress.Mvvm;
using System.Collections.Generic;

namespace TreeViewGettingStarted {
    public class MainWindowViewModel : ViewModelBase {
        public MainWindowViewModel() {
            EmployeeDepartments = Departments.GetDepartments();
        }
        public List<EmployeeDepartment> EmployeeDepartments { get; set; }
    }
}
Build the solution. Invoke the main window’s smart tag and define its data context as shown in the image below.
You can also define the window’s data context in code:
<dx:ThemedWindow
    ...
    xmlns:local="clr-namespace:TreeViewGettingStarted">
    <dx:ThemedWindow.DataContext>
        <local:MainWindowViewModel/>
    </dx:ThemedWindow.DataContext>
Steps 4-5. Add the TreeViewControl to a View
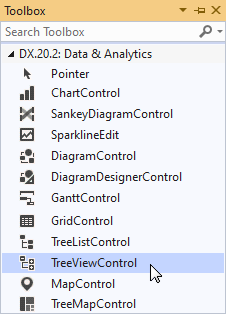
Drag the TreeViewControl from the DX.20.2: Data & Analytics Toolbox tab and drop it onto the main window.
Visual Studio performs the following actions:
Adds the following references to the project:
- DevExpress.Data.Desktop.v20.2
- DevExpress.Data.v20.2
- DevExpress.Mvvm.v20.2
- DevExpress.Printing.v20.2.Core
- DevExpress.Xpf.Core.v20.2
- DevExpress.Xpf.Grid.v20.2
- DevExpress.Xpf.Grid.v20.2.Core
Generates the code below:
<dx:ThemedWindow x:Class="TreeViewGettingStarted.MainWindow"
    xmlns:dx="http://schemas.devexpress.com/winfx/2008/xaml/core"
    xmlns="http://schemas.microsoft.com/winfx/2006/xaml/presentation"
    xmlns:x="http://schemas.microsoft.com/winfx/2006/xaml"
    xmlns:dxg="http://schemas.devexpress.com/winfx/2008/xaml/grid"
    xmlns:local="clr-namespace:TreeViewGettingStarted"
    Title="MainWindow" Height="350" Width="525">
    <dx:ThemedWindow.DataContext>
        <local:MainWindowViewModel/>
    </dx:ThemedWindow.DataContext>
    <Grid>
        <dxg:TreeViewControl/>
    </Grid>
</dx:ThemedWindow>
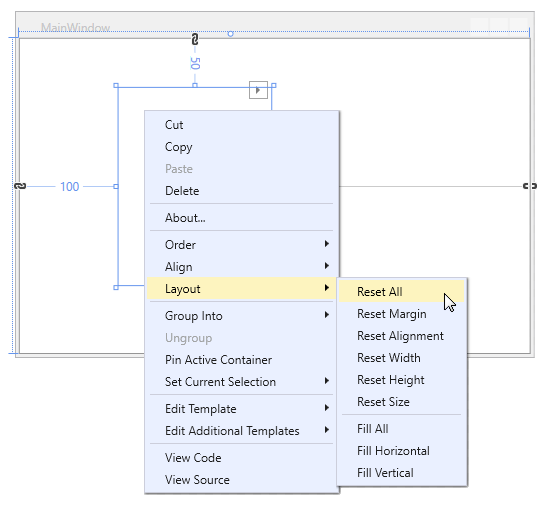
Right-click the control and select Layout | Reset All to allow the TreeViewControl to fill the entire window.
Steps 6-8. Bind the TreeViewControl to Data
Invoke the TreeViewControl‘s smart tag and define the ItemsSource field.
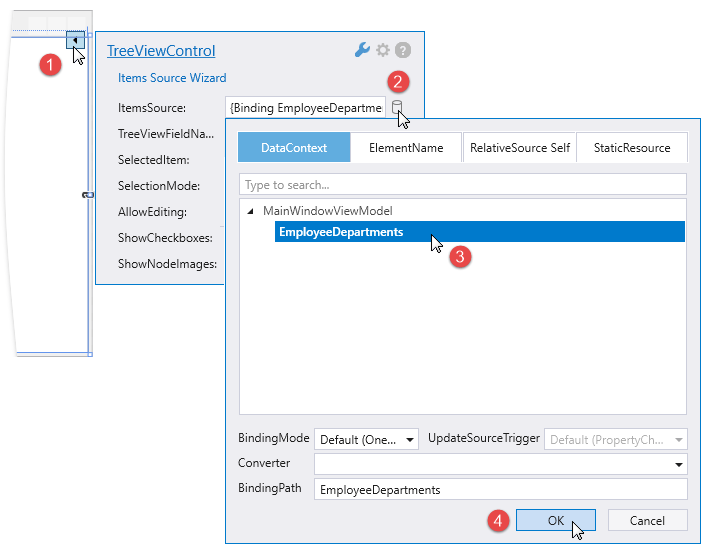
To bind the TreeViewControl to data in code, specify the DataControlBase.ItemsSource property:
<dxg:TreeViewControl ItemsSource="{Binding EmployeeDepartments}"/>Set the TreeViewControl.ChildNodesPath property to the Employees field. This field contains a node’s children.
Set the TreeViewFieldName property to the Name field. The TreeViewControl uses this field’s value to display text in nodes.
<dx:ThemedWindow x:Class="TreeViewGettingStarted.MainWindow"
    Title="MainWindow" Height="350" Width="525"
    xmlns:dx="http://schemas.devexpress.com/winfx/2008/xaml/core"
    xmlns="http://schemas.microsoft.com/winfx/2006/xaml/presentation"
    xmlns:x="http://schemas.microsoft.com/winfx/2006/xaml"
    xmlns:dxg="http://schemas.devexpress.com/winfx/2008/xaml/grid"
    xmlns:local="clr-namespace:TreeViewGettingStarted">
    <dx:ThemedWindow.DataContext>
        <local:MainWindowViewModel />
    </dx:ThemedWindow.DataContext>
    <Grid>
        <dxg:TreeViewControl ItemsSource="{Binding EmployeeDepartments}"
                             ChildNodesPath="Employees"
                             TreeViewFieldName="Name"/>
    </Grid>
</dx:ThemedWindow>