Lesson 1: Bind Scheduler to Data
- 4 minutes to read
The DevExpress Scheduler for Xamarin.Forms provides a set of standard views to display and manage appointments (scheduled events): Day, Work Week, Week and Month.
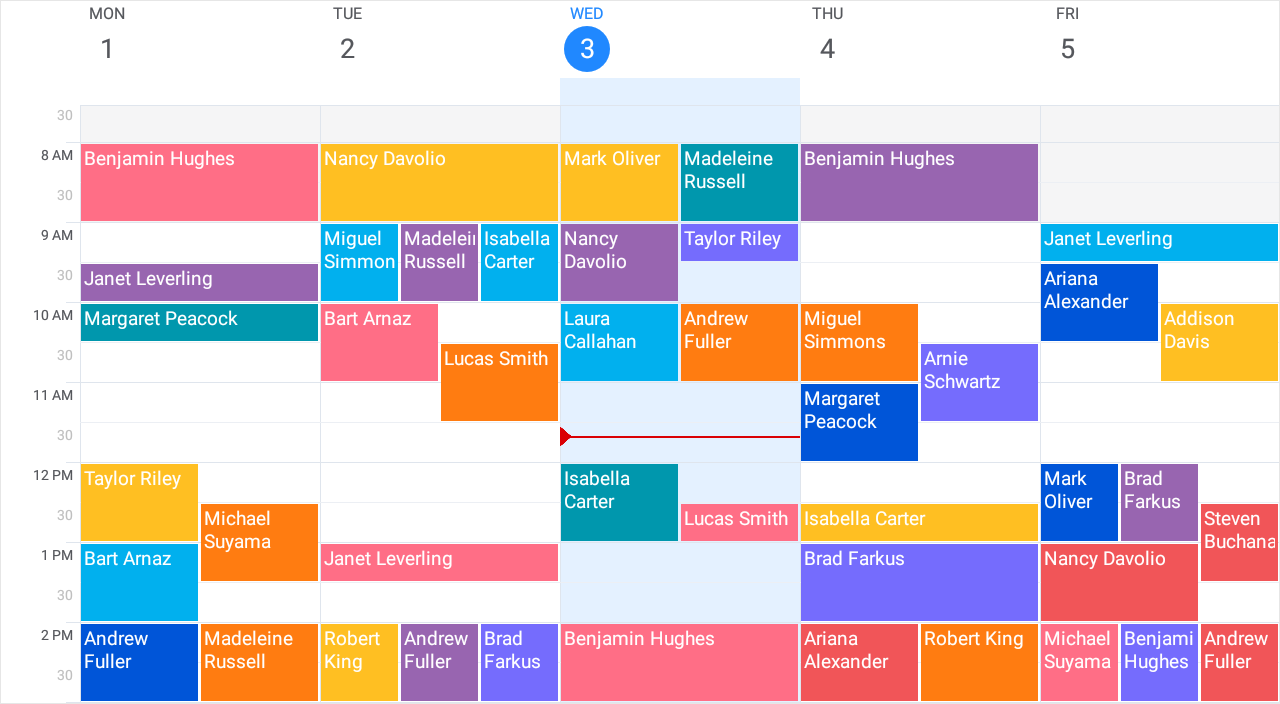
This tutorial explains how to create a WorkWeekView instance and associate it with a data source that stores appointments.
Create a New Application and Add a Scheduler
Create a new Xamarin.Forms cross-platform solution (for example, Scheduler_GettingStarted) and include the DevExpress Scheduler component.
In the main project’s App.xaml.cs file, call the DevExpress.XamarinForms.Scheduler.Initializer.Init() method to prepare DevExpress Scheduler for use in the application.
using Xamarin.Forms;

namespace Scheduler_GettingStarted {
    public partial class App : Application {
        public App() {
            DevExpress.XamarinForms.Scheduler.Initializer.Init();
            InitializeComponent();
            MainPage = new MainPage();
        }
    }
}
In the iOS project’s AppDelegate.cs file, call the DevExpress.XamarinForms.Scheduler.iOS.Initializer.Init() method.
using Foundation;
using UIKit;

namespace Scheduler_GettingStarted.iOS {
    [Register("AppDelegate")]
    public partial class AppDelegate : global::Xamarin.Forms.Platform.iOS.FormsApplicationDelegate {
        public override bool FinishedLaunching(UIApplication app, NSDictionary options) {
            global::Xamarin.Forms.Forms.Init();
            DevExpress.XamarinForms.Scheduler.iOS.Initializer.Init();
            LoadApplication(new App());

            return base.FinishedLaunching(app, options);
        }
    }
}
Tip
If you use the DevExpress Xamarin App v22.1 template to create an application, these method calls are automatically added to the code.
In the MainPage.xaml file of the .NET Standard project containing the shared code, use the dxsch prefix to declare a namespace and add a WorkWeekView to a content page:
<ContentPage xmlns="http://xamarin.com/schemas/2014/forms"
            xmlns:x="http://schemas.microsoft.com/winfx/2009/xaml"
            xmlns:dxsch="http://schemas.devexpress.com/xamarin/2014/forms/scheduler"
            xmlns:local="clr-namespace:Scheduler_GettingStarted"
            x:Class="Scheduler_GettingStarted.MainPage">
    <dxsch:WorkWeekView>
    </dxsch:WorkWeekView>
</ContentPage>
Prepare a Data Source
Add the following classes that represent data objects in the application:
- MedicalAppointment - An appointment (activity scheduled for a specific time interval) that should be rendered in the scheduler.
- ReceptionDeskData - A data source that stores data for the scheduler. The MedicalAppointments property provides access to appointments.
using System;
using System.Collections.ObjectModel;
using Xamarin.Forms;

namespace Scheduler_GettingStarted {
    public class MedicalAppointment {
        public int Id { get; set; }
        public DateTime StartTime { get; set; }
        public DateTime EndTime { get; set; }
        public string Subject { get; set; }
        public int LabelId { get; set; }
        public string Location { get; set; }
    }

    public class ReceptionDeskData {
        public static DateTime BaseDate = DateTime.Today;

        public static string[] PatientNames = { "Andrew Glover", "Mark Oliver",
                                                "Taylor Riley", "Addison Davis",
                                                "Benjamin Hughes", "Lucas Smith",
                                                "Robert King", "Laura Callahan",
                                                "Miguel Simmons", "Isabella Carter",
                                                "Andrew Fuller", "Madeleine Russell",
                                                "Steven Buchanan", "Nancy Davolio",
                                                "Michael Suyama", "Margaret Peacock",
                                                "Janet Leverling", "Ariana Alexander",
                                                "Brad Farkus", "Bart Arnaz",
                                                "Arnie Schwartz", "Billy Zimmer"};

        static Random rnd = new Random();

        void CreateMedicalAppointments() {
            int appointmentId = 1;
            int patientIndex = 0;
            DateTime start;
            TimeSpan duration;
            ObservableCollection<MedicalAppointment> result =
                                                     new ObservableCollection<MedicalAppointment>();
            for (int i = -20; i < 20; i++)
                for (int j = 0; j < 15; j++) {
                    int room = rnd.Next(1, 100);
                    start = BaseDate.AddDays(i).AddHours(rnd.Next(8, 17)).AddMinutes(rnd.Next(0, 40));
                    duration = TimeSpan.FromMinutes(rnd.Next(20, 30));
                    result.Add(CreateMedicAppointment(appointmentId, PatientNames[patientIndex],
                                                    start, duration, room));
                    appointmentId++;
                    patientIndex++;
                    if (patientIndex >= PatientNames.Length - 1)
                        patientIndex = 1;
                }
            MedicalAppointments = result;
        }

        MedicalAppointment CreateMedicAppointment(int appointmentId, string patientName,
                                                    DateTime start, TimeSpan duration, int room) {
            MedicalAppointment medicalAppointment = new MedicalAppointment();
            medicalAppointment.Id = appointmentId;
            medicalAppointment.StartTime = start;
            medicalAppointment.EndTime = start.Add(duration);
            medicalAppointment.Subject = patientName;

            // Assign one of the predefined labels to an appointment
            medicalAppointment.LabelId = rnd.Next(1, 10);

            medicalAppointment.Location = String.Format("{0}", room);
            return medicalAppointment;
        }

        public ObservableCollection<MedicalAppointment> MedicalAppointments { get; private set; }

        public ReceptionDeskData() {
            CreateMedicalAppointments();
        }
    }
}
Create the ReceptionDeskViewModel class that provides content the scheduler should display.
using System;
using System.Collections.Generic;
using System.ComponentModel;

namespace Scheduler_GettingStarted {
    public class ReceptionDeskViewModel : INotifyPropertyChanged {
        readonly ReceptionDeskData data;

        public event PropertyChangedEventHandler PropertyChanged;
        public DateTime StartDate { get { return ReceptionDeskData.BaseDate; } }
        public IReadOnlyList<MedicalAppointment> MedicalAppointments
                            { get => data.MedicalAppointments; }

        public ReceptionDeskViewModel() {
            data = new ReceptionDeskData();
        }

        protected void RaisePropertyChanged(string name) {
            if (PropertyChanged != null)
                PropertyChanged(this, new PropertyChangedEventArgs(name));
        }
    }
}
Bind Scheduler to Data
In the MainPage.xaml file:
- Assign the ReceptionDeskViewModel object to the content page’s BindingContext property.
- Set the WorkWeekView.DataStorage property to a SchedulerDataStorage object and use the SchedulerDataStorage.DataSource property to bind the scheduler view to a data source.
- Set the DataSource.AppointmentsSource property to the collection of appointment objects.
- Use the DataSource.AppointmentMappings property to map appointment properties to the MedicalAppointment class properties.
<ContentPage xmlns="http://xamarin.com/schemas/2014/forms"
            xmlns:x="http://schemas.microsoft.com/winfx/2009/xaml"
            xmlns:local="clr-namespace:Scheduler_GettingStarted"
            xmlns:dxsch="http://schemas.devexpress.com/xamarin/2014/forms/scheduler"
            x:Class="Scheduler_GettingStarted.MainPage">
    <ContentPage.BindingContext>
        <local:ReceptionDeskViewModel/>
    </ContentPage.BindingContext>
    <dxsch:WorkWeekView>
        <dxsch:WorkWeekView.DataStorage>
            <dxsch:SchedulerDataStorage>
                <dxsch:SchedulerDataStorage.DataSource>
                    <dxsch:DataSource AppointmentsSource="{Binding MedicalAppointments}">
                        <dxsch:DataSource.AppointmentMappings>
                            <dxsch:AppointmentMappings
                            Id="Id"
                            Start="StartTime"
                            End="EndTime"
                            Subject="Subject"
                            LabelId="LabelId"
                            Location="Location"/>
                        </dxsch:DataSource.AppointmentMappings>
                    </dxsch:DataSource>
                </dxsch:SchedulerDataStorage.DataSource>
            </dxsch:SchedulerDataStorage>
        </dxsch:WorkWeekView.DataStorage>
    </dxsch:WorkWeekView>
</ContentPage>
Note
Use this approach to bind a scheduler view of any type to a data source.
The scheduler displays appointments in a work week view with default settings.

The next lesson explains how to adjust the view settings.