Dashboard Description
- 10 minutes to read
This topic describes how to create a custom property for a dashboard. In this example, the custom property provides the editor to edit text and use this text as the dashboard’s description.
Create the Custom Functionality Module
The code is organized into a separate module you can integrate in any dashboard application.
Create the DashboardDescriptionModule class that serves as a custom functionality module and contains:
- a dashboard control that you pass as a parameter when you register the module,
- a custom property’s unique name,
- event subscriptions that are used to provide custom functionality,
- a ribbon in which you add a button to edit custom property’s value.
Note
You can use the IDashboardControl interface that provides common API for WinForms Designer and Viewer to write code that can be used in both controls simultaneously.
You can add control elements to the Ribbon / Toolbar to change the custom property’s value in the UI.
Use the DashboardDesignerBarExtensions class static methods to get the current Ribbon / Toolbar instance. The DashboardRibbonPage / DashboardToolbar and DashboardBarItemCategory values are used to indicate the button position.
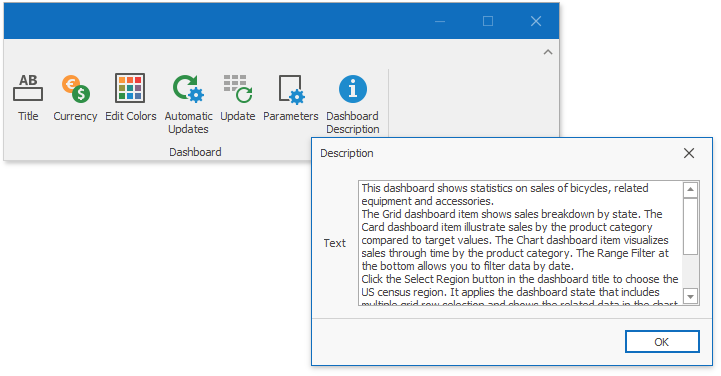
In this example, the Dashboard Description button is in the Dashboard group on the Dashboard’s Home page.
public class DashboardDescriptionModule {
public static readonly string PropertyName = "DashboardDescription";
readonly DashboardDesigner designer;
readonly SvgImage titleDescriptionImage;

public DashboardDescriptionModule(DashboardDesigner designer, SvgImage barImage = null, SvgImage titleDescriptionImage = null) {
    this.designer = designer;
    this.titleDescriptionImage = titleDescriptionImage;
    RibbonControl ribbon = (RibbonControl)designer.MenuManager;
    RibbonPage page = ribbon.GetDashboardRibbonPage(DashboardBarItemCategory.None, DashboardRibbonPage.Home);
    RibbonPageGroup group = page.Groups.GetGroupByText(DashboardWinLocalizer.GetString(DashboardWinStringId.RibbonPageDashboardCaption));
    BarButtonItem barItem = CreateBarItem("Dashboard Description", barImage);
    group.ItemLinks.Add(barItem);
    barItem.ItemClick += DescriptionBarItem_Click;
    designer.CustomizeDashboardTitle += Designer_CustomizeDashboardTitle;
    designer.DashboardCustomPropertyChanged += Designer_DashboardCustomPropertyChanged;
}
BarButtonItem CreateBarItem(string caption, SvgImage barImage) {
    BarButtonItem barItem = new BarButtonItem();
    barItem.Caption = caption;
    barItem.ImageOptions.SvgImage = barImage;
    return barItem;
}
Edit and Save the Custom Property’s Value
Create a new form where a user can edit the dashboard’s description text. Add a text editor and a button that saves changes. You can add them to the Layout Control and arrange controls within a form without them being overlapped and misaligned. The form should be invoked when a user clicks the button in the Ribbon. Closing the form saves the custom property’s value.
Use the DashboardDesigner.AddToHistory method to record a new custom property’s value and save the action to the Dashboard Designer’s history when a user changes the value. This method calls the CustomProperties.SetValue method and adds the information to the history item. You can undo/redo this action like other user actions.
void ShowDescriptionForm() {
    string currentCaption = designer.Dashboard.CustomProperties.GetValue(PropertyName);
    LayoutControl layoutControl = new LayoutControl();
    layoutControl.Dock = DockStyle.Fill;
    layoutControl.Name = "layoutControl1";

    LayoutControlItem memoEditLayoutItem = layoutControl.Root.AddItem();
    memoEditLayoutItem.TextLocation = Locations.Top;
    memoEditLayoutItem.Text = "Text:";
    MemoEdit memoEdit = new MemoEdit();
    memoEdit.Text = currentCaption;
    memoEditLayoutItem.Control = memoEdit;

    LayoutControlItem buttonLayoutItem = layoutControl.Root.AddItem();
    buttonLayoutItem.SizeConstraintsType = SizeConstraintsType.Custom;
    buttonLayoutItem.TextVisible = false;
    SimpleButton buttonOk = new SimpleButton();
    buttonOk.Text = "OK";
    buttonOk.DialogResult = DialogResult.OK;
    buttonOk.Click += (sender1, e1) => {
        string modifiedCaption = memoEdit.Text;
        if(currentCaption != modifiedCaption) {
            string status = !string.IsNullOrEmpty(modifiedCaption) ? "Remove" : "Add";
            CustomPropertyHistoryItem historyItem = new CustomPropertyHistoryItem(designer.Dashboard, PropertyName, modifiedCaption, status + " the dashboard caption");
            designer.AddToHistory(historyItem);
        }
    };
    buttonLayoutItem.Control = buttonOk;
    layoutControl.Root.AddItem(new EmptySpaceItem(), buttonLayoutItem, InsertType.Left);
    using(XtraForm form = new XtraForm()) {
        form.Text = "Description";
        form.Size = new System.Drawing.Size(250, 250);
        form.StartPosition = FormStartPosition.CenterParent;
        form.IconOptions.ShowIcon = false;
        form.Controls.Add(layoutControl);
        form.ShowDialog();
        }
    }

void DescriptionBarItem_Click(object sender, EventArgs e) {
    ShowDescriptionForm();
}
Apply the Custom Property’s Value to the Dashboard
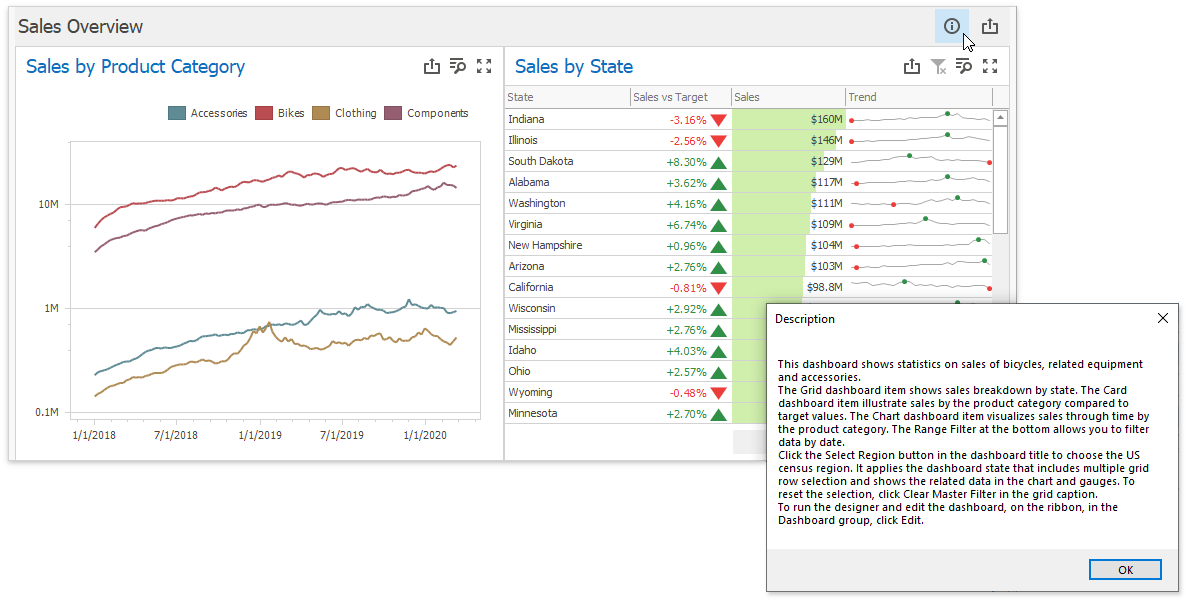
Handle the DashboardDesigner.CustomizeDashboardTitle event to create a new toolbar item that is used to show the dashboard’s description. Create the DashboardToolbarItem instance. If a custom property value is specified, add the created toolbar item to the CustomizeDashboardCaptionBaseEventArgs.Items collection.
Add an action that displays the description after you click it for the toolbar item. When you click the button, it invokes a window with the description text.
void Designer_CustomizeDashboardTitle(object sender, CustomizeDashboardTitleEventArgs e) {
    string text = designer.Dashboard.CustomProperties.GetValue(PropertyName);
    if(!string.IsNullOrEmpty(text)) {
        DashboardToolbarItem showDataItem = new DashboardToolbarItem("Description",
            new Action<DashboardToolbarItemClickEventArgs>((args) => {
                MessageBox.Show(text, "Description");
            }));
        showDataItem.SvgImage = titleDescriptionImage;
        e.Items.Insert(0, showDataItem);
    }
}
Update the Dashboard Description when the Value is Changed
Handle the DashboardDesigner.DashboardCustomPropertyChanged to update the custom property’s value when it is changed (for example, when you undo/redo actions).
Call the UpdateDashboardTitle method to raise the DashboardDesigner.CustomizeDashboardTitle event and hide/display the toolbar item according to the custom property’s value. The toolbar item should be displayed if the custom property’s value is not empty.
private void Designer_DashboardCustomPropertyChanged(object sender, DevExpress.DashboardCommon.CustomPropertyChangedEventArgs e) {
    if(e.Name == PropertyName) {
        designer.UpdateDashboardTitle();
    }
}
Register the Custom Functionality Module
The code below is a complete module you need to add the Dashboard’s Dashboard Description option:
using System;
using System.Windows.Forms;
using DevExpress.DashboardCommon;
using DevExpress.DashboardWin;
using DevExpress.Utils;
using DevExpress.Utils.Svg;
using DevExpress.XtraBars;
using DevExpress.XtraBars.Ribbon;
using DevExpress.XtraEditors;
using DevExpress.XtraLayout;
using DevExpress.XtraLayout.Utils;
using DevExpress.DashboardWin.Localization;

namespace WindowsFormsAppCustomProperties {
    public class DashboardDescriptionModule {
        public static readonly string PropertyName = "DashboardDescription";
        readonly DashboardDesigner designer;
        readonly SvgImage titleDecriptionImage;
        public DashboardDescriptionModule(DashboardDesigner designer, SvgImage barImage = null, SvgImage titleDecriptionImage = null) {
            this.designer = designer;
            this.titleDecriptionImage = titleDecriptionImage;
            RibbonControl ribbon = (RibbonControl)designer.MenuManager;
            RibbonPage page = ribbon.GetDashboardRibbonPage(DashboardBarItemCategory.None, DashboardRibbonPage.Home);
            RibbonPageGroup group = page.Groups.GetGroupByText(DashboardWinLocalizer.GetString(DashboardWinStringId.RibbonPageDashboardCaption));
            BarButtonItem barItem = CreateBarItem("Dashboard Description", barImage);
            group.ItemLinks.Add(barItem);
            barItem.ItemClick += DescriptionBarItem_Click;
            designer.CustomizeDashboardTitle += Designer_CustomizeDashboardTitle;
            designer.DashboardCustomPropertyChanged += Designer_DashboardCustomPropertyChanged;
        }
        BarButtonItem CreateBarItem(string caption, SvgImage barImage) {
            BarButtonItem barItem = new BarButtonItem();
            barItem.Caption = caption;
            barItem.ImageOptions.SvgImage = barImage;
            return barItem;
        }
        void DescriptionBarItem_Click(object sender, EventArgs e) {
            ShowDescriptionForm();
        }
        void ShowDescriptionForm() {
            string currentCaption = designer.Dashboard.CustomProperties.GetValue(PropertyName);
            LayoutControl layoutControl = new LayoutControl();
            layoutControl.Dock = DockStyle.Fill;
            layoutControl.Name = "layoutControl1";

            LayoutControlItem memoEditLayoutItem = layoutControl.Root.AddItem();
            memoEditLayoutItem.TextLocation = Locations.Top;
            memoEditLayoutItem.Text = "Text:";
            MemoEdit memoEdit = new MemoEdit();
            memoEdit.Text = currentCaption;
            memoEditLayoutItem.Control = memoEdit;

            LayoutControlItem buttonLayoutItem = layoutControl.Root.AddItem();
            buttonLayoutItem.SizeConstraintsType = SizeConstraintsType.Custom;
            buttonLayoutItem.TextVisible = false;
            SimpleButton buttonOk = new SimpleButton();
            buttonOk.Text = "OK";
            buttonOk.DialogResult = DialogResult.OK;
            buttonOk.Click += (sender1, e1) => {
                string modifiedCaption = memoEdit.Text;
                if(currentCaption != modifiedCaption) {
                    string status = !string.IsNullOrEmpty(modifiedCaption) ? "Remove" : "Add";
                    CustomPropertyHistoryItem historyItem = new CustomPropertyHistoryItem(designer.Dashboard, PropertyName, modifiedCaption, status + " the dashboard caption");
                    designer.AddToHistory(historyItem);
                }
            };
            buttonLayoutItem.Control = buttonOk;
            layoutControl.Root.AddItem(new EmptySpaceItem(), buttonLayoutItem, InsertType.Left);

            using(XtraForm form = new XtraForm()) {
                form.Text = "Description";
                form.Size = new System.Drawing.Size(250, 250);
                form.StartPosition = FormStartPosition.CenterParent;
                form.IconOptions.ShowIcon = false;
                form.Controls.Add(layoutControl);
                form.ShowDialog();
            }
        }
        void Designer_CustomizeDashboardTitle(object sender, CustomizeDashboardTitleEventArgs e) {
            string text = designer.Dashboard.CustomProperties.GetValue(PropertyName);
            if(!string.IsNullOrEmpty(text)) {
                DashboardToolbarItem showDataItem = new DashboardToolbarItem("Description",
                    new Action<DashboardToolbarItemClickEventArgs>((args) => {
                        MessageBox.Show(text, "Description");
                    }));
                showDataItem.SvgImage = titleDecriptionImage;
                e.Items.Insert(0, showDataItem);
            }
        }
        void Designer_DashboardCustomPropertyChanged(object sender, CustomPropertyChangedEventArgs e) {
            if(e.Name == PropertyName)
                designer.UpdateDashboardTitle();
        }
    }
}
Register the created module before you load a dashboard to apply settings. For this, create a new DashboardDescriptionModule instance and pass the Dashboard Designer for which you register a property. You can create the SvgImageCollection instance to store vector images and use one of them as the bar item’s icon.
using WindowsFormsAppCustomProperties;
//...
public Form1() {
    InitializeComponent();
    new DashboardDescriptionModule(dashboardDesigner1, svgImageCollection1["about"], svgImageCollection1["Description"]);
    dashboardDesigner1.LoadDashboard("../../Dashboard/newDashboard.xml");
//...
}
Result
After you registered the DashboardDescriptionModule module, it adds the Dashboard Description button that invokes the editor where you can edit the dashboard’s description.
When you specify the description and click OK, the “Description” button is added to the dashboard title. Click the button to display the description.
The information about the DashboardDescription property’s state is saved in history, so you can undo/redo the current action.