Access and Customize Rich Text Editor Controls
- 6 minutes to read
This topic describes how to access and customize the following controls in XAF applications with the Office Module:
Platform | Control | Purpose |
|---|---|---|
ASP.NET Core Blazor | Displays Rich Text documents | |
WinForms | Displays Rich Text documents |
This topic describes the following tasks:
- Specify font size, spell checker availability, and paper type (ASP.NET Core Blazor, Windows Forms).
- Change Toolbar and Ribbon Tab availability (Windows Forms).
- Specify a Menu Manager for a Detail View (Windows Forms).
- Change the document storage format (Windows Forms).
- Specify the editor height in a List View (Windows Forms).
ASP.NET Core Blazor: Access the Rich Text Editor Control
Follow these steps to access the DxRichEditModel component model. A component model defines a Blazor component in code. When you modify the model, the underlying component reflects these changes. For more information about component models, refer to the following topic: Underlying Controls and Components Behind UI Elements (ASP.NET Core Blazor).
- In the Controllers folder of the YourSolutionName.Blazor.Server project, create a custom ViewController.
- In the Controller’s
OnActivatedmethod, use the CustomizeViewItemControl<T>(DetailView, Controller, Action<T>) extension method to customize theRichTextPropertyEditor. In the event handlers, access the
DevExpress.ExpressApp.Office.Blazor.Components.Models.DxRichEditModelcomponent model and do the following:- Specify its
ViewTypeproperty to change a document view layout type (see ViewType). - Enable spell checker.
- Specify the document’s font size.
- Specify the paper type.
File:
YourSolutionName.Blazor.Server\Controllers\BlazorRichEditController.csusing DevExpress.Drawing.Printing; using DevExpress.ExpressApp; using DevExpress.ExpressApp.Office.Blazor.Components.Models; using DevExpress.ExpressApp.Office.Blazor.Editors; using DevExpress.ExpressApp.Office.Blazor.Editors.Adapters; using DevExpress.XtraRichEdit; using Microsoft.AspNetCore.Components; namespace dxTestSolution.Blazor.Server.Controllers; public class BlazorRichEditController : ViewController<DetailView> { protected override void OnActivated() { base.OnActivated(); View.CustomizeViewItemControl<RichTextPropertyEditor>(this, CustomizeRichTextEditor); } void CustomizeRichTextEditor(RichTextPropertyEditor propertyEditor) { DxRichEditModel richEditModel = propertyEditor.ComponentModel; // Specify the View type. richEditModel.ViewType = DevExpress.Blazor.RichEdit.ViewType.Simple; // Enable spell checker. For more information, refer to the following topic: // https://docs.devexpress.com/Blazor/DevExpress.Blazor.RichEdit.SpellCheck.SpellCheckExtensions richEditModel.CheckSpelling = true; richEditModel.DocumentCulture = "en-US"; if (propertyEditor.PropertyValue == null) { var documentLoadedHandler = richEditModel.DocumentLoaded; // Specify the document's font size. richEditModel.DocumentLoaded = EventCallback.Factory.Create<DevExpress.Blazor.RichEdit.Document>(this, async document => { await documentLoadedHandler.InvokeAsync(document); await document.ChangeDefaultCharacterPropertiesAsync(properties => { properties.FontSize = 22; }); // Specify the paper type. foreach (var section in await document.Sections.GetAllAsync()) { await section.ChangePropertiesAsync(properties => { properties.PaperKind = DXPaperKind.A2; }); } }); } // Set up the document. propertyEditor.CustomizeRichEditDocumentServer += CustomizeDocument; } void CustomizeDocument(object sender, CustomizeRichEditDocumentServerEventArgs e) { e.RichEditDocumentServer.EmptyDocumentCreated += SetupDocument; } // Specify the document's font size. private void SetupDocument(object sender, EventArgs e) { RichEditDocumentServer richEditDocumentServer = (RichEditDocumentServer)sender; richEditDocumentServer.Document.DefaultCharacterProperties.FontSize = 22; } }- Specify its
Windows Forms: Access the Rich Text Editor Control
- In the Controllers folder of the YourSolutionName.Win project, create a custom ViewController.
- Add two assemblies to project references: DevExpress.SpellChecker.v25.2.dll and DevExpress.XtraSpellChecker.v25.2.dll.
Override the
OnActivatedmethod and use the CustomizeViewItemControl<T>(DetailView, Controller, Action<T>) extension method. Create and set up the SpellChecker object and pass this object to the SpellChecker property.File:
YourSolutionName.Win\Controllers\WinRichEditController.csusing DevExpress.Drawing.Printing; using DevExpress.ExpressApp; using DevExpress.ExpressApp.Office.Win; using DevExpress.XtraRichEdit; using DevExpress.XtraSpellChecker; namespace YourSolutionName.Win; public partial class WinRichEditController : ViewController<DetailView> { protected override void OnActivated() { base.OnActivated(); View.CustomizeViewItemControl<RichTextPropertyEditor>(this, (propertyEditor) => { // Specify the View type. propertyEditor.RichEditControl.ActiveViewType = RichEditViewType.Simple; // Enable spell checker. For more information refer to the following topic: // https://docs.devexpress.com/WindowsForms/9889/controls-and-libraries/rich-text-editor/spell-checking SpellChecker spellChecker = new SpellChecker(); spellChecker.SetSpellCheckerOptions(propertyEditor.RichEditControl, new OptionsSpelling()); spellChecker.SpellCheckMode = SpellCheckMode.AsYouType; propertyEditor.RichEditControl.SpellChecker = spellChecker; // Setup the document. propertyEditor.RichEditControl.EmptyDocumentCreated += SetupDocument; }); } private void SetupDocument(object sender, EventArgs e) { RichEditControl richEditControl = (RichEditControl)sender; // Specify the font size. richEditControl.Document.DefaultCharacterProperties.FontSize = 22; // Specify the paper type. foreach (var section in richEditControl.Document.Sections) { section.Page.PaperKind = DXPaperKind.A2; } } }
Note
The spell checker uses an English dictionary by default. To see how to change the dictionary, refer to the following topic: Dictionaries.
Change Toolbar and Ribbon Tab Availability
The RichTextPropertyEditor menu does not display all available toolbars and ribbon tabs. Use the static RichTextPropertyEditor.DefaultRichEditToolbarType property to customize toolbars. The available toolbars and tabs are listed in the RichEditToolbarType enumeration.
using DevExpress.XtraRichEdit;
using DevExpress.ExpressApp.Office.Win;
// ...
RichTextPropertyEditor.DefaultRichEditToolbarType =
    RichEditToolbarType.Home | RichEditToolbarType.Insert | RichEditToolbarType.File |
    RichEditToolbarType.FloatingObject | RichEditToolbarType.Table | RichEditToolbarType.HeaderFooter;
Handle the MenuManagerController.CustomizeRichEditToolbarType event to change toolbar and tab availability for a single editor:
- Create a View Controller in the Windows Forms application project (YourSolutionName.Win\Controllers).
- Access the
MenuManagerControllerand subscribe to itsCustomizeRichEditToolbarTypeevent in the overriddenOnActivatedmethod. In the event handler, specify the
CustomizeRichEditToolbarTypeEventArgs.RichEditToolbarTypeproperty.File:
YourSolutionName.Win\Controllers\CustomRichEditController.csusing DevExpress.ExpressApp; using DevExpress.ExpressApp.Office.Win; using DevExpress.XtraRichEdit; namespace YourSolutionName.Win.Controllers; public class CustomRichEditController : ViewController { protected override void OnActivated() { base.OnActivated(); MenuManagerController controller = Frame.GetController<MenuManagerController>(); if (controller != null) { controller.CustomizeRichEditToolbarType += Controller_CustomizeRichEditToolbarType; } } private void Controller_CustomizeRichEditToolbarType(object sender, CustomizeRichEditToolbarTypeEventArgs e) { e.RichEditToolbarType = RichEditToolbarType.Home | RichEditToolbarType.Insert | RichEditToolbarType.File | RichEditToolbarType.FloatingObject | RichEditToolbarType.Table | RichEditToolbarType.HeaderFooter; } }
You can also use the Toolbar Customization menu at runtime. The result is saved to the user’s model differences.
Customize Ribbon Categories and Items
Handle the CustomizeRibbonControl event to customize the ribbon. Use the event argument’s RibbonControl property to access ribbon settings.
using DevExpress.ExpressApp;
using DevExpress.ExpressApp.Office.Win;
using DevExpress.XtraRichEdit;

namespace YourSolutionName.Win.Controllers;
public class CustomRichEditController : ViewController {
    protected override void OnActivated() {
        base.OnActivated();
        MenuManagerController controller = Frame.GetController<MenuManagerController>();
        if (controller != null) {
            controller.CustomizeRibbonControl += Controller_CustomizeRibbonControl;
        }
    }
        private void Controller_CustomizeRibbonControl(object sender, CustomizeRibbonControlEventArgs e) {
            BarButtonItem customButton = e.RibbonControl.Items.CreateButton("Test");
            MenuManagerController menuManagerController = (MenuManagerController)sender;
            var defaultCategory = menuManagerController.RibbonObjectsContainer.RichRibbonCategories.FirstOrDefault(t => t.Text == "RichText");
            defaultCategory.Pages[0].Groups[0].ItemLinks.Add(customButton);
        }
}
Use Model Editor to Customize Rich Text Editors
This section demonstrates how to use the Model Editor to customize the Rich Text Property Editor in a Windows Forms project.
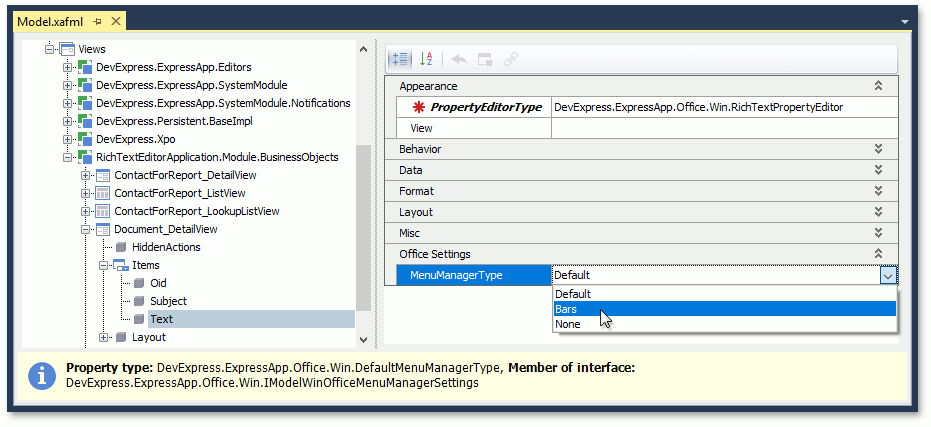
Specify MenuManagerType for a Detail View
The RichTextPropertyEditor menu manager can display a Ribbon Control or Bars.
Navigate to the Views | <DetailView> | Items | <PropertyEditor> node and set the editor’s MenuManagerType:
Change the Document Storage Format
Set the BOModel | <Class> | OwnMembers | <Member> node’s DocumentStorageFormat property to the desired format (RTF or HTML) for string properties.
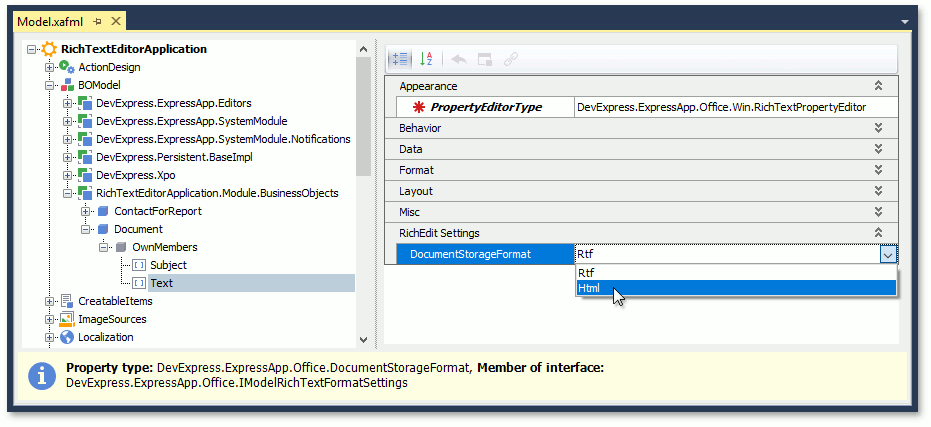
You can use a byte array property to save documents in the DOCX format or a string property to store documents in the RTF and HTML formats.
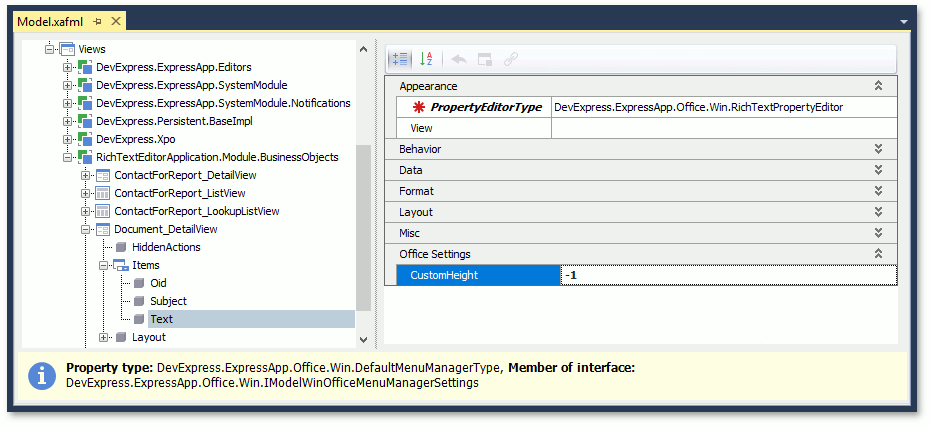
Specify the Editor Height (Embedded Cell Viewer/Editor)
In WinForms applications, the Rich Text Editor’s height is fixed and equal to the height of a single-line editor.
To change the editor’s height, set the IModelRichTextColumn.CustomHeight property in the Views | <ListView> | Columns | <Column> node.
Set the CustomHeight property to -1 to allow the grid control to automatically calculate the row height based on the Rich Text Editor’s content in WinForms.