Controllers (UI Logic & Interaction)
- 6 minutes to read
Building an XAF application usually involves three steps:
- Implement the business model
- Customize the default UI
- Add custom features to change your application’s flow and implement end-user interaction
You use Controllers for the last step. XAF ships multiple built-in Controllers that generate the default UI (for example, validation, navigation, and search). To implement a custom feature, create a Controller class derived from ExpressApp.Controller, ExpressApp.ViewController, or ExpressApp.WindowController. This topic explains how to create Controllers.
Controllers Overview
Controllers serve two main purposes:
Perform specific actions when a Window (Frame) is created or destroyed.
When a Window (Frame) is created, all the Controllers that are intended for it are activated, which means that the corresponding events are raised (see Controller.Activated). You can handle these events to implement features related to the current Window (Frame) or its View. When a Window (Frame) is disposed of, its Controllers are deactivated, which means that the corresponding event is raised (see Controller.Deactivated). This way you can perform specific actions when closing a Window or disposing of a Frame.
Extend the user interface.
Usually, features require user interaction. For this purpose, Controllers can serve as containers for Actions. Actions are objects that are abstract UI elements, and can be displayed in a UI using controls: a button, combo box, submenu, and so on. To respond to a user’s changes with an action control, handle the corresponding Action’s events.
Like most XAF entities, controller information defined in the application’s modules is loaded into the Application Model. You can access controller settings in the IModelControllers node. Refer to this node’s description for the list of available customizations.
WindowController, ViewController, and Controller Classes
In code, Controllers derive from Controller. Usually, you do not inherit from this base class directly. Instead, inherit from one of its predefined descendants:
- ExpressApp.ViewController (including its generic versions: ViewController<ViewType> and ObjectViewController<ViewType, ObjectType>)
- ExpressApp.WindowController.
These classes include the Controller.Activated and Controller.Deactivated events. Use these events to run code when a Window (Frame) is created or destroyed. In these event handlers, access the Window (Frame) and its View through the ViewController‘s Controller.Frame and ViewController.View properties. The WindowController class exposes the Window through the WindowController.Window property.
Though these two classes have a great deal in common, you should use them in different scenarios.
View Controllers
View Controllers are intended for implementing features (filter, search, etc.) for Views. Basically, you need to use a View Controller every time you implement a data-aware feature.
Actions contained in a View Controller accompany Views for which the Controller is activated. For instance, if a Controller is activated for a nested List View (List View of a collection property), its Actions will be attached to this View, not to the entire Window.
View Controllers are activated for both Windows and Frames when a View is set to a Window/Frame. However, you can specify the type or ID of the View that you need to be contained in the Window or Frame. For this purpose, use the following ViewController‘s properties:
-
Specifies the View type: List View, Detail View, or any other View. The default value of this property is Any.
ViewController.TargetViewNesting
Specifies whether the current Controller is allowed to be activated for the root View, nested View, or any other View. The default value of this property is Any.
ViewController.TargetObjectType
Specifies the type of a persistent object displayed by the View.
-
Specifies the View ID. This ID is specified in the Application Model.
Window Controllers
Window Controllers are activated when a Window or a Frame is created, and intended for implementing features for Windows (features that are not related to specific Views). As such, these features are not usually related to data. An example can be a Controller that changes the appearance of a navigation control in the main Window (refer to the How to: Access the Navigation Control topic to see an example). The Actions contained in Window Controllers are always displayed in a Window, regardless of what View is currently displayed.
Window Controllers are activated for Windows only. You can additionally specify the Window type for which the Controller will be activated. For this purpose, use the Controller’s WindowController.TargetWindowType property. Its value can be set to Any, Main, or Child. Note that XAF applications have a single Main window, which is displayed first. The remaining windows are Child windows.
Implement Custom Controllers
If a Controller, together with its Actions, is UI-independent, it should be implemented in a Module project. At the same time, there may be a UI-specific task. In this instance, a Controller should be developed in a UI-specific Module. If your solution does not contain this project, implement it in an application project.
Controllers in XAF support dependency injection in ASP.NET Core Blazor and Windows Forms applications.
Add a Controller at Design Time
You can use the ready-to-use Controller templates to create a custom Controller.
In the Solution Explorer, select a project to which you want to add a Controller. Right-click the Controllers folder located inside the project to invoke the context menu and select Add | New Item…. In the opened dialog, select DevExpress 26.1 Template Kit, specify the controller name, and click Add to invoke the Template Kit.
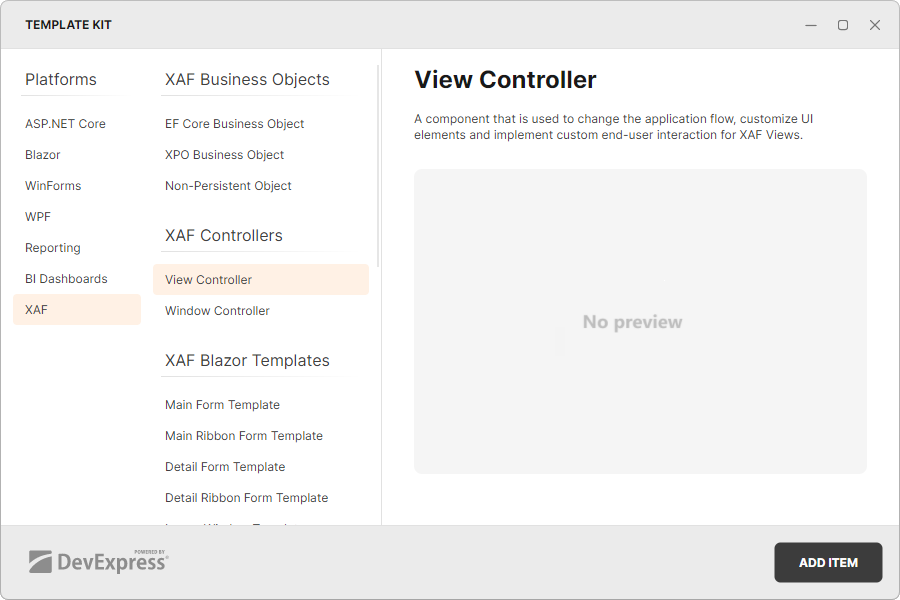
Select Window Controller or View Controller and click the ADD ITEM button to add a new Controller to your project.
Add a Controller in Code
Add a new class to a Module project (MySolution.Module or MySolution.***.Module). If your solution does not contain platform-specific Module projects, you can add a class to the application project. Inherit this class from one of the following classes:
In the Controller’s constructor, specify the target View or Window and create Actions.
- Implement custom logic in the Controller event handlers.
Tip
Alternatively, you can add Actions and Controllers with a few keystrokes using CodeRush templates.
View Controller
using DevExpress.ExpressApp;
using DevExpress.Persistent.BaseImpl;
// ...
public class MyViewController : ViewController<ListView> {
    protected override void OnActivated() {
        base.OnActivated();
        View.CustomizeViewItemControl<PropertyEditorType>(this, editor => {
            if (editor.ComponentModel is ComponentModelType componentModelType) {
                // Customize the underlying component
            }
        });
    }

    protected override void OnDeactivated() {
        // Unsubscribe from previously subscribed events and release other references and resources.
        base.OnDeactivated();
    }
}
Window Controller
using DevExpress.ExpressApp;
using DevExpress.ExpressApp.SystemModule;
// This Controller changes the caption in the main application window.
public class CustomizeWindowController : WindowController {
    public CustomizeWindowController() {
        TargetWindowType = WindowType.Main;
    }
    protected override void OnActivated() {
        base.OnActivated();
        WindowTemplateController controller = Frame.GetController<WindowTemplateController>();
        controller.CustomizeWindowCaption += Controller_CustomizeWindowCaption;
    }
    private void Controller_CustomizeWindowCaption(object sender, CustomizeWindowCaptionEventArgs e) {
        e.WindowCaption.Text = "My Custom Caption";
    }
    protected override void OnDeactivated() {
        base.OnDeactivated();
        WindowTemplateController controller = Frame.GetController<WindowTemplateController>();
        controller.CustomizeWindowCaption -= Controller_CustomizeWindowCaption;
    }
}
Note
CodeRush allows you to add Actions and Controllers with a few keystrokes. To learn about the Code Templates for XAF, refer to the following help topic: XAF Templates.