Prompt to Report Behavior in the WinForms Report Designer (CTP)
- 8 minutes to read
This help topic describes how to integrate the AI-powered Prompt-to-Report functionality into the Report Designer. Once integrated, users can create reports by specifying a prompt (report description in natural language).
Important
The Prompt-to-Report functionality is currently available as a community technology preview (CTP).
Install NuGet Packages
Install the following NuGet packages:
Azure.AI.OpenAI (Version=”2.2.0-beta.4”)
This tutorial uses Azure OpenAI. Refer to the AI-powered Extensions help topic for information about NuGet packages required for other supported AI services.
DevExpress.AIIntegration.WinForms.Reporting(requires .NET 8 or .NET Framework v4.7.2 and higher)
Optional:
DevExpress.Win.Design(for .NET projects)
Register AI Client
The following code snippet registers an Azure OpenAI client at application startup:
using Azure.AI.OpenAI;
using DevExpress.AIIntegration;
using Microsoft.Extensions.AI;
using System.ClientModel;

internal static class Program {
    static string AzureOpenAIEndpoint { get { return "AZURE_OPENAI_ENDPOINT"; } }
    static string AzureOpenAIKey { get { return "AZURE_OPENAI_APIKEY"; } }
    static string DeploymentName { get { return "MODEL_NAME"; } } // For example, gpt-4.1.
    [STAThread]
    static void Main(){
        IChatClient client = new AzureOpenAIClient(
            new Uri(AzureOpenAIEndpoint),
            new ApiKeyCredential(AzureOpenAIKey))
                .GetChatClient(DeploymentName).AsIChatClient();
        AIExtensionsContainerDesktop.Default.RegisterChatClient(client);
        ApplicationConfiguration.Initialize();
        Application.Run(new Form1());
    }
}
Note
Review the following help topic for information on how to register other supported AI services: How to Register an AI Client.
Create and Configure a Behavior Object
Follow the steps below to attach a Prompt-to-Report Behavior to the WinForms Report Designer control at design time:
- Drop the BehaviorManager component from the Toolbox onto a Form.
(For .NET Framework Projects) Use the Register AI-Powered Behaviors option in the BehaviorManager’s smart tag menu to add the “AI-Powered Behaviors” submenu with report behaviors to
BehaviorManager.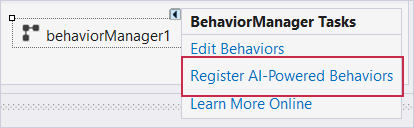
Use the Edit Behaviors option in the BehaviorManager’s smart tag menu to access the behavior collection.
Add a Report Prompt-to-Report Behavior and specify its settings:
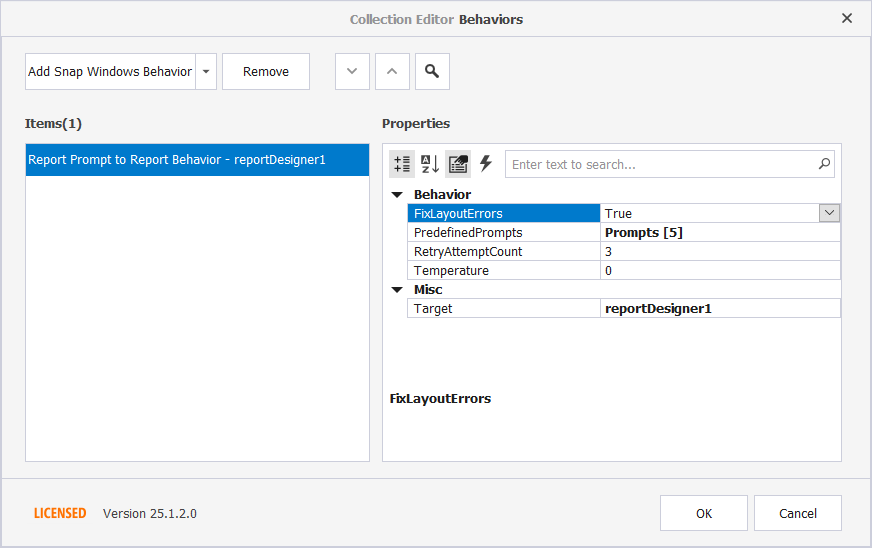
The following settings are available:
FixLayoutErrors
Specifies whether the designer attempts to fix the report layout in case of overlapping report controls.
RetryAttemptCount
Defines the number of attempts to fix report layout errors that may appear in the LLM response. The default value is 3.
Predefined Prompts
Specifies predefined prompts that can be used for the report creation.
Temperature
Controls output randomness. Lower temperatures (values between 0 and 0.5) yield more predictable and focused outputs, while higher temperatures (values between 0.5 and 1) produce more diverse and creative responses. The default value is 0.
Target
Attaches behaviors to DevExpress controls.
Create and Configure a Behavior Object in Code
The following code registers a ReportPromptToReportBehavior and attaches it to the WinForms Report Designer control:
using DevExpress.AIIntegration.WinForms.Reporting;
// ...
public partial class Form1 : Form {
    public Form1() {
        InitializeComponent();
        behaviorManager1.Attach<ReportPromptToReportBehavior>(reportDesigner1, behavior => {
           // ...
        });
    }
}
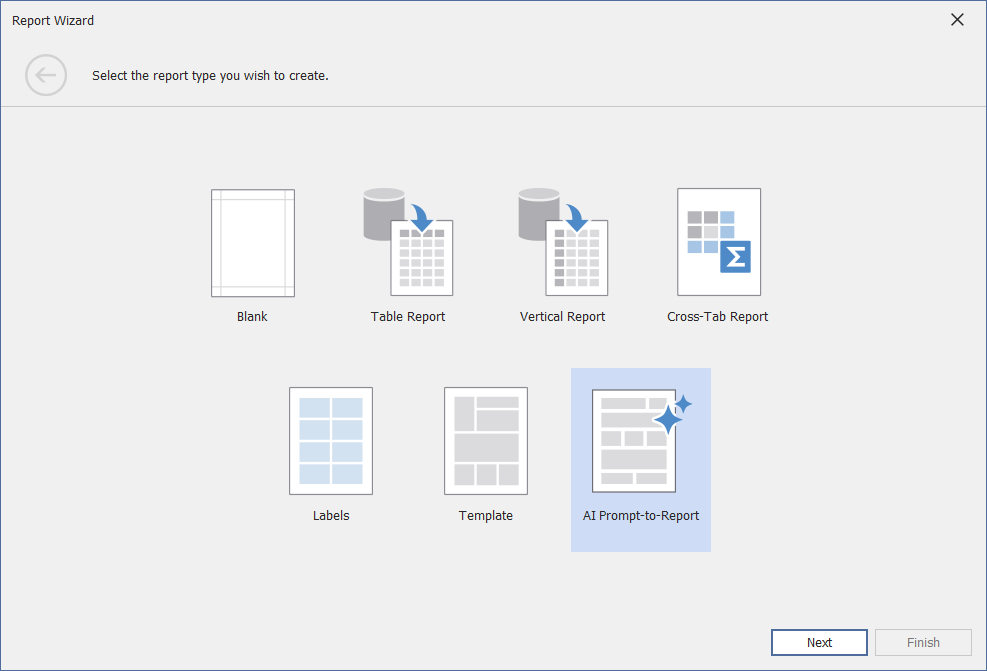
Create Reports
Once the behavior is registered, the Report Wizard interface displays the new AI Prompt-to-Report option. Select this option to create the AI-generated report.
The AI-powered report generation works with two data source options:
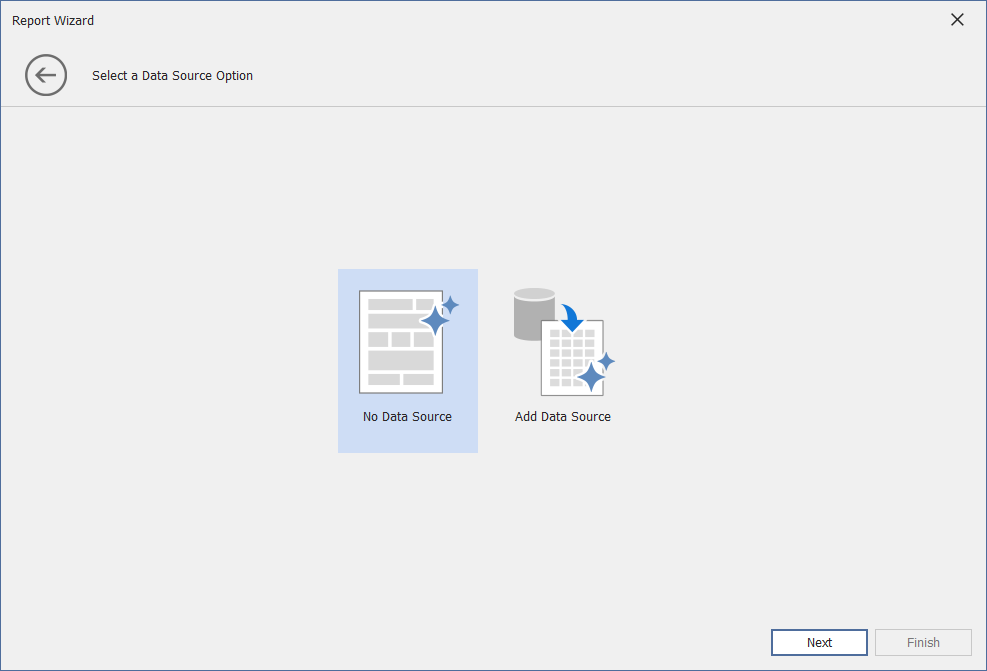
-
Creates a complete report structure based only on the user’s natural language description.
-
Allows users to create a report data source in the first step, displays the data source structure in the Report Wizard interface, and automatically includes this metadata in the LLM prompt. Users can reference available data source fields when they describe data-bound report elements.
No Data Source Option
If you select No Data Source, the “Enter Report Description” page appears. The Report Wizard interface includes a prompt input area with placeholder fields that guide users toward detailed prompts. Specify and configure a prompt and click Finish to see the result.

The following image illustrates the resulting report:
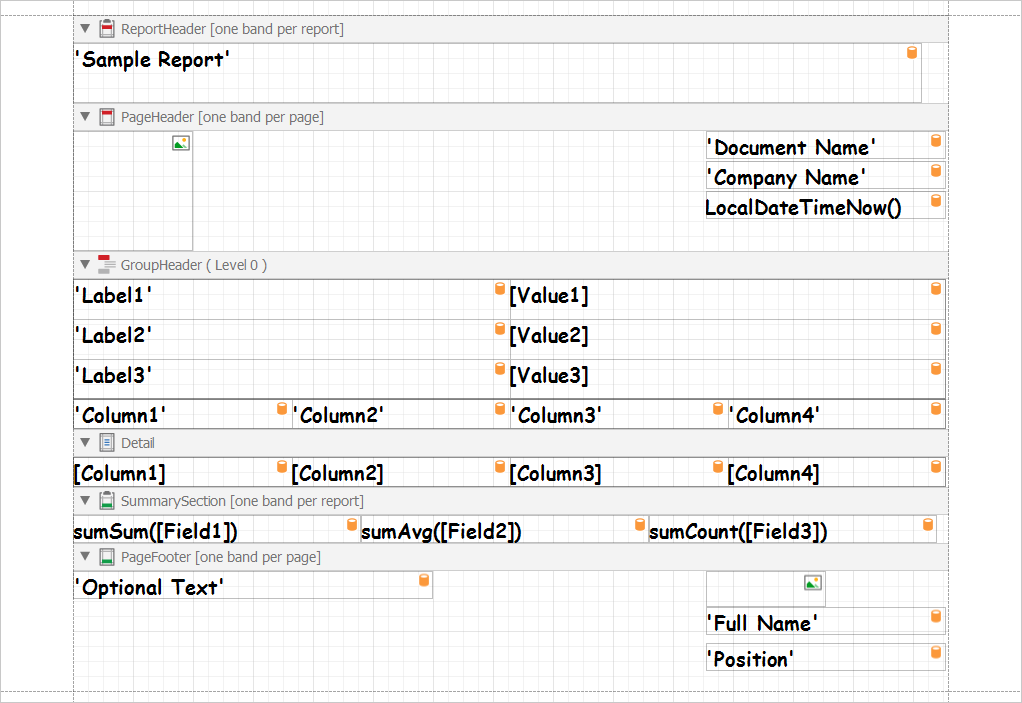
You can review the report layout and bind elements to data as needed.
Note
You can either adjust predefined prompts or write a new prompt from scratch. Review the Configure Report Prompt section for more information.
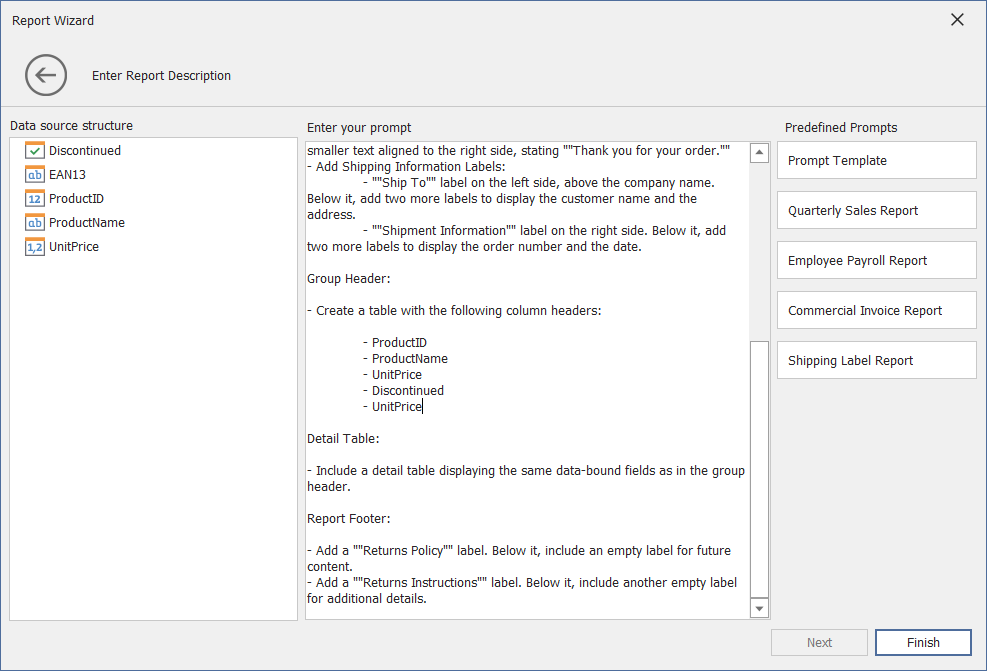
Add Data Source Option
If you select Add Data Source, the Wizard proceed you to the Select a Data Connection page to create a data connection.
After you connected to a data source, the “Enter Report Description” page appears. The Report Wizard interface includes a prompt input area with placeholder fields that guide users toward detailed prompts. The “Data Source Structure” field list contains the resulting data source schema. You can add field names to a prompt to create a data-bound report.
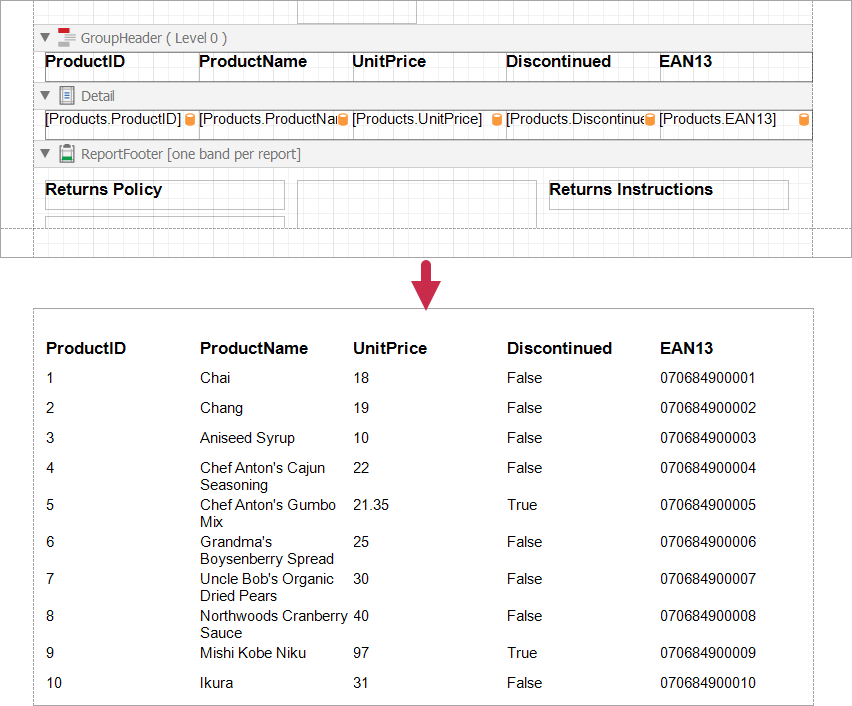
The following image illustrates the data-bound report and its preview:
Note
You can either adjust predefined prompts or write a new prompt from scratch. Review the Configure Report Prompt section for more information.
Configure Report Prompt
General Tips
The output quality depends on the details you specify in the natural language description. Users should include detailed information about layout preferences, calculations, grouping requirements, and visualization types. Like other LLM implementations, the system has limitations and may need adjustments to meet your requirements.
You can specify Temperature to control the output randomness and use RetryAttemptCount to increase the number of attempts to fix report layout errors that may appear in the LLM response.
Configure Predefined Prompts
Built-in prompt suggestions show useful examples. You can review these to create your own prompts. For example, check the “Prompt Template” entry - a basic template you can customize. You can set up page layout, styles, fields, and functions. Other templates cover common report types, like invoices.
Note that prompt changes made in the Report Wizard do not persist.
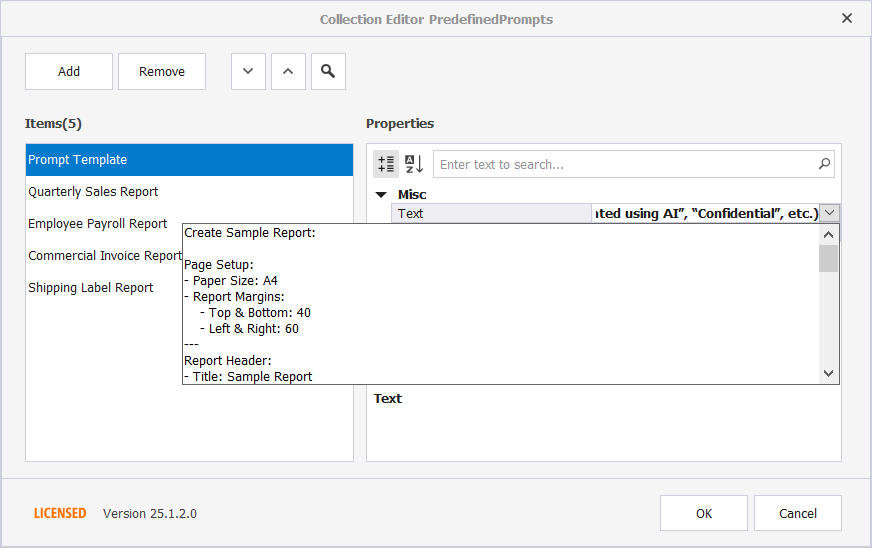
To make permanent changes to built-in prompts, access the PredefinedPrompts collection in the BehaviorManager at design time. Modify prompt “Text” and “Title”. You can also add custom prompts to the collection at design time or in code.
Add a New Prompt
The following code snippet obtains built-in DevExpress prompts from AIReportPromptCollection, creates a custom prompt (an AIReportPrompt object), and adds this prompt to the collection. The collection is assigned to the ReportPromptToReportBehaviorProperties.PredefinedPrompts property.
using DevExpress.AIIntegration.WinForms.Reporting;
// ...
public partial class Form1 : Form {
    public Form1() {
        behaviorManager1.Attach<ReportPromptToReportBehavior>(reportDesigner1, behavior => {
            // Obtain built-in DevExpress prompts from the collection.
            var collection = AIReportPromptCollection.GetDefaultReportPrompts();
            // Create a custom prompt.
            AIReportPrompt customPrompt = new AIReportPrompt();
            customPrompt.Title = "Custom Prompt";
            customPrompt.Text = Prompts.CustomAIReportPrompt;
            // Add this prompt to the collection.
            collection.Add(customPrompt);
            // Display Prompts in the Report Wizard.
            behavior.Properties.PredefinedPrompts = collection;
        });
    }
    public static class Prompts {
        public const string CustomAIReportPrompt = "Create Sample Report:\r\n \r\nPage Setup:\r\n- Paper Size: A4\r\n- Report Margins:\r\n - Top & Bottom: 40\r\n - Left & Right: 60\r\n\r\nReport Header:\r\n- Title: Sample Report\r\n- Alignment: Center\r\n- Font: Comic Sans MS, 12pt, Bold\r\n\r\nCreate a horizontal table with the four column headers that correspond to fields in the bound data source.\r\n\r\nFont for column headers: Comic Sans MS, 12pt, Bold\r\n \r\nDetail Section:\r\nBind data cells to the fields corresponding to the column headers defined in the Group Header\r\nFont for data cells: Comic Sans MS, 12pt, Bold\r\n \r\nSummary Section:\r\nInclude calculated values for bound fields.\r\nSummary type: [Sum]\r\nFont for summary values: Comic Sans MS, 12pt, Bold";
    // ...
    }
}
At design time, you can add this prompt using the Collection Editor of PredefinedPrompts:
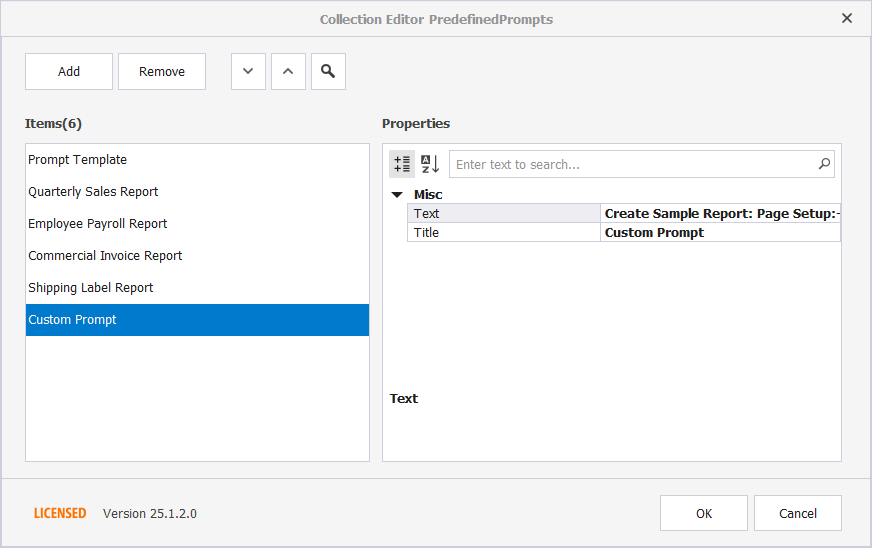
After you added a custom prompt to the collection it appears in the Report Wizard:
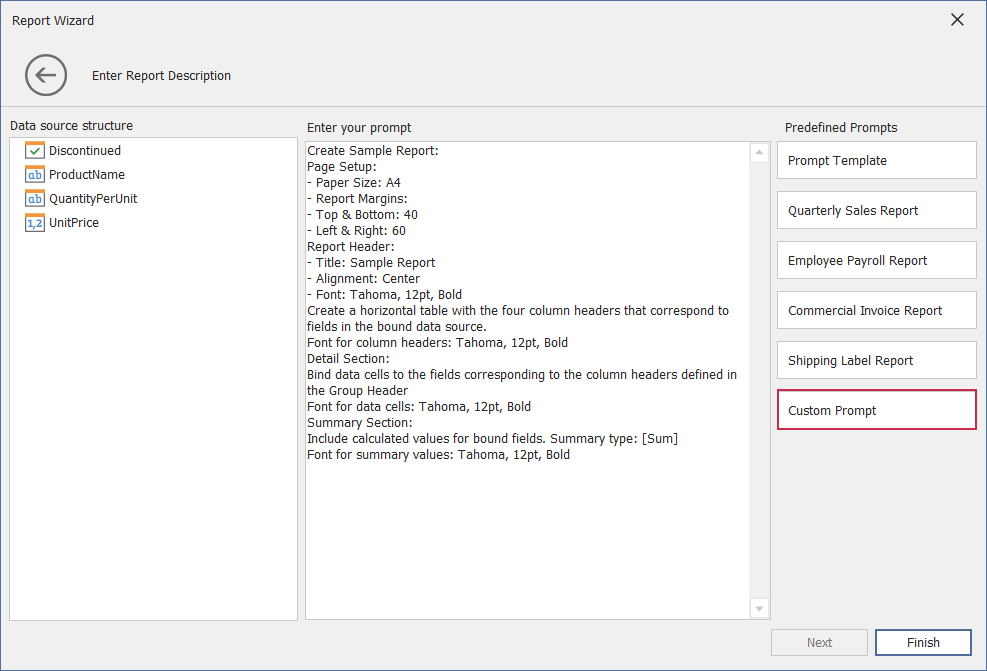
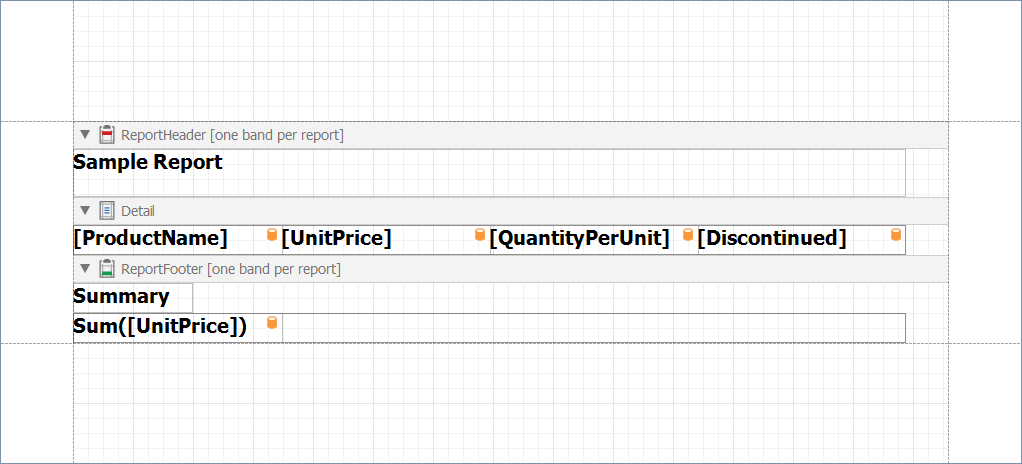
The following image illustrates the result:
More Examples
The following example creates and registers the AI-powered Report Wizard manually. This approach allows you to incorporate AI options within the Wizard and customize associated pages as needs dictate.