Modify Report Behavior in the WinForms Report Designer (CTP)
- 6 minutes to read
This help topic describes how to integrate the AI-powered Modify Reports functionality into the Report Designer. You can chat with an AI Assistant to make adjustments to your report layout. This functionality is available for .NET 8+.
Important
The Modify Report functionality is currently available as a community technology preview (CTP).
Install NuGet Packages
Install the following NuGet packages:
DevExpress.AIIntegration.WinForms.ReportingDevExpress.Win.Design(activates design-time features for DevExpress WinForms UI controls in .NET projects)- Microsoft.Extensions.AI.OpenAI (Version=”10.5.1”)
Azure.AI.OpenAI (Version=”2.3.0-beta.2”)
This help topic uses Azure OpenAI. See the following help topic for information about supported AI services and required NuGet packages: AI-powered Extensions.
See the following help topic for information on how to install DevExpress NuGet packages: Install DevExpress Products
Note
DevExpress AI-powered extensions follow the “bring your own key” principle. DevExpress does not offer a REST API and does not ship any built-in LLMs/SLMs. You need an active Azure/Open AI subscription to obtain the REST API endpoint, key, and model deployment name. These variables must be specified at application startup to register AI clients and enable DevExpress AI-powered Extensions in your application.
Change Project SDK
Update the project SDK to Microsoft.NET.Sdk.Razor.
<Project Sdk="Microsoft.NET.Sdk.Razor">
Register AI Client
The following code snippet registers an Azure OpenAI client at application startup:
using Azure.AI.OpenAI;
using DevExpress.AIIntegration;
using Microsoft.Extensions.AI;
using System.ClientModel;

internal static class Program {
    static string AzureOpenAIEndpoint { get { return "AZURE_OPENAI_ENDPOINT"; } }
    static string AzureOpenAIKey { get { return "AZURE_OPENAI_APIKEY"; } }
    static string DeploymentName { get { return "MODEL_NAME"; } } // For example, gpt-5.2.
    [STAThread]
    static void Main(){
        IChatClient client = new AzureOpenAIClient(
            new Uri(AzureOpenAIEndpoint),
            new ApiKeyCredential(AzureOpenAIKey))
                .GetChatClient(DeploymentName).AsIChatClient();
        AIExtensionsContainerDesktop.Default.RegisterChatClient(client);
        ApplicationConfiguration.Initialize();
        Application.Run(new Form1());
    }
}
Create and Configure a Behavior Object
Follow the steps below to attach a Report Modify Behavior to the WinForms Report Designer control at design time:
- Drop the BehaviorManager component from the Toolbox onto a Form that contains the Report Designer.
- Use the Edit Behaviors option in the BehaviorManager’s smart tag menu to access the behavior collection.
Add a Report Modify Behavior and specify its settings:
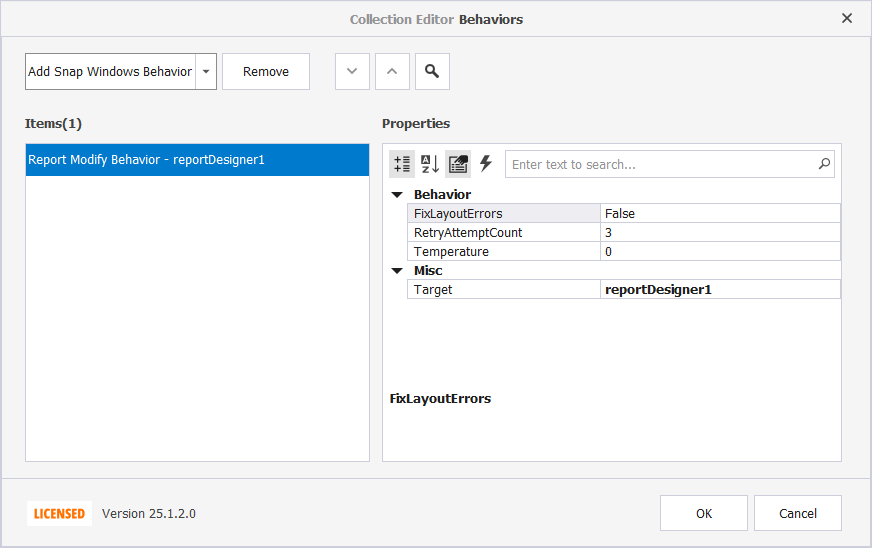
The following settings are available:
FixLayoutErrorsSpecifies whether the designer attempts to fix the report layout when report controls overlap.
RetryAttemptCountDefines the maximum number of attempts to fix report layout errors that may appear in the LLM response. The default value is 3.
TemperatureControls how creative or deterministic the LLM’s responses are. Lower temperatures (values between 0 and 0.5) yield more predictable and focused outputs, while higher temperatures (values between 0.5 and 1) produce more diverse and creative responses. The default value is 0.
TargetAttaches behaviors to DevExpress controls.
Create and Configure a Behavior Object in Code
Use the following code to register a ReportModifyBehavior and attach it to the reportDesigner1 UI component created at design time from the Toolbox:
using DevExpress.AIIntegration.WinForms.Reporting;

public partial class Form1 : Form {
    public Form1() {
        InitializeComponent();
        behaviorManager1.Attach<ReportModifyBehavior>(reportDesigner1, behavior => {
           behavior.Properties.FixLayoutErrors = true;
           behavior.Properties.Temperature = 0.5f;
           behavior.Properties.RetryAttemptCount = 2;
        });
    }
}
The following code registers a ReportModifyBehavior and attaches it to the WinForms Report Designer control (XRDesignMdiController):
using DevExpress.XtraReports.UI;
using DevExpress.AIIntegration.WinForms.Reporting;

public partial class Form1 : Form {
    public Form1() {
        InitializeComponent();
        // Create a new blank report instance or use your report.
        XtraReport report = new XtraReport();

        // Create a ReportDesignTool to configure and display the report in the Report Designer.
        ReportDesignTool designTool = new ReportDesignTool(report);

        // Attach AI-powered behavior to the Report Designer's MDI controller.
        behaviorManager1.Attach<ReportModifyBehavior>(designTool.DesignRibbonForm.DesignMdiController, behavior => {
            // Enable automatic layout error correction in the report.
            behavior.Properties.FixLayoutErrors = true;

            // Set the creativity level of AI suggestions (range: 0 = deterministic, 1 = creative).
            behavior.Properties.Temperature = 0.5f;

            // Define the number of retry attempts for AI operations in case of failure.
            behavior.Properties.RetryAttemptCount = 2;
        });

        // Display the Report Designer with a ribbon UI.
        designTool.ShowRibbonDesigner();
    }
}
Note
Call the BehaviorInitializer.Initialize() method at application startup if your project targets the .NET Framework and you create AI-powered behaviors in code. Otherwise, an exception is thrown.
internal static class Program {
    [STAThread]
    static void Main() {
        //...
        // The Initialize() method forcibly initializes the behavior manager in .NET Framework apps.
        DevExpress.AIIntegration.WinForms.Reporting.BehaviorInitializer.Initialize();
        Application.Run(new Form1());
    }
}
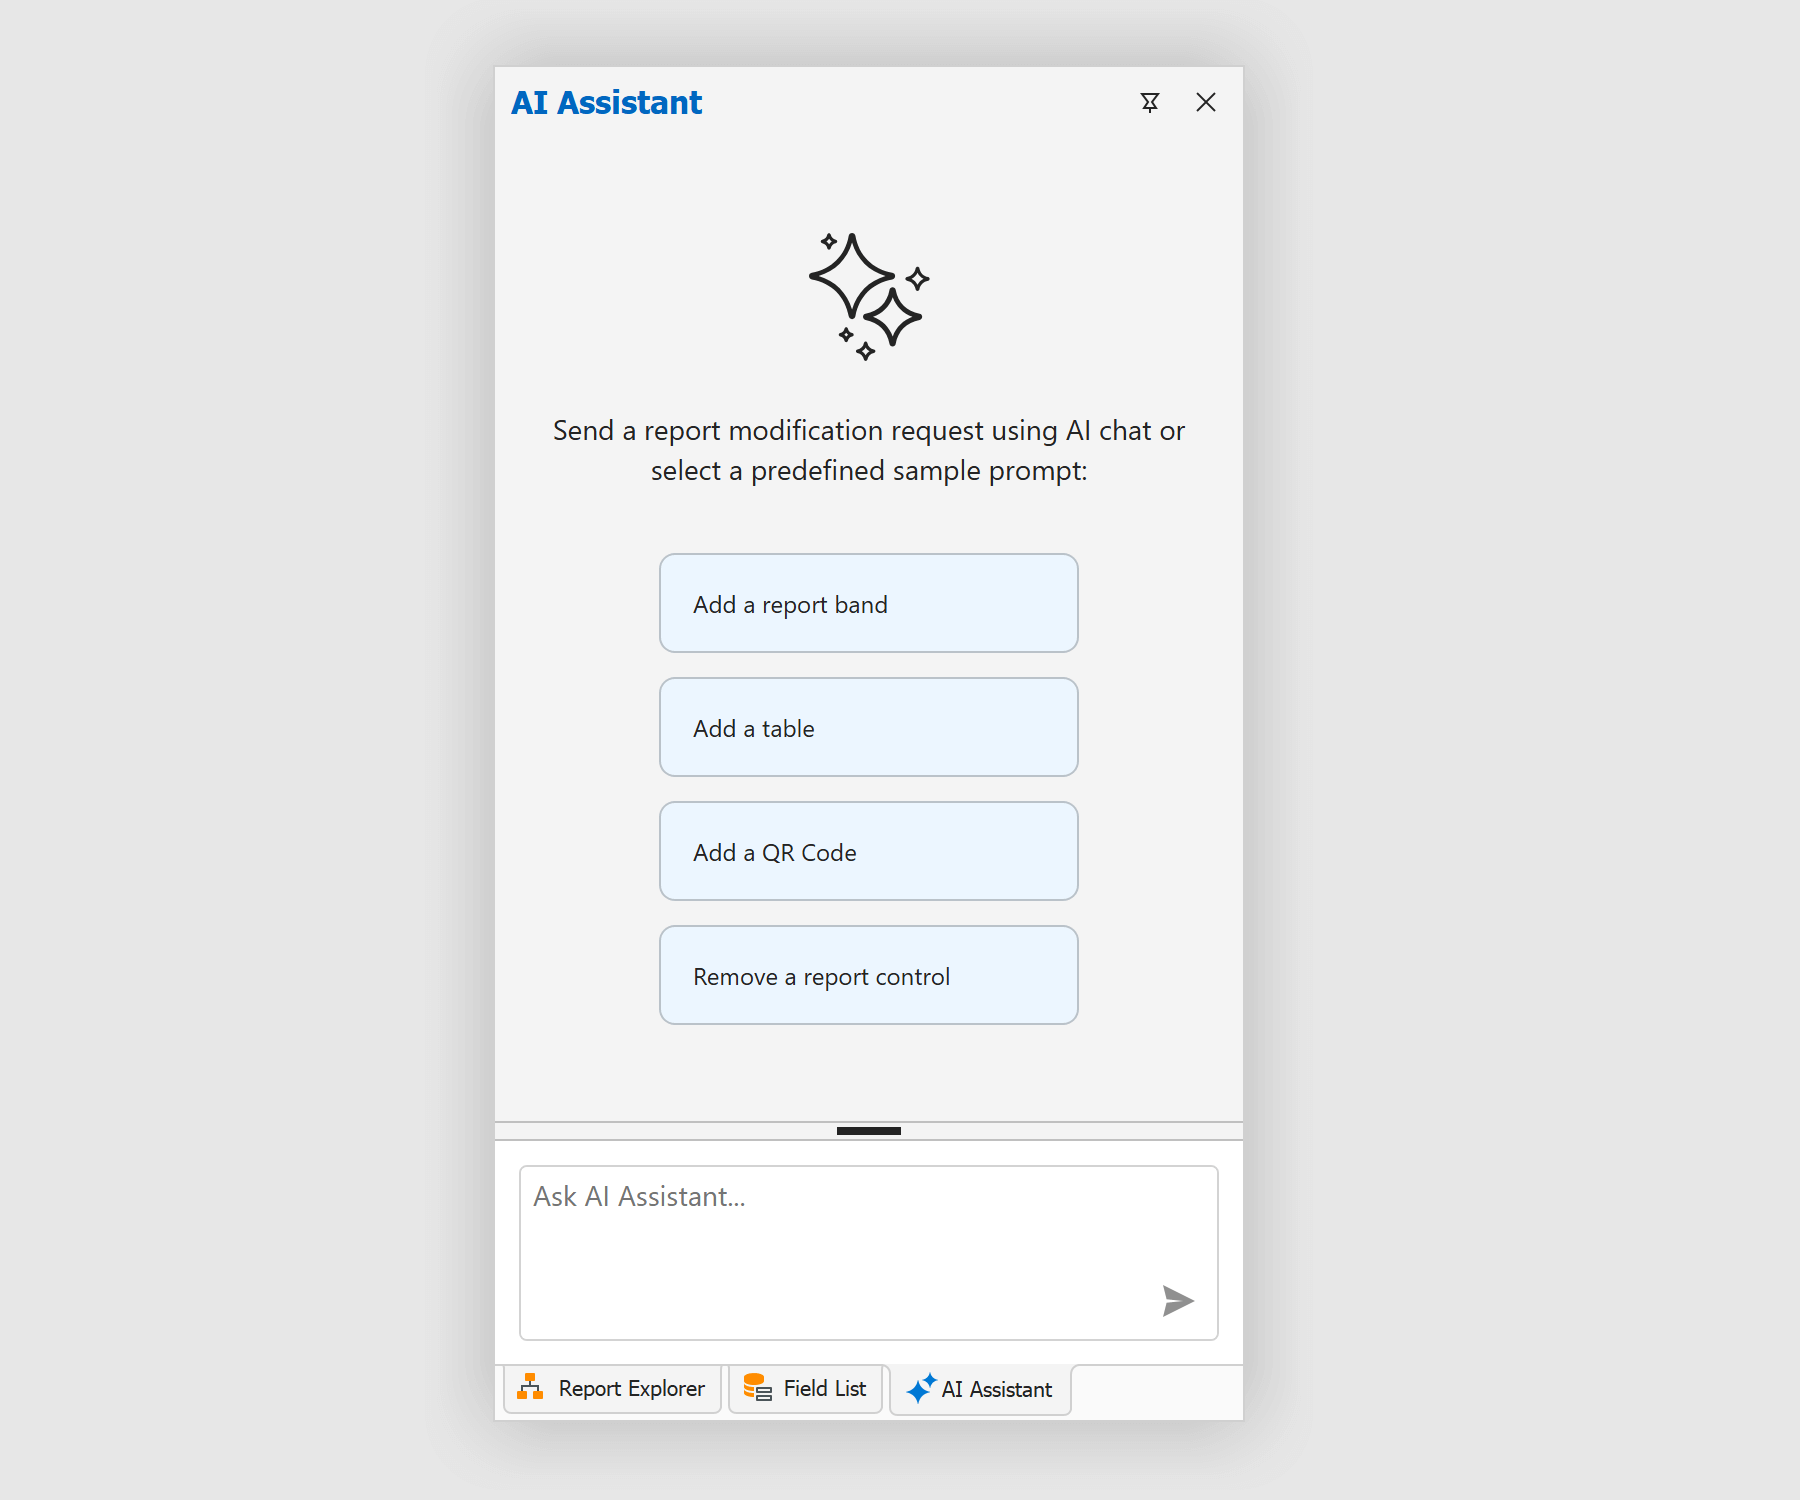
Modify Reports
Once the behavior is registered, the Report Designer interface displays the AI Assistant panel.
The chat in the AI assistant window allows you to add and modify report elements using natural language. For example, you can execute commands such as:
Add/remove report bands
Add a report header band.Add/remove report controls (labels, tables, barcodes, etc.)
Add a 3x3 table to the Detail band.
Remove the following controls from the report layout:
- label1
- pictureBox1
Find report controls by name and modify associated properties (text, expression binding, background and foreground colors, etc.)
Set the xrTable1 table to full width.
Set the column widths as follows:
- First column: 50%
- Second column: 25%
- Third column: 25%
Set the background color of all cells in the first column to green.
Modify report properties (margins, paper kind, etc.)
Modify report settings.
Margins:
- Left & Right: 60
- Top & Bottom: 40
Report Header:
- Title: Sample Report
- Font: Tahoma, 14pt, Bold
- Alignment: Center
Group, sort, and filter report data
Group the report by the "State" field.
Create a label in the group header. Bind the label to the "State" field.
Note
The output quality depends on the details you specify in the natural language description. It is also influenced by the underlying language model — including its architecture, size, and training data. Different LLM implementations may yield varying results due to differences in model capabilities.