Create an ASP.NET Core Backend Application with Angular UI and Document Viewer
- 4 minutes to read
This document describes how to use the DevExpress Template Gallery or .NET Core command line interface (CLI) to generate a Single-Page Application (SPA) with an ASP.NET Core project that works as an API backend and an Angular CLI project that works as a UI and contains the Document Viewer control.
Tip
See ASP.NET Core Reporting for information about DevExpress Reporting in ASP.NET Core applications.
The Create a Report in Visual Studio tutorial provides instructions on how to add a report to an ASP.NET Core application.
Use the DevExpress Template Gallery
Perform the following steps to create an ASP.NET Core application in Visual Studio:
Select FILE | New | Project in the main menu or press CTRL+SHIFT+N to create a new project.
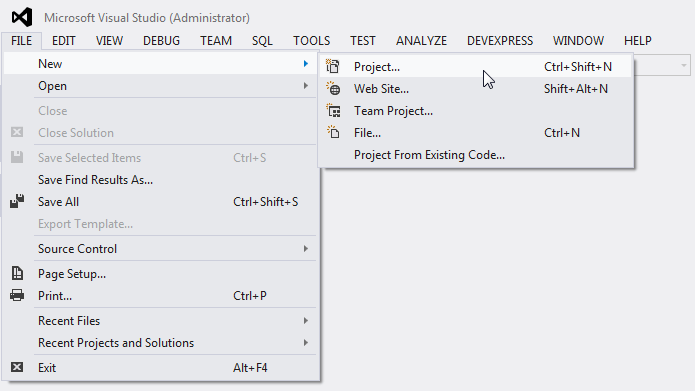
Select the Installed | Visual C# | Web category in the invoked New Project dialog and select the DevExpress v20.1 Template Gallery template.
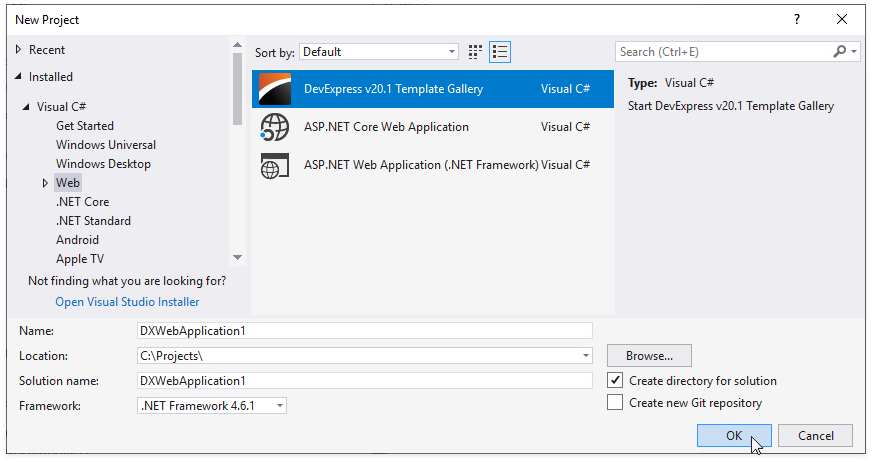
Specify the application name and click OK.
Select Reporting Angular Application from the NET Core category in the invoked DevExpress Template Gallery.

Select framework version and click Create Project.
Enable the Add Viewer Page checkbox in the invoked DevExpress ASP.NET MVC Project Wizard to add the Document Viewer to the web application (the report-viewer.html file).
Tip
You can add a Web Document Viewer and a Report Designer to the application.
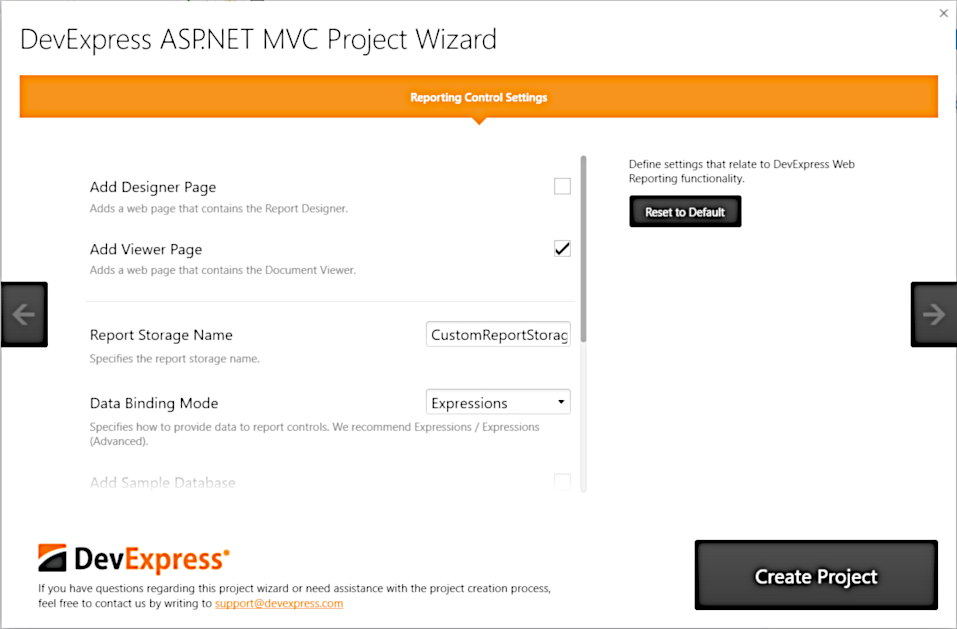
Use the following Document Viewer settings:
- Report Storage Name - Specifies the name of a sample server-side report storage. This storage allows users to open report layout files (REPX) from the Reports folder and instances of report types predefined in the assembly.
- Data Binding Mode - Specifies the data fetch mode for report controls. You can switch between legacy binding mode and expression bindings.
Click Create Project to apply these settings to the project.
Once Visual Studio created an application, right-click the ClientApp | package.json file in the Solution Explorer window and choose Restore Packages (you should run Visual Studio with administrator privileges).
You can specify a report to open in the Document Viewer when the application starts. Navigate to the ClientApp | src | app | report-viewer | report-viewer.ts file and replace the built-in report name with the name of your report:
reportUrl: string = "TestReport";This loads the report with the specified name into the Document Viewer.
Use the Console
Use the .NET Core command line interface (CLI) to create an ASP.NET Core Reporting application from the console:
Open the console and type the following command to install DevExpress CLI templates:
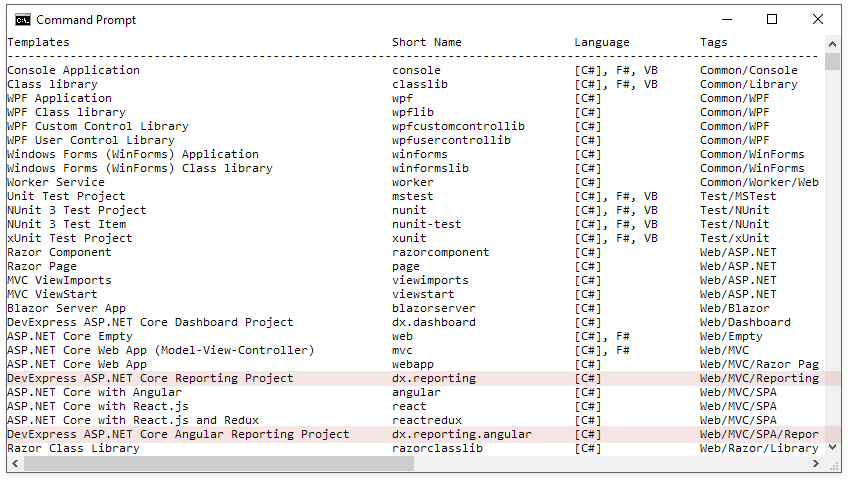
dotnet new -i "DevExpress.DotNet.Web.ProjectTemplates"The console displays the list of templates installed on your machine after the installation command is finished.
Refer to the https://nuget.devexpress.com/#feed-url page and obtain the NuGet Feed URL. This URL includes your personal feed authorization key and is used to install NuGet packages for the Document Viewer.
Use the command below to create a new project with a Document Viewer.
dotnet new dx.reporting.angular --nuget-feed https://nuget.devexpress.com/{auth_key}/api --name DocumentViewerApp --add-viewer trueSpecify the following command line parameters to customize the project:
- -nf | –nuget-feed (required) - Specifies your personal DevExpress NuGet Feed URL.
- -f |–framework (optional) to specify the framework to target. Use values netcoreapp2.1 or netcoreapp3.0. The default value is netcoreapp3.0.
- -av | –add-viewer - Specifies whether to create a web page with a Document Viewer. The default value is true.
- -ul | –use-logger (optional) - Specifies whether to log the Report Designer‘s server-side errors and events. The default value is false.
See Create an ASP.NET Core Backend Application with Angular UI and Report Designer for information on other settings.
Run the commands below to navigate to the created application’s folder and download the client resources.
cd DocumentViewerApp\ClientAppnpm installTip
Make sure Node.js 8.0 or later with the npm package manager is installed on your computer.
Use the node -v and npm -v console commands on 64-bit Windows systems to check package versions.
Check the PATH environment variable’s value if a package’s version does not match the version you installed, as there may be a conflict between an x86 and x64 package.Use the following commands to restore dependencies, build the application, and get the application’s URL:
cd ..dotnet restoredotnet runOpen your browser and insert the generated URL to see the result.
