Get Started
- 4 minutes to read
This topic describes how to change the Microsoft Excel-inspired Office 2019 Colorful theme from blue colors to green.
Create a New Theme
Run the Theme Designer. Open the Get Started Tab and select Create a New Theme.

Select a base theme and version for your new theme. In this example, we selected the Office 2019 Colorful theme v20.1.3.

Specify a theme name (Colorful_Excel) and path. Your new theme name should be different from the base theme name.

- Click Create.
The Theme Designer copies the Office 2019 Colorful base theme and adds it to the specified directory.
Edit a Theme
Set up preview
The Theme Designer allows you to preview DevExpress and standard controls with your theme applied.
Click Build or use F6 to build the theme.

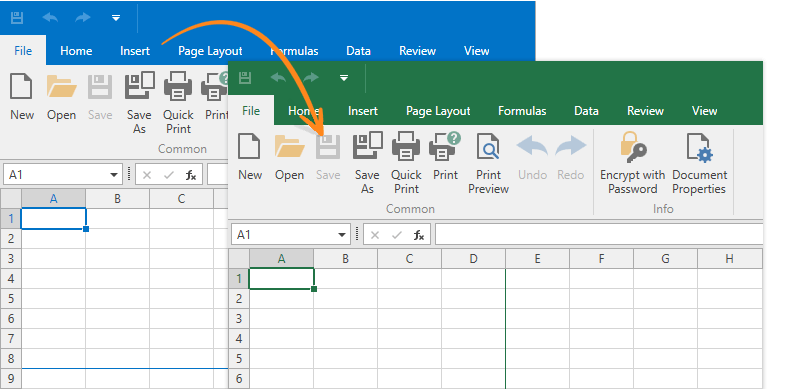
Select the Spreadsheet with Ribbon in the Navigation window to preview the theme.

Select the element
Enable the Inspect Element tool in the ribbon or use Ctrl+D, hold down Ctrl+Shift, and click the Ribbon header to select the element.

Filter colors
Use the ribbon icon or Ctrl+E to enable the Filter Colors tool and display only the selected element’s colors.

Find similar colors
Copy the Backstage.Window.Background color value, disable the Filter Colors tool, and paste the copied color value into the Palette Window search box. When you paste the color into the search box, the palette window will only display palette colors with the same value.

Change the colors
To the right of the palette color value, click the color value and select the Color Picker tool. Pick the accent color associated with Excel. The Color Picker tool copies the color to the clipboard. Use the value copied to the clipboard for all palette colors in the search results.

Find and change other colors
Disable the search in the Palette window. Repeat steps 4 and 5 for the Backstage.Delimeter, Backstage.HoverBackground, and Backstage.SelectionBackground palette colors. Pick the Excel colors from the following elements:

Save all files
Use Ctrl+Shift+S or the Save All icon to save all changes.

Edit XAML Files
This section describes how to find and edit the XAML code for an element.
Open the SplashScreen preview in the Navigation window.
Enable the Inspect Element tool, hold down Ctrl+Shift, and click the SplashScreen‘s progress bar. The Theme Designer opens the XAML code for this element in the CodeView Window.

Open the Properties Window to see the selected element’s properties. To the right of the TextElement.Foreground property, click the Inherited link to navigate to the template where the property is specified.

To the right of the Background property, click the Style link to open the XAML file where the property is defined.

In the CodeView Window, Click the ProgressBarBackgroundBrush static resource and use F12 to navigate to the XAML code where the SolidColorBrush key is specified. Change the Color value to
$HoverBackgroundand the ProgressBarBorderBrush‘s Color to$Focused.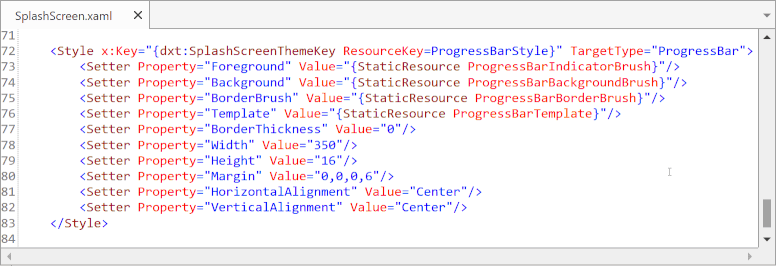
Click the the SplashScreen.xaml tab to return to the SplashScreen.xaml file. Click the Template property’s ProgressBarTemplate static resource, use F12, and change the BorderThickness value to
1to display the progress bar’s border. Use Ctrl+S to save the XAML file.
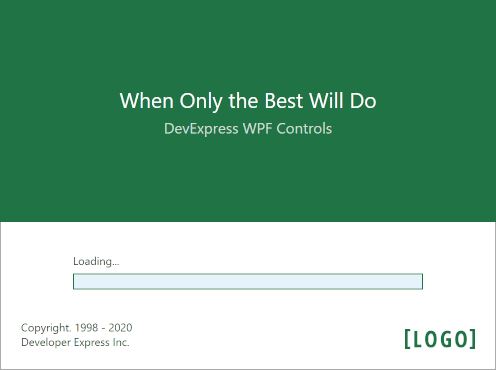
Use F6 to build the theme. Now, your changes are applied to the theme.
Note
Refer to the Edit Theme in XAML topic for more information on how to edit themes in XAML files.
Save and Publish
Click Publish to create a theme assembly file.

The Theme Designer publishes your theme and prompts you to open the output directory with .DLL and .PDB files.

Apply the Theme to an Application
- Run Visual Studio and open a WPF application.
Add a reference to the theme’s .DLL assembly.


Tip
You can use this method to apply a custom theme to a .NET Core 3.0 application.
Add the following code to the App.xaml.cs file:
- Run the application.