Office File API v25.2 Release Notes
- 18 minutes to read
AI-powered Document Processing APIs
v25.2 includes NLP-powered text transformation extensions for DevExpress Office File API product libraries (Word Processing Document API, PDF Document API, and Presentation API). These extensions integrate with language models via the Microsoft.Extensions.AI library and its IChatClient interface. Both cloud-based services (Azure OpenAI, OpenAI, Google Gemini) and local models (Ollama, ONNX Runtime, AI Foundry Local) are supported.
Refer to the following article for more information on AI-powered extension methods: AI-powered Extensions for DevExpress Office File API
The following code snippet registers the document processing service (based on the Azure OpenAI provider) in a .NET console application:
using DevExpress.AIIntegration;
using DevExpress.AIIntegration.Docs;
using Microsoft.Extensions.AI;

// Configure Azure OpenAI endpoint and API key via environment variables.
string azureOpenAIEndpoint = <"AZURE_OPENAI_ENDPOINT">;
string azureOpenAIKey = <"AZURE_OPENAI_APIKEY">;
var modelName = "gpt-4o-mini";

// Register an Azure OpenAI client and obtain the
// default AI extensions container.
    IChatClient client =
        new Azure.AI.OpenAI.AzureOpenAIClient(
            new Uri(azureOpenAIEndpoint),
            new System.ClientModel.ApiKeyCredential(azureOpenAIKey))
        .GetChatClient(modelName)
        .AsIChatClient();

AIExtensionsContainerDefault defaultAIExtensionsContainer =
    AIExtensionsContainerConsole.CreateDefaultAIExtensionContainer(client);
Translate & Proofread Word Documents, PDF Files, and Presentations
Office File API v25.2 ships with the following AI-powered translation and proofreading capabilities:
- Proofread and translate entire Word documents and PowerPoint presentations (or specific sections including paragraphs, slides, custom ranges). Our extensions automatically update selected files and preserve original formatting.
- Translate entire PDF documents or specific pages/regions and obtain text responses.
The code following code snippet proofreads and translates a Word document:
using DevExpress.AIIntegration.Docs;
using DevExpress.XtraRichEdit;
using Microsoft.Extensions.AI;

// Create a document processing service instance
// from the AI extensions container.
var docProcessingService = new AIDocProcessingService(defaultAIExtensionsContainer);

using (var wordProcessor = new RichEditDocumentServer()) {
    // Load source document (ensure file exists in relative Documents folder)
    wordProcessor.LoadDocument("Documents/FirstLookShortened.docx");

    // Proofread entire document (culture en-US)
    await docProcessingService.ProofreadAsync(wordProcessor, new System.Globalization.CultureInfo("en-US"));

    // Translate the document to German
    await docProcessingService.TranslateAsync(paragraph.Range, new System.Globalization.CultureInfo("DE-DE"));
    wordProcessor.SaveDocument("Documents/translation.docx", DocumentFormat.Docx);
}
Ask Questions about the Word Document and PDF Files
Our new AskAIAsync extension methods allow you to ask contextual questions about a Word and PDF document using custom prompts. The method uses retrieval‑augmented generation (RAG) to build the response. Refer to the following article section for more information: Ask Contextual Questions about Document Content
The following code snippet asks a contextual question about the PDF document content:
using DevExpress.AIIntegration.Docs;
using DevExpress.Pdf;
using Microsoft.Extensions.AI;

// Create a document processing service instance
// from the AI extensions container.
var docProcessingService = new AIDocProcessingService(defaultAIExtensionsContainer);

using (var pdfDocumentProcessor = new PdfDocumentProcessor()) {
    FileStream fs = File.OpenRead(
        Path.Combine(
            AppDomain.CurrentDomain.BaseDirectory,
            @"Documents/Document1.pdf"));
        pdfDocumentProcessor.LoadDocument(fs, true);
    fs.Close();

    string result =
        await docProcessingService.AskAIAsync(
            pdfDocumentProcessor,
            "What terms does this document contain?");
}
Summarize Word Documents, PDF Files, and Presentations
Use Summarize extension methods to generate a short summary for a document/presentation. The following summarization modes are available:
- Abstractive Summarization
- Understands original text context and rephrases it in a new, concise form. AI “writes” a new summary based on its understanding and generates new sentences (instead of reusing the original wording).
- Extractive Summarization
- Selects and extracts key sentences/phrases from the original text. AI identifies the most important content and combines them into a summary without altering the original wording.
The following code snippet summarizes the presentation content:
using DevExpress.AIIntegration.Docs;
using DevExpress.Docs.Presentation;

// Create a document processing service instance
// from the AI extensions container.
var docProcessingService = defaultAIExtensionsContainer.CreateAIDocProcessingService();

var presentation = new Presentation(File.ReadAllBytes("Documents/Presentation.pptx"));
string summary = await docProcessingService.SummarizeAsync(
    presentation,
    SummarizationMode.Extractive,
    CancellationToken.None);
PDF Document API
Object Stream Compression and Optimization
DevExpress PDF Document API now supports automatic object stream compression (to reduce file size when saving documents). Object streams (PDF 1.5+) pack multiple PDF objects into a single compressed stream without affecting document content or quality. When you save a document, our API recreates all objects within new compressed streams to improve internal structure and compression efficiency.
To enable object stream optimization, you must:
- Create a PdfSaveOptions instance.
- Set the UseObjectStreams option to
true. - Pass the instance to the SaveDocument or CreateEmptyDocument method.
The following code snippet merges multiple PDF files and removes duplicate object streams:
using DevExpress.Pdf;

using (PdfDocumentProcessor processor = new PdfDocumentProcessor()) {
    // Create an empty document with object stream optimization
    var saveOptions = new PdfSaveOptions() {
        UseObjectStreams = true
    };
    processor.CreateEmptyDocument("Merged.pdf", saveOptions);

    // Append multiple PDF files
    processor.AppendDocument("Document1.pdf");
    processor.AppendDocument("Document2.pdf");
    processor.AppendDocument("Document3.pdf");
    // Duplicate object streams are automatically eliminated
}
Refer to the following help topics for additional information: Optimize Documents, Merge PDF Documents.
Object Stream Compression for PDF Export in Other DevExpress Products
PDF export operations in DevExpress Reports, Rich Text Editor, and Spreadsheet Controls also supports object stream compression. To activate object stream compression in these products, set the static PrintingSettings.CompressPdfWithObjectStreams property to true:
using DevExpress.XtraPrinting.Native;

// Enable object stream compression for PDF export
PrintingSettings.CompressPdfWithObjectStreams = true;
Enhanced Image Compression Support - Grayscale & Bitonal
DevExpress PDF Document API includes specialized compression algorithms for grayscale and bitonal (black-and-white) images. You can also convert color images to grayscale to reduce file size when color accuracy is not essential.
The following code snippet optimizes a PDF document using new compression options:
using DevExpress.Pdf;

using (PdfDocumentProcessor processor = new PdfDocumentProcessor()) {
    processor.LoadDocument("Document.pdf");

    // Configure optimization options
    var optimizationOptions = new PdfOptimizationOptions();

    // Convert color images to grayscale
    optimizationOptions.ImageCompression.ConvertGrayscale = true;

    // Set compression for grayscale images
    optimizationOptions.ImageCompression.GrayscaleCompressionType =
        PdfGrayscaleImageCompressionType.Jpeg;
    optimizationOptions.ImageCompression.JpegQuality = 80;

    // Set compression for bitonal (black and white) images
    optimizationOptions.ImageCompression.BitonalCompressionType =
        PdfBitonalImageCompressionType.CCITTGroup4;

    // Optimize and save the document
    processor.OptimizeDocument(optimizationOptions);
    processor.SaveDocument("Optimized.pdf");
}
Refer to the following help topic for additional information: Optimize Documents.
Remove Optional Content During Optimization
DevExpress PDF Document API v25.2 allows you to optimize file size by removing optional content, such as:
- Metadata (author, creation date, etc.)
- Embedded files and attachments
- Bookmarks
- Page preview thumbnails.
- Interactive JavaScript code.
- Accessibility and structure information
The following code snippet removes unnecessary content from a PDF file:
using DevExpress.Pdf;

using (PdfDocumentProcessor processor = new PdfDocumentProcessor()) {
    // Load the document
    processor.LoadDocument("Document.pdf");

    // Configure optimization options
    var options = new PdfOptimizationOptions() {
        // Remove unnecessary elements
        RemoveMetadata = true,
        RemoveAttachments = true,
        RemoveThumbnails = true,
        }
    };

    // Optimize the document
    processor.OptimizeDocument(options);

    // Save the result
    processor.SaveDocument("Document.optimized.pdf");
}
Refer to the following help topic for additional information: Optimize Documents.
PDF/A Processing Enhancements
We’ve enhanced PDF/A file processing capabilities (import, edit, and save) when using the DevExpress PDF Document API. This capability ensures that files remain PDF/A-compliant after modifications. We also added APIs to determine the current PDF/A and PDF/UA compatibility state for a document and reset this state.
The following code snippet checks the PDF/A and PDF/UA state for a loaded PDF file, and resets compatibility settings:
using DevExpress.Pdf;

PdfDocumentProcessor pdfProcessor = new PdfDocumentProcessor();
pdfProcessor.LoadDocument("document.pdf");
// Obtain current PDF/A and PDF/UA state
var pdfA = pdfProcessor.Document.PdfACompatibility;
var pdfUA = pdfProcessor.Document.PdfUACompatibility;
//Reset document compatibility
pdfProcessor.Document.ResetCompatibility();
Custom Font Support for PDF Content
DevExpress PDF Document API now supports custom fonts from DXFontRepository when generating or updating PDF content. This enhancement ensures visual consistency across annotations, form fields, and digital signature appearances.
You can apply custom DXFontRepository fonts to:
- Form fields (AcroForms) and annotations (FreeText, Redaction).
- Digital signature appearance generated with PdfDocumentSigner.
Note
Custom font resolution applies only when you explicitly set font name via the API.
Word Processing Document API
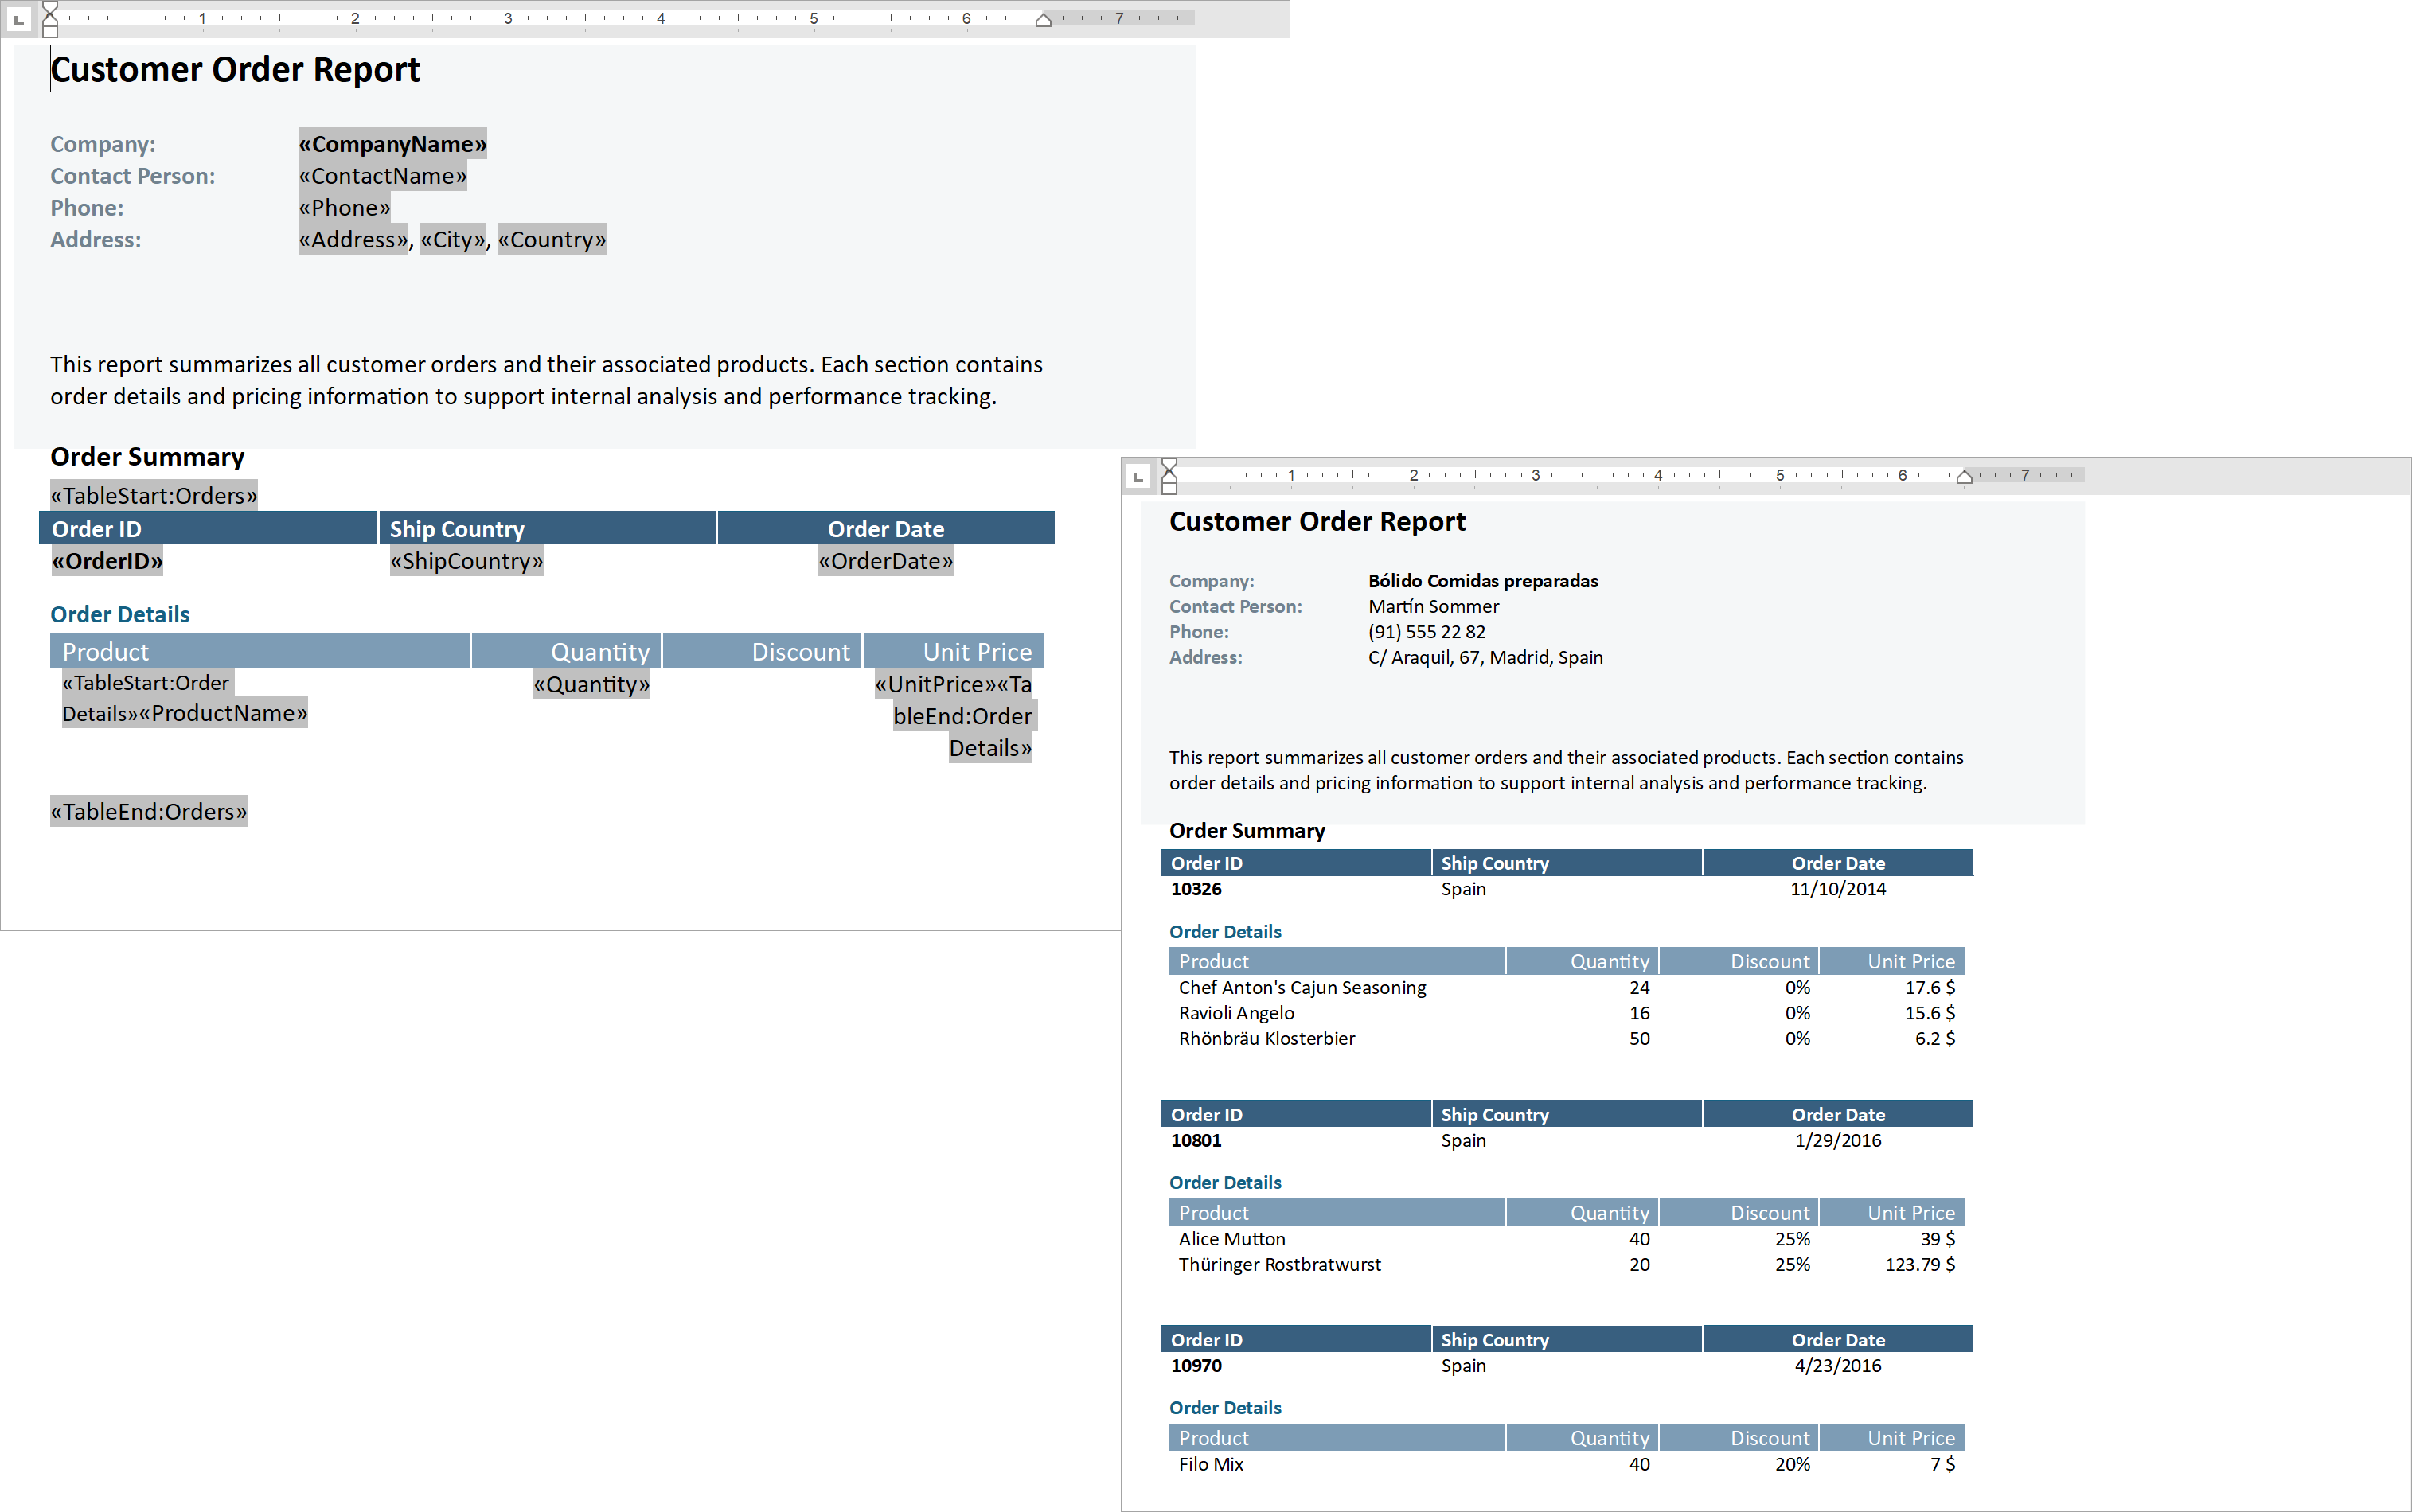
Mail Merge Enhancements - Merge Data with Detail Regions
The mail merge engine used within the DevExpress Word Processing Document API supports nested regions. You can merge data with any number of hierarchical levels (master–detail–subdetail and beyond) within a single template. Existing MailMerge methods work for both single-level and multi-level documents, no additional settings/toggles required.
Use TableStart:RegionName and TableEnd:RegionName merge fields to mark regions that contain data from a single record (master or detail). Merge regions can be defined within paragraphs or tables. Regions placed in tables automatically expand the table with source data during the merge.
Additional Mail Merge and Field API enhancements:
- Support for major data source types: IList, IList<T>, ArrayList, DataTable, DataSet.
- Added options to define and process custom region tags (instead of default TableStart / TableEnd).
- Added a new GetRegionHierarchy method to get document region hierarchy. Use it to determine parent and nested regions, obtain region names and ranges, retrieve region fields.
- Added the IsMergeField flag determining Merge Fields.
- Introduced the MergeField interface to obtain merge field name and settings.
- Enhanced mail merge-related events with region information arguments.
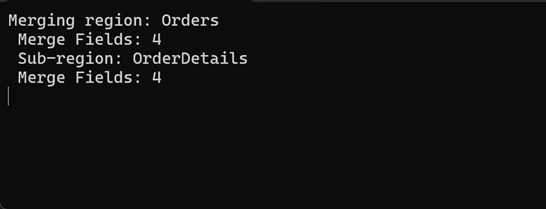
The following code snippet merges data and handles the MailMergeRecordStarted event to log the merge process:
// Read JSON data to a database object
string dataPath = Path.Combine(AppDomain.CurrentDomain.BaseDirectory, "nwind_data.json");
string json = File.ReadAllText(dataPath);
NWind? nwind;
nwind = JsonSerializer.Deserialize<NWind>(json);

// Create a RichEditDocumentServer instance
using var wordProcessor = new RichEditDocumentServer();

// Load the template into the word processor instance.
var templatePath = Path.Combine(AppDomain.CurrentDomain.BaseDirectory, "template.docx");
wordProcessor.LoadDocument(templatePath);

// Create mail merge options.
MailMergeOptions myMergeOptions = wordProcessor.Document.CreateMailMergeOptions();

// Assign the data source.
myMergeOptions.DataSource = nwind?.Customers;

// Register event handlers to customize merge behavior (progress output and dynamic variables).
wordProcessor.MailMergeRecordStarted += WordProcessor_OnMailMergeRecordStarted;

// Execute the mail merge.
wordProcessor.MailMerge(myMergeOptions, "result.docx", DocumentFormat.Docx);


// Event handler outputs diagnostic info for each mail merge region
// and its sub‑regions when a record merge starts.
void WordProcessor_OnMailMergeRecordStarted(object sender, MailMergeRecordStartedEventArgs e)
{
    var region = e.MailMergeRegionInfo;
    if (region != null)
    {
        Console.WriteLine($"Merging region: {region.Name}\r\n Merge Fields: {region.MergeFields.Count}");
        if (region.Regions != null && region.Regions.Count > 0)
        {

            foreach (var subRegion in region.Regions)
            {
                Console.WriteLine($" Sub-region: {subRegion.Name}\r\n Merge Fields: {subRegion.MergeFields.Count}");
            }
            Console.ReadKey();
        }
    }
}
Documentation: Mail Merge in Word Processing Document API
PDF/UA Export - Form Field Tagging
DevExpress Word Processing Document API v25.2 automatically adds accessible tags to PDF form fields when users export Word documents with Content Controls to accessible PDF formats.
PowerPoint Presentation API
PowerPoint Tables
We added support for PowerPoint tables. You can now upload and save PowerPoint presentations with tables and manage them programmatically (customize, read, delete, or create new tables from scratch). Table support includes the following features/capabilities:
- Insert tables with a specified number of rows and columns.
- Modify table location on a slide.
- Insert, delete, and resize rows, columns, and cells.
- Fill, modify, and clear table cell data.
- Merge and split table cells.
- Apply predefined themed table styles.
- Manage styling for banded rows and columns, the first and last column, the header and total row.
- Format individual cells - apply borders, shading, alignment, background fills and more.
using DevExpress.Docs.Presentation;
namespace PresentationApiSample;
public class Program {
public static void Main(string[] _) {
// Create an in-memory Presentation document
Presentation presentation = new Presentation();
presentation.Slides.Clear();
// Create a blank slide and add it to the presentation
Slide slide = new Slide(SlideLayoutType.Blank);
presentation.Slides.Add(slide);
// Create a 5x7 table (rows x columns) and add it as a shape to the slide
Table table = new Table(5, 7);
slide.Shapes.Add(table);
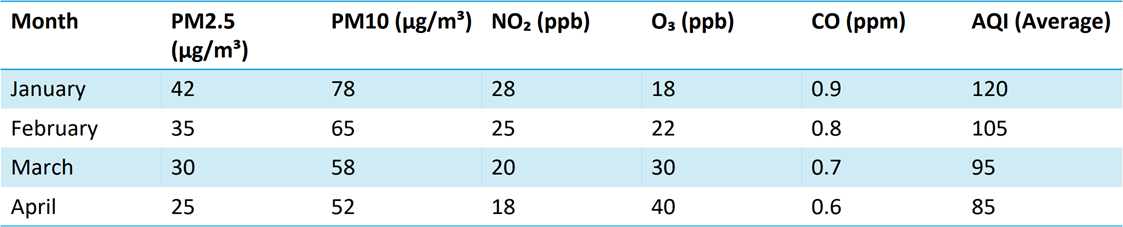
// Populate table cell text (row, column) for demonstration
table[0, 0].TextArea.Text = "Month";
table[0, 1].TextArea.Text = "PM2.5 (µg/m³)";
table[0, 2].TextArea.Text = "PM10 (µg/m³)";
table[0, 3].TextArea.Text = "NO₂ (ppb)";
table[0, 4].TextArea.Text = "O₃ (ppb)";
table[0, 5].TextArea.Text = "CO (ppm)";
table[0, 6].TextArea.Text = "AQI (Average)";
table[1, 0].TextArea.Text = "January";
table[1, 1].TextArea.Text = "42";
table[1, 2].TextArea.Text = "78";
table[1, 3].TextArea.Text = "28";
table[1, 4].TextArea.Text = "18";
table[1, 5].TextArea.Text = "0.9";
table[1, 6].TextArea.Text = "120";
table[2, 0].TextArea.Text = "February";
table[2, 1].TextArea.Text = "35";
table[2, 2].TextArea.Text = "65";
table[2, 3].TextArea.Text = "25";
table[2, 4].TextArea.Text = "22";
table[2, 5].TextArea.Text = "0.8";
table[2, 6].TextArea.Text = "105";
table[3, 0].TextArea.Text = "March";
table[3, 1].TextArea.Text = "30";
table[3, 2].TextArea.Text = "58";
table[3, 3].TextArea.Text = "20";
table[3, 4].TextArea.Text = "30";
table[3, 5].TextArea.Text = "0.7";
table[3, 6].TextArea.Text = "95";
table[4, 0].TextArea.Text = "April";
table[4, 1].TextArea.Text = "25";
table[4, 2].TextArea.Text = "52";
table[4, 3].TextArea.Text = "18";
table[4, 4].TextArea.Text = "40";
table[4, 5].TextArea.Text = "0.6";
table[4, 6].TextArea.Text = "85";
// Specify the table style
table.Style = new ThemedTableStyle(TableStyleType.LightStyle1Accent4);
}
}
Documentation: DevExpress Presentation API Library: Work with Tables
New Formats
The DevExpress PowerPoint Presentation API allows you to upload and save presentations in the following formats (in addition to PPTX):
- PPTM (PowerPoint Macro-Enabled Presentation)
- POTX (PowerPoint Template)
- POTM (PowerPoint Macro-Enabled Template)
Pass a DocumentFormatto the Presentation constructor or SaveDocument method to upload or save documents from/to the chosen format. All compatible document elements are preserved when you convert documents from one format to another.
// Convert macro-enabled presentation to macro-enabled template
using var presentation = new Presentation(inputStream, DocumentFormat.Pptm);
var outputStream = new MemoryStream();
presentation.SaveDocument(outputStream, DocumentFormat.Potm);
Documentation: DevExpress Presentation API Library: Create, Load, and Save Presentations
Text Manipulation APIs - Search, Replace, Remove, Highlight
The following APIs allow you to search for text and replace/format matches across an entire presentation, individual slides, or specific shapes:
TextArea.FindText|Slide.FindText|Presentation.FindTextTextArea.ReplaceText|Slide.ReplaceText|Presentation.ReplaceTextTextArea.RemoveText|Slide.RemoveText|Presentation.RemoveTextTextArea.ModifyTextProperties|Slide.ModifyTextProperties|Presentation.ModifyTextProperties
Documentation: Work with Shape Text | Search, Replace, Remove, and Highlight Text in a Slide or Presentation
Themes
New theme APIs allow you to read, apply, and modify PowerPoint themes programmatically. With these APIs, you can:
Read and apply existing presentation themes.
Customize theme color palettes, effects, fonts, and background styles.
Override themes for individual slides or slide layouts.
Manage and update slide color maps.
// Get the theme from the slide master
var myTheme = mySlideMaster?.Theme;

// Set theme name
myTheme.Name = "My Custom Theme Name";

// Configure accent colors
myTheme.ColorScheme.Accent1 = new OfficeColor(Color.Green);
myTheme.ColorScheme.Accent2 = new OfficeColor(HslColor.FromRgb(Color.Orange));
myTheme.ColorScheme.Accent3 = new OfficeColor(Color.Aqua);

// Add custom fill styles
List<Fill> themeFills = new List<Fill>() {
    new SolidFill(Color.Yellow),
    new SolidFill(Color.Cyan),
    new SolidFill(Color.Magenta)
};
myTheme.FormatScheme.Fills.ResetTo(themeFills);

// Add custom background fills
List<Fill> themeBackgroundFills = new List<Fill>() {
    new SolidFill(Color.Green),
    new SolidFill(Color.Red),
    new SolidFill(Color.Blue)
};
myTheme.FormatScheme.BackgroundFills.ResetTo(themeBackgroundFills);


// Set theme fonts
myTheme.FontScheme.MinorFont = new ThemeFont("Calibri", "Calibri Light", "Calibri");
myTheme.FontScheme.MajorFont = new ThemeFont("Comic Sans MS", "Comic Sans MS", "Comic Sans MS");

// Add custom line styles

List<LineStyle> lineStyles = new List<LineStyle>() {
    new LineStyle { Width = 50, DashType = LineDashType.Dot, Fill = new SolidFill(new OfficeColor(Color.Blue)) },
    new LineStyle { Width = 5, DashType = LineDashType.DashDot, Fill = new SolidFill(new OfficeColor(SchemeColors.Accent3)) },
    new LineStyle { Width = 5, DashType = LineDashType.DashDot, Fill = new SolidFill(new OfficeColor(SchemeColors.Accent3)) }
};

myTheme.FormatScheme.LineStyles.ResetTo(lineStyles);

// Create and configure a shadow effect
var effect1 = new ShapeEffectProperties {
    OuterShadow = new OuterShadowEffect() {
        RotateWithShape = false,
        BlurRadius = 18.75f,
        Distance = 6.25f,
        Angle = 90,
        HorizontalScaleFactor = 137,
        VerticalScaleFactor = 137,
        Color = new OfficeColor(Color.Black) {
            Transforms = {
        new AlphaColorTransform(63)
    }
        }
    }
};

myTheme.FormatScheme.Effects.ResetTo(new List<ShapeEffectProperties> { effect1 });

// Apply a themed background to the slide
slide.Background = new ThemedSlideBackground(2);
Documentation: Customize Themes with the DevExpress Presentation API Library
Rendering Enhancements
We refined our internal document layout engine to deliver more accurate rendering of PowerPoint presentation content. This update improves how text, shapes, and layout elements are measured and drawn when you print or export presentations to PDF.
Spreadsheet Document API
Extended OLE Object Support
DevExpress Spreadsheet Document API library allows you to import/export linked and embedded OLE Objects in binary Excel formats (XLS and XLSB). You can create, edit, or remove OLE objects in Excel documents and save these document to binary formats without content loss.