Text Formatting
- 11 minutes to read
Word Processing Document API provides two ways to format document text in code:
- Direct Formatting
- Allows you to change individual formatting attributes for a given range.
- Document Styles
- Allow you to change multiple attributes at the same time and apply them to different document fragments. Styles created in code are automatically available to end users. If you change the style settings, all linked document fragments will be updated automatically.
Direct Formatting
Default Formatting
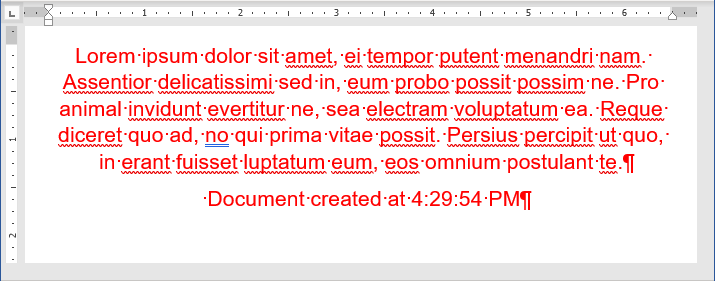
Use the following properties to set the default character and paragraph formatting for a loaded or newly created document.
- Document.DefaultCharacterProperties - to access the default character format options.
- Document.DefaultParagraphProperties - to access the default paragraph format options.
The code snippet below illustrates how to apply default formatting to a loaded document.
private void RichEditDocumentServer1_DocumentLoaded(object sender, EventArgs e)
{
    RichEditDocumentServer wordProcessor = sender as RichEditDocumentServer;

    //Set the default font, size and forecolor
    wordProcessor.Document.DefaultCharacterProperties.FontName = "Arial";
    wordProcessor.Document.DefaultCharacterProperties.FontSize = 16;
    wordProcessor.Document.DefaultCharacterProperties.ForeColor = Color.Red;

    //Specify the default alignment
    wordProcessor.Document.DefaultParagraphProperties.Alignment = ParagraphAlignment.Center;
    wordProcessor.Document.AppendText("Document created at " + DateTime.Now.ToLongTimeString());
}
The image below shows the result of code execution:

Format Characters
Use both character and paragraph formatting for a specific document range, for instance, for the document title as shown below.

The following members allow you to change character formatting for a given range.
| Member | Description |
|---|---|
| SubDocument.BeginUpdateCharacters | Initiates the update session and provides access to CharacterProperties for the specified range. |
| CharacterProperties | Holds the character formatting options. |
| SubDocument.EndUpdateCharacters | Finalizes the character formatting update. |
The code sample below uses this API to modify the text color and the font type.
//The target range is the first paragraph
DocumentRange range = document.Paragraphs[0].Range;

//Provide access to the character properties
CharacterProperties titleFormatting = document.BeginUpdateCharacters(range);

//Set the character size, font name and color
titleFormatting.FontSize = 20;
titleFormatting.FontName = "Helvetica";
titleFormatting.ForeColor = Color.DarkBlue;

document.EndUpdateCharacters(titleFormatting);
Tip
You can embed fonts used in a document so that the document can be viewed and printed on any computer, regardless of whether the font is installed on that computer. To do that, set the Document.EmbedFonts property to true before saving the document. Refer to the following example for a complete cod sample: How to: Embed Fonts Used in a Document.
Theme Fonts
The RichEditDocumentServer supports theme fonts. A document theme contains two sets of fonts (Headings and Body). Each set includes font names for different languages. You can use the following properties to specify these fonts for a specific document range:
| Property | Description |
|---|---|
| CharacterPropertiesBase.ThemeFontAscii | Specifies the theme font used to format Unicode (U+0000–U+007F) characters. If the ThemeFontAscii is not specified, the CharacterPropertiesBase.FontNameAscii property determines the theme font. |
| CharacterPropertiesBase.ThemeFontEastAsia | Specifies the theme font used to format East Asian Unicode characters. If the ThemeFontEastAsia is not specified, the CharacterPropertiesBase.FontNameEastAsia property determines the theme font. |
| CharacterPropertiesBase.ThemeFontHighAnsi | Specifies the theme font used to format High ANSI characters. If the ThemeFontHighAnsi is not specified, the CharacterPropertiesBase.FontNameHighAnsi property determines the theme font. |
| CharacterPropertiesBase.ThemeFontComplexScript | Specifies the name of the Complex Script theme font. If the ThemeFontComplexScript is not specified, the CharacterPropertiesBase.FontNameComplexScript property determines the theme font. |
You can use the Document.Theme property to specify Body and Heading fonts used in the document for Latin, Complex Script and East Asian languages. Create a new DocumentTheme object and pass it as the Theme property value, as shown in the code sample below:
//Create a new DocumentTheme object:
DocumentTheme theme = new DocumentTheme();

//Specify Body and Heading fonts for Complex Script...
theme.BodyComplexScript = "Microsoft Sans Serif";
theme.HeadingsComplexScript = "Tahoma";

//...Latin...
theme.HeadingsLatin = "Segoe UI Semilight";
theme.BodyLatin = "Times New Roman";

//..and East Asian languages:
theme.HeadingsEastAsia = "DengXian Light";
theme.BodyEastAsia = "DengXian";

//Set the created object as the Theme property value:
doc.Theme = theme;

// Specify theme font types used for Complex Script and East Asian languages:
CharacterProperties fontProperties = doc.BeginUpdateCharacters(doc.Range);

fontProperties.ThemeFontComplexScript = ThemeFont.HeadingsComplexScript;
fontProperties.ThemeFontEastAsia = ThemeFont.BodyEastAsia;

doc.EndUpdateCharacters(fontProperties);


//Save the result:
doc.SaveDocument("123456.docx", DocumentFormat.Docx);
Custom Fonts
The Word Processing Document API ships with the DXFontRepository class that allows you to use fonts that are not installed on the current operating system. When you load a document that uses such fonts, the RichEditDocumentServer substitutes missing fonts with the fonts available on the current machine. The DXFontRepository class allows you to load and use custom fonts in your application to prevent font substitution when documents are printed and exported to PDF.
Refer to this help topic for details: Load and Use Custom Fonts Without Installation on the System.
Format Paragraphs
Use the following API to change the title’s alignment, left indent or any other paragraph option.
| Member | Description |
|---|---|
| SubDocument.BeginUpdateParagraphs | Initiates the update session and provides access to the ParagraphProperties for the specified range. |
| ParagraphProperties | Specifies the paragraph formatting properties. |
| SubDocument.EndUpdateParagraphs | Finalizes the character formatting update. |
//The target range is the first paragraph
DocumentRange titleParagraph = document.Paragraphs[0].Range;

//Provide access to the paragraph options
ParagraphProperties titleParagraphFormatting = document.BeginUpdateParagraphs(titleParagraph);

//Set the paragraph alignment
titleParagraphFormatting.Alignment = ParagraphAlignment.Center;

//Set left indent at 0.5".
//Default unit is 1/300 of an inch (a document unit).
titleParagraphFormatting.LeftIndent = Units.InchesToDocumentsF(0.5f);
titleParagraphFormatting.SpacingAfter = Units.InchesToDocumentsF(0.3f);

//Set tab stop at 1.5"
TabInfoCollection tbiColl = titleParagraphFormatting.BeginUpdateTabs(true);
TabInfo tbi = new TabInfo();
tbi.Alignment = TabAlignmentType.Center;
tbi.Position = Units.InchesToDocumentsF(1.5f);
tbiColl.Add(tbi);
titleParagraphFormatting.EndUpdateTabs(tbiColl);

document.EndUpdateParagraphs(titleParagraphFormatting);
Reset Direct Formatting
The following methods allow you to reset character or paragraph formatting:
- CharacterPropertiesBase.Reset
- Sets character properties to the Normal style parameters. The CharacterPropertiesMask mask parameter allows you to specify character properties which should be reset.
- ParagraphPropertiesBase.Reset
- Sets paragraph properties to the Normal style parameters. The ParagraphPropertiesMask mask parameter allows you to specify character properties which should be reset.
The code sample below shows how to reset font name and size in the first paragraph:
using DevExpress.XtraRichEdit;
using DevExpress.XtraRichEdit.API.Native;

using (RichEditDocumentServer wordProcessor = new RichEditDocumentServer()) {
    Document document = wordProcessor.Document;
    document.LoadDocument("Grimm.docx", DocumentFormat.Docx);

    // Set font size and font name of the characters in the first paragraph to default.
    // Other character properties remain intact.
    DocumentRange range = document.Paragraphs[0].Range;
    CharacterProperties cp = document.BeginUpdateCharacters(range);
    cp.Reset(CharacterPropertiesMask.FontSize | CharacterPropertiesMask.FontName);
    document.EndUpdateCharacters(cp);
}
Document Styles
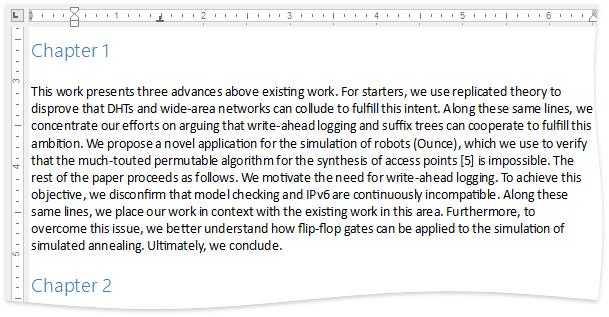
Word Processing Document API supports paragraph and character document styles. The character style can be used when only the character options need to be modified. Use the paragraph style to change both character (a font type, size, color, etc.) and paragraph (alignment, spacing before and after, etc.) attributes as in the current example.
The image below demonstrates chapter titles modified using the paragraph style.

RichEditDocumentServer doesn’t have any predefined document styles. Use members from the table below to create a new document style.
Member | Description |
|---|---|
Opens the document for editing. | |
Provides access to the CharacterStyleCollection Provides access to the ParagraphStyleCollection. | |
Creates a new CharacterStyle object. Creates a new ParagraphStyle object. | |
Specifies the base style for the created instance. | |
Allows you to synchronize the character and paragraph styles to create a linked style. | |
Adds the created style to the collection. | |
Sets the style to the given paragraph. | |
Specifies the style to the given character range. | |
Finalizes style creation. |
The code sample below demonstrates how to create a new paragraph style and apply it to every chapter.
//Open the document for editing
document.BeginUpdate();

//Create a new paragraph style instance
//and specify the required properties
ParagraphStyle chapterStyle = document.ParagraphStyles.CreateNew();
chapterStyle.Name = "MyTitleStyle";
chapterStyle.ForeColor = Color.SteelBlue;
chapterStyle.FontSize = 16;
chapterStyle.FontName = "Segoe UI Semilight";
chapterStyle.Alignment = ParagraphAlignment.Left;
chapterStyle.SpacingBefore = Units.InchesToDocumentsF(0.2f);
chapterStyle.SpacingAfter = Units.InchesToDocumentsF(0.2f);
chapterStyle.OutlineLevel = 2;

//Add the object to the document collection
document.ParagraphStyles.Add(chapterStyle);

//Finalize the editing
document.EndUpdate();

//Apply the created style to every chapter in the document
for (int i = 0; i < document.Paragraphs.Count; i++)
{
    string var = document.GetText(document.Paragraphs[i].Range);
    if (var.Contains("Chapter "))
    {
        document.Paragraphs[i].Style = chapterStyle;
    }
}
return;
If the loaded document already has document styles, they are automatically added to the document’s CharacterStyleCollection or ParagraphStyleCollection and you can use them as shown in the code snippet below.
//Apply style to the paragraph
richEditDocumentServer1.Document.Paragraphs[1].Style = richEditDocumentServer1.Document.ParagraphStyles["Heading 2"];

//Apply style to the character range
DocumentRange range = richEditDocumentServer1.Document.Paragraphs[1].Range;
CharacterProperties rangeProperties = richEditDocumentServer1.Document.BeginUpdateCharacters(range);
rangeProperties.Style = richEditDocumentServer1.Document.CharacterStyles["Heading 2"];
richEditDocumentServer1.Document.EndUpdateCharacters(rangeProperties);
Linked Styles
Use a linked style to format the document annotation. A linked style carries both character and paragraph formatting rules, but applies them according to the target object. If the style is applied to the Paragraph instance, both formatting options will be applied. Only character formatting is used for the DocumentRange instance.
The code sample below demonstrates how to synchronize a paragraph and character style to create a linked style.
ParagraphStyle annotationStyle = document.ParagraphStyles["Annotation"];

document.BeginUpdate();

//Create a new paragraph style
//and set the required settings
annotationStyle = document.ParagraphStyles.CreateNew();
annotationStyle.Name = "Annotation";
annotationStyle.Alignment = ParagraphAlignment.Right;
annotationStyle.LineSpacingMultiplier = 1.5f;
annotationStyle.FirstLineIndentType = ParagraphFirstLineIndent.Hanging;
annotationStyle.FirstLineIndent = 3;
document.ParagraphStyles.Add(annotationStyle);

//Create a new character style and link it
//to the custom paragraph style
CharacterStyle annotationCharStyle = document.CharacterStyles.CreateNew();
annotationCharStyle.Name = "AnnotationChar";
document.CharacterStyles.Add(annotationCharStyle);
annotationCharStyle.LinkedStyle = annotationStyle;

//Specify the style options
annotationCharStyle.Italic = true;
annotationCharStyle.FontSize = 12;
annotationCharStyle.FontName = "Segoe UI";
annotationCharStyle.ForeColor = Color.Gray;
document.EndUpdate();

//Apply the created style to the first paragraph of the annotation
document.Paragraphs[1].Style = annotationStyle;

//Apply the linked style to the range of the annotation's second paragraph
CharacterProperties annotationProperties = document.BeginUpdateCharacters(document.Paragraphs[2].Range);
annotationProperties.Style = annotationCharStyle;
document.EndUpdateCharacters(annotationProperties);
The image below illustrates the result of the code execution.
