Dashboard Title in the WinForms Designer
- 9 minutes to read
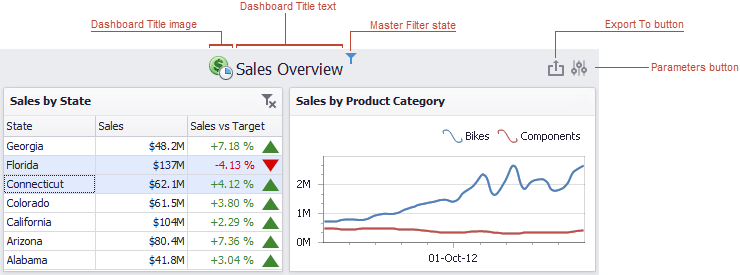
The Dashboard Title is located at the top of the dashboard surface. It can contain text, images and command buttons.
If you are using the Ribbon menu in the Dashboard Designer, you can change title settings by clicking the Title button.

This invokes the Dashboard Title dialog that allows you to change the text and image within the dashboard title.
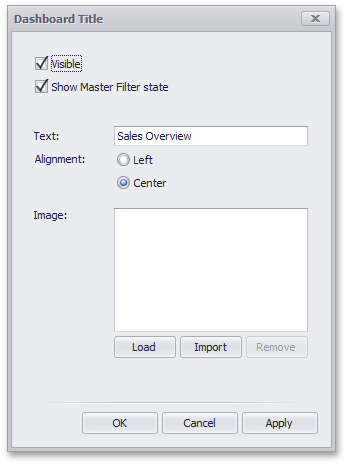
This dialog contains the following options.
- Visible - Specifies whether the dashboard title is visible. In code, use the DashboardTitle.Visible property.
Show Master Filter state - Specifies whether to show the state of master filter items in the dashboard title. To enable this capability in code, use the DashboardTitle.ShowMasterFilterState property.
When a user hovers over the filter icon (
 ), all master filters applied to the dashboard are displayed in the invoked popup.
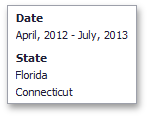
- Text - Specifies the title text. The string can contain HTML Tags. For example, the following string displays bold text: “<b>Title”. Note that img tags are not supported. To insert images in the dashboard title use the run-time customization approach.
- Alignment - Specifies the alignment of the dashboard title. In code, use the DashboardTitle.Alignment property.
Load button - Allows you to specify the image displayed within the dashboard title. In this case, the dashboard definition will contain the URL to access the image. In code, use the DashboardTitle.ImageUrl property.
Import button - Allows you to specify the image displayed within the dashboard title. In this case, the dashboard definition will contain an image as a byte array. In code, use the DashboardTitle.ImageData property.
The dashboard title can contain command buttons.
- Export To button - allows users to print/export the dashboard. To learn more about printing and exporting, see the Printing and Exporting topic.
- Parameters button - allows users to modify dashboard parameter values. To learn more about parameters, see the Dashboard Parameters topic.
- Custom buttons - you can create command buttons and drop-down menus by handling the CustomizeDashboardTitle event for the Designer/Viewer. However, these buttons are created at runtime, do not persist and cannot be saved in XML dashboard definition files.
Runtime Customization
To access title settings in code, use the Dashboard.Title property.
You can also customize the dashboard title in your application at runtime if you handle the DashboardDesigner.CustomizeDashboardTitle event. This method allows you to modify the text displayed in the title, remove existing buttons, and add custom buttons and drop-down menus to execute actions that can benefit users.
Warning
Custom buttons and bar items created in code within the event handlers are not saved in the dashboard definition.
The following properties are accessible in the CustomizeDashboardTitle event handler:
The text displayed in the dashboard title. | |
The text displayed in the title that identifies a single master filter value applied to the dashboard. When several filters are apllied, the text is not displayed. However, you can modify the built-in behavior and provide any relevant text. | |
Provides access to a collection of items (command buttons and other bar items) located in the dashboard title. You can modify the collection to remove or add built-in or custom items. |
Example 1 - How to Customize the Dashboard Title and Dashboard Item Captions
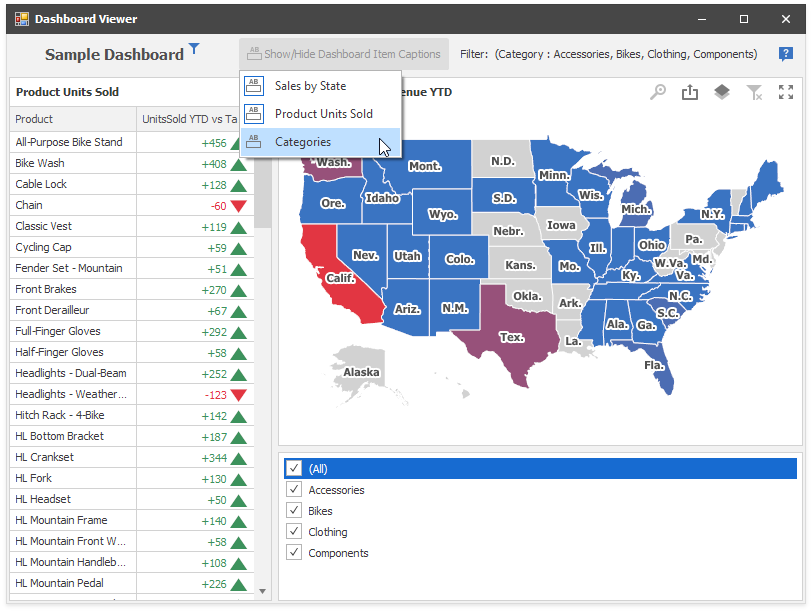
This example demonstrates how to handle the IDashboardControl.CustomizeDashboardItemCaption and IDashboardControl.CustomizeDashboardTitle events to modify dashboard title and dashboard item captions.
The dashboard title displays the dimensions and values by which the dashboard data is filtered. You can use a drop-down menu to selectively hide dashboard item captions. Clicking a custom Support button navigates to this example online.
A dashboard item caption displays the item’s master filter values.
Export buttons are hidden for all dashboard items except the map, and for the entire dashboard, if the displayed data’s Category field contains “Bikes”.
using DevExpress.DashboardCommon;
using DevExpress.DashboardCommon.ViewerData;
using DevExpress.DashboardWin;
using System;
using System.Collections.Generic;
using System.Data;
using System.Linq;

namespace CustomizeDashboardItemCaption_Viewer_Example {
    public partial class ViewerForm1 : DevExpress.XtraEditors.XtraForm {
        private static bool allowExport = false;
        public ViewerForm1() {
            InitializeComponent();
            dashboardViewer.AllowPrintDashboardItems = true;

            dashboardViewer.CustomizeDashboardTitle += DashboardViewer_CustomizeDashboardTitle;
            dashboardViewer.CustomizeDashboardItemCaption += DashboardViewer_CustomizeDashboardItemCaption;

            dashboardViewer.PopupMenuShowing += DashboardViewer_PopupMenuShowing;
            dashboardViewer.MasterFilterSet += DashboardViewer_MasterFilterSet;

            dashboardViewer.UpdateDashboardTitle();
            UpdateDashboardItemCaptions();
        }

        private void DashboardViewer_CustomizeDashboardTitle(object sender, CustomizeDashboardTitleEventArgs e) {
            DashboardViewer viewer = (DashboardViewer)sender;

            // Display a string of master filter values.
            string filterText = string.Empty;
            foreach (var item in viewer.Dashboard.Items) {
                if (viewer.CanSetMasterFilter(item.ComponentName)) {
                    var filterValues = viewer.GetCurrentFilterValues(item.ComponentName);
                    filterText += GetFilterText(filterValues);
                }
            }
            DashboardToolbarItem toolbarItem = new DashboardToolbarItem();
            toolbarItem.Caption = "Filter: " + filterText;
            e.Items.Insert(0, toolbarItem);


            // Remove the Export button depending on the static variable.
            if (!allowExport) {
                RemoveExportButton(e.Items);
            }

            // Add drop-down menu to show/hide dashboard item captions.
            DashboardToolbarItem toolbarItemRoot = new DashboardToolbarItem();
            toolbarItemRoot.Caption = @"Show/Hide Dashboard Item Captions";
            toolbarItemRoot.SvgImage = svgImageCollection1["title"];
            foreach (var item in viewer.Dashboard.Items) {
                DashboardToolbarMenuItem menuItem = new DashboardToolbarMenuItem(item.ShowCaption, item.Name,
                    new Action<DashboardToolbarItemClickEventArgs>((args) => {
                        item.ShowCaption = !item.ShowCaption;
                    }));
                menuItem.ImageOptions.SvgImage = svgImageCollection1["title"];
                toolbarItemRoot.MenuItems.Add(menuItem);
            }
            e.Items.Insert(0, toolbarItemRoot);


            // Add a button with an image to navigate to Online Help.
            DashboardToolbarItem infoLinkItem = new DashboardToolbarItem("",
                new Action<DashboardToolbarItemClickEventArgs>((args) => {
                    System.Diagnostics.Process.Start("https://docs.devexpress.com/Dashboard/");
                }));
            // Note that a raster image is proportionally resized to 24 px height when displayed in the Title area.
            infoLinkItem.SvgImage = svgImageCollection1["support"];
            e.Items.Add(infoLinkItem);
        }

        private void DashboardViewer_CustomizeDashboardItemCaption(object sender, CustomizeDashboardItemCaptionEventArgs e) {
            // Remove the Export button depending on the static variable.
            if (!allowExport) {
                if (!e.DashboardItemName.Contains("Map")) {
                    RemoveExportButton(e.Items);
                }
            }

            // Display filter values.
            DashboardViewer viewer = (DashboardViewer)sender;
            var filterValues = viewer.GetCurrentFilterValues(e.DashboardItemName);
            if (filterValues != null)
                if (filterValues.Count > 0)
                    e.FilterText = string.Format(" ( Filter: {0})", string.Concat(filterValues.Select(
                        axp => string.Format("{0} ", axp.GetAxisPoint(axp.AvailableAxisNames[0]).DisplayText)).ToArray()));

        }

        private void DashboardViewer_PopupMenuShowing(object sender, DashboardPopupMenuShowingEventArgs e) {
            // Hide popup menu everywhere except the dashboard title, to hide commands related to the export actions.
            if (e.DashboardArea == DashboardArea.DashboardItem)
                e.Allow = false;
        }
        private void DashboardViewer_MasterFilterSet(object sender, MasterFilterSetEventArgs e) {
            if (e.DashboardItemName == "listBoxDashboardItem1")
                allowExport = e.SelectedValues.Select(value => value[0].ToString()).Contains("Bikes") ? false : true;
            UpdateDashboardItemCaptions();
            dashboardViewer.UpdateDashboardTitle();
        }
        private string GetFilterText(IList<AxisPointTuple> filterValues) {
            string filterText = string.Empty;
            if (filterValues.Count > 0) {
                string dimensionName = string.Concat(filterValues.Select(
                    axp => string.Format("{0} ", axp.GetAxisPoint(axp.AvailableAxisNames[0]).Dimension.Name)).Distinct());
                filterText = string.Format(" ({0}:{1})", dimensionName, string.Join(",", filterValues.Select(
                    axp => string.Format(" {0}", axp.GetAxisPoint(axp.AvailableAxisNames[0]).DisplayText)).ToArray()));
            }
            return filterText;
        }
        private void UpdateDashboardItemCaptions()         {
            foreach (DashboardItem i in dashboardViewer.Dashboard.Items) {
                dashboardViewer.UpdateDashboardItemCaption(i.ComponentName);
            }
        }
        private void RemoveExportButton(IList<DashboardToolbarItem> items) {
            var exportItem = items.FirstOrDefault(i => i.ButtonType == DashboardButtonType.Export);
            if (exportItem != null) {
                items.Remove(exportItem);
            }
        }
    }
}
Example 2 - How to Delay Data Load Until All Filters are Set
The following code snippets demonstrate how to load data in the Dashboard designer on demand when all required filters are set. For this, the Show Data button is created in the DashboardDesigner.CustomizeDashboardTitle event handler.
using DevExpress.DashboardWin;
using System;
using System.Linq;

namespace CustomShowDataExample
{
    public partial class DesignerForm1 : DevExpress.XtraBars.Ribbon.RibbonForm
    {
        public DesignerForm1()
        {
            InitializeComponent();
            dashboardDesigner.CustomizeDashboardTitle += DashboardDesigner_CustomizeDashboardTitle;
            dashboardDesigner.LoadDashboard(@"..\..\Dashboards\dashboard1.xml");
        }

        #region #CustomizeDashboardTitle
        private void DashboardDesigner_CustomizeDashboardTitle(object sender, CustomizeDashboardTitleEventArgs e)
        {
            DevExpress.Data.IParameter showDataParameter = dashboardDesigner.Parameters.FirstOrDefault(p => p.Name == "ShowData");
            if (showDataParameter != null)
            {
                bool showData = (bool)showDataParameter.Value;
                DashboardToolbarItem showDataItem = new DashboardToolbarItem(showData, "Select states in the State list box and click this button to display data",
                    new Action<DashboardToolbarItemClickEventArgs>((args) => {
                        showDataParameter.Value = !showData;
                    }));
                showDataItem.Caption = "Show Data";
                showDataItem.SvgImage = svgImageCollection1[0];
                e.Items.Insert(0, showDataItem);
            }
        }
        #endregion #CustomizeDashboardTitle
    }
}
Example 3 - How to Navigate Tabs using Custom Tab Header Buttons or Set Up a Slide Show
This example illustrates methods and events used to manage the selected tabs.