Localization
- 6 minutes to read
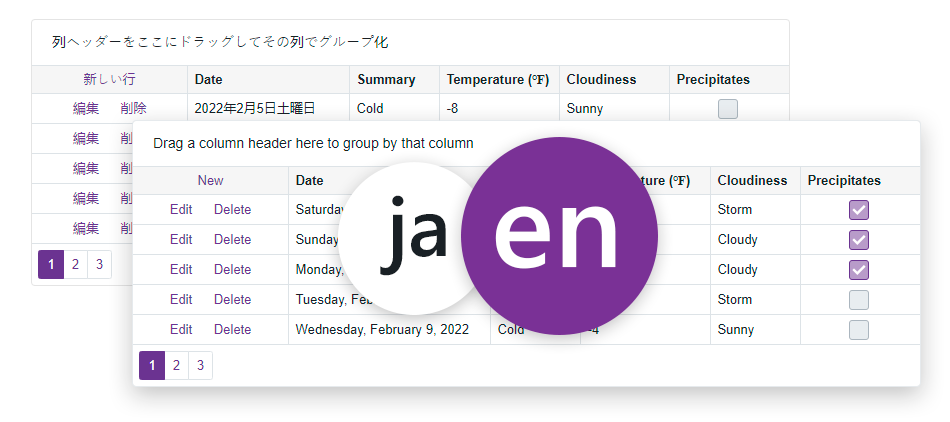
DevExpress Blazor components ship with localizable resources for UI elements, such as editor labels, buttons, menu items, error messages, and dialog boxes. Our components use English as the default language. This topic describes how to localize DevExpress components for other languages.
Predefined Satellite Assemblies
DevExpress components contain community-sourced satellite resource assemblies for the following languages:
- German
- Spanish
- Japanese
You can find localization packages in the Dependencies section of your Solution Explorer:

Follow the steps below to add these assemblies to your project:
- In Visual Studio, select Tools → NuGet Package Manager → Manage NuGet Packages for Solution.
- In the invoked dialog, select the DevExpress package source.
Find the DevExpress.Blazor.XX NuGet package with the required culture and install it:

- Optional. Find the DevExpress.Blazor.RichEdit.XX NuGet package with the required culture and install it to localize the Rich Text Editor.
- Change the application’s culture. Use one of the techniques described in the Microsoft documentation: ASP.NET Core Blazor globalization and localization.
- Rebuild the application.
Satellite Assemblies for Other Cultures
In Blazor applications, DevExpress components use the standard localization mechanism from the .NET – Satellite Resource Assemblies (libraries that contain translated resources). Refer to the following MSDN article for additional information: Create Satellite Assemblies for .NET Apps.
Use the DevExpress Localization Service to create and download a custom set of satellite assemblies, and modify resources.
Ensure that the major version of the satellite assemblies (for instance, v25.2) matches the major version of the DevExpress Blazor package in the project.
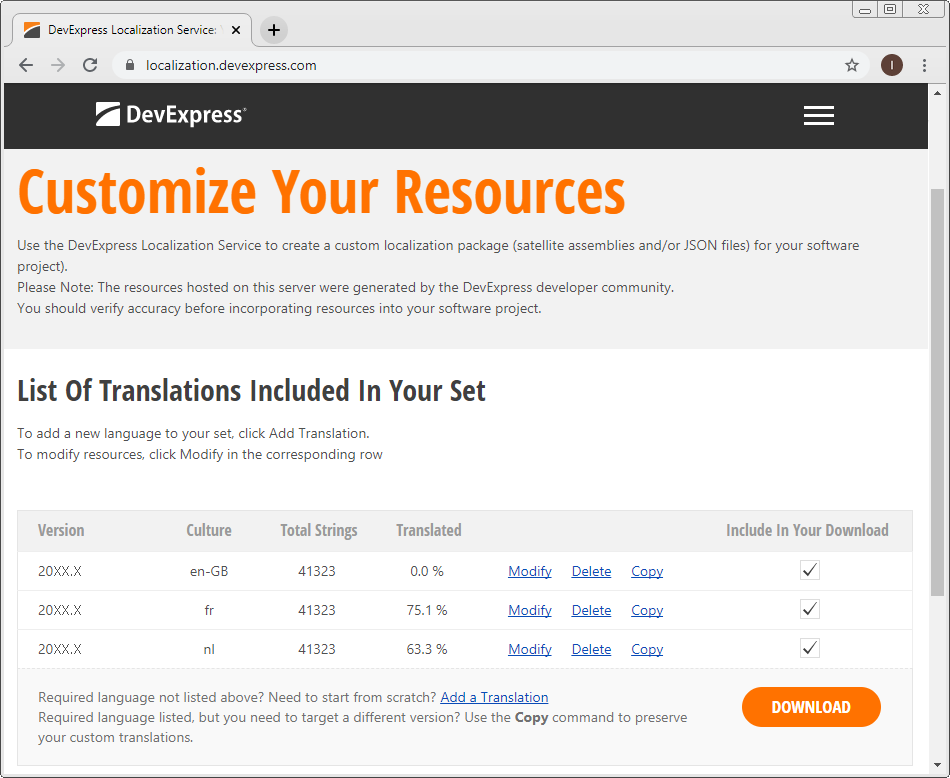
For additional information on how to prepare and download resource assemblies, watch to the following video:
To apply satellite assemblies for DevExpress Blazor components for other cultures, use an approach that corresponds to your application’s hosting model.
Blazor Server
Follow the steps below to add downloaded assemblies to your Blazor Server application:
- Create a subdirectory in the application’s EXE file directory (usually in the bin\Debug\netX.X\ folder) with a name that corresponds to the resource’s culture (for example, bin\Debug\net6.0\it - to translate your application into Italian).
- Unpack the archive with resources generated by the DevExpress Localization Service and copy the DevExpress.Blazor.v25.2.resources.dll file to the newly created subdirectory.
- Optional. To localize the Rich Text Editor, copy the DevExpress.Blazor.RichEdit.v25.2.resources.dll file to the same subdirectory.
- Optional. To localize the PDF Viewer, copy the DevExpress.Blazor.v25.2.Viewer.resources.dll file to the same subdirectory.
- Change the application’s culture. Use one of the techniques described in the Microsoft documentation: ASP.NET Core Blazor globalization and localization.
- Rebuild the application.
Blazor WebAssembly
Follow the steps below to add downloaded assemblies to your Blazor WebAssembly application:
Enable the
BlazorWebAssemblyLoadAllGlobalizationDataproperty in the project file:<PropertyGroup> ... <BlazorWebAssemblyLoadAllGlobalizationData>true</BlazorWebAssemblyLoadAllGlobalizationData> </PropertyGroup>Install the Microsoft.Extensions.Localization NuGet package.
Create the Resources folder in your Blazor project and copy the LocalizationRes.resx and LocalizationRes.<culture_name>.resx files from the DevExpressLocalizedResources_2025.2_<culture_name>\src\DevExpress.Blazor\Resources folder to this new folder.
Confirm that your Blazor project’s Resources folder contains the LocalizationRes.Designer.cs file. This file is automatically generated by Visual Studio to enable strongly-typed access to the resources.

If the LocalizationRes.Designer.cs file is missing:
- Right-click the LocalizationRes.resx file and select Properties from the context menu.
- Switch the Code Generation mode to Public.

Create a localization service:
using System.Globalization;
using DevExpress.Blazor.Localization;

namespace BlazorWebAssembly.Services {
    public class LocalizationService : DxLocalizationService, IDxLocalizationService {
        string? IDxLocalizationService.GetString(string key) {
            return CultureInfo.CurrentUICulture.Name == "it-IT" ?
                Resources.LocalizationRes.ResourceManager.GetString(key) :
                base.GetString(key);
        }
    }
}
Register the localization service in the Program.cs file:
using System.Globalization;
// ...
using DevExpress.Blazor.Localization;
using BlazorWebAssembly.Services;
// ...
builder.Services.AddSingleton(typeof(IDxLocalizationService), typeof(LocalizationService));
Change the application’s culture. Use one of the techniques described in the Microsoft documentation: ASP.NET Core Blazor globalization and localization.
Rebuild the application.
Rich Text Editor Localization
To localize Rich Text Editor, complete the following additional steps:
- Open the DevExpressLocalizedResources_2025.2_<culture_name>\src\DevExpress.Blazor.RichEdit\Resources folder.
- In this folder, add the RichEdit prefix to the names of the LocalizationRes.resx and LocalizationRes.<culture_name>.resx files.
- Copy the RichEditLocalizationRes.resx and RichEditLocalizationRes.<culture_name>.resx files to your project’s Resources folder.
Confirm that your Blazor project’s Resources folder contains the RichEditLocalizationRes.Designer.cs file. This file is automatically generated by Visual Studio to enable strongly-typed access to the resources.
If the RichEditLocalizationRes.Designer.cs file is missing:
- Right-click the RichEditLocalizationRes.resx file and select Properties from the context menu.
- Switch the Code Generation mode to Public.
Create a localization service. Replace the localization service implementation from the previous section with the following code:
using System.Globalization;
using DevExpress.Blazor.Localization;

namespace BlazorWebAssembly.Services {
    public class LocalizationService : DxLocalizationService, IDxLocalizationService {

        string? IDxLocalizationService.GetString(string key) {
            return CultureInfo.CurrentUICulture.Name == "it-IT" ?
                GetLocalizationString(key) :
                base.GetString(key);
        }

        string? GetLocalizationString(string key) {
            string? res = DxBlazorApplication1.Resources.LocalizationRes.ResourceManager.GetString(key);
            return res ??
              DxBlazorApplication1.Resources.RichEditLocalizationRes.ResourceManager.GetString(key);
        }
    }
}
PDF Viewer Localization
To localize PDF Viewer, complete the following additional steps:
- Open the DevExpressLocalizedResources_2025.2_<culture_name>\src\DevExpress.Blazor.Viewer\Resources folder.
- In this folder, add the PdfViewer prefix to the names of the LocalizationRes.resx and LocalizationRes.<culture_name>.resx files.
- Copy the PdfViewerLocalizationRes.resx and PdfViewerLocalizationRes.<culture_name>.resx files to your project’s Resources folder.
Confirm that your Blazor project’s Resources folder contains the PdfViewerLocalizationRes.Designer.cs file. This file is automatically generated by Visual Studio to enable strongly-typed access to the resources.
If the PdfViewerLocalizationRes.Designer.cs file is missing:
- Right-click the PdfViewerLocalizationRes.resx file and select Properties from the context menu.
- Switch the Code Generation mode to Public.
Create a localization service.
using DevExpress.Blazor.Localization;
using DevExpress.Blazor.Reporting.Localization;
using System.Globalization;

namespace YourProjectServices {
        public class ReportViewerLocalizationService : DxBlazorReportViewerLocalizerLocalizationService
        {
            protected override string GetString(string key)
            {
                return Resources.PdfViewerLocalizationRes.ResourceManager.GetString(key);
            }
        }
}
Register the localization services in the Program.cs file:
using System.Globalization;
using DevExpress.Blazor.Localization;
using BlazorWebAssembly.Services;
// ...
builder.Services.AddSingleton<IDxViewerLocalizationService, ReportViewerLocalizationService>();
Identification of Non-Translated Resources
Use our DevExpress UI Localization Client (Maintenance Mode) tool to identify untranslated strings of DevExpress UI controls and translate them during a debug session. The utility automatically generates RESX files with translated resources and adds them to the project. Note that the tool is not available in WebAssembly projects.
Handle the XtraLocalizer.QueryLocalizedStringNonTranslated event to collect non-localized resource strings for translation.
Use XtraLocalizer to Localize DevExpress Controls at Runtime
The global XtraLocalizer class implements a localization-related API that allows you to translate DevExpress UI controls and forms into different languages without the need to use satellite assemblies.
To localize UI elements in your Blazor application, assign a handler to the QueryLocalizedString event. Use event argument properties to determine the processed string and specify a new value.
Since Blazor applications support multi-threaded rendering, call the HandleAllThreadEvents() method to forward information about localization-related events to all threads in the application.
@using DevExpress.Blazor.Localization;
@using DevExpress.Utils.Localization;

protected override async Task OnInitializedAsync() {
    XtraLocalizer.HandleAllThreadEvents();
    XtraLocalizer.QueryLocalizedString +=
    new EventHandler<XtraLocalizer.QueryLocalizedStringEventArgs>(XtraLocalizer_QueryLocalizedString);
}
static private void XtraLocalizer_QueryLocalizedString(object sender, XtraLocalizer.QueryLocalizedStringEventArgs e) {
    if (e.StringIDType == typeof(DxBlazorStringId)) {
        if ((DxBlazorStringId)e.StringID == DxBlazorStringId.A11y_Grid_SearchBox)
            e.Value = "Enter text to search grid data. Use space to separate several search strings";
        if ((DxBlazorStringId)e.StringID == DxBlazorStringId.Grid_SearchBoxNullText)
            e.Value = "Search...";
    }
}