Predefined State Transitions Created in Code
- 5 minutes to read
This topic describes how to create a predefined State Machine in code. A predefined State Machine cannot be changed by users. For information how to define a state machine at runtime, refer to the User-Defined State Transitions Specified at Runtime topic instead.
Important
In certain scenarios, creating a custom Controller with the SingleChoiceAction Action or a set of SimpleAction Actions can be simpler and more straightforward than defining a coded State Machine. So, if you need to define a static state management process that should not be changed by users, consider this approach first instead of using the State Machine module.
See Also:
Note
To see this example in action, refer to the State Machine section of the Feature Center demo located in the %PUBLIC%\Documents\DevExpress Demos 25.2\Components\XAF\FeatureCenter.NET.XPO folder by default, or refer to the Feature Center demo online.
The following code defines a simple Task business class, which can have different states such as not started, in progress, completed, etc.
using DevExpress.Persistent.Base;
using DevExpress.Persistent.BaseImpl.EF;
using System.ComponentModel.DataAnnotations;
//...
public enum TaskStatus { Draft, NotStarted, InProgress, Paused, Completed, Dropped }

[DefaultClassOptions,ImageName("BO_Task")]
public class Task : BaseObject {
    public virtual string Subject { get; set; }
    public virtual TaskStatus Status { get; set; }
}

// Make sure that you use options.UseChangeTrackingProxies() in your DbContext settings.
To create a state machine for this class, perform the following steps.
Declare a StateMachine<T> class descendant with the generic type parameter specifying the target business class. Override the Name property to specify a textual description for a state machine.
using DevExpress.ExpressApp.StateMachine.NonPersistent;
//...
public class TaskStatusStateMachine : StateMachine<Task> {
    public override string Name {
        get { return "Change status to"; }
    }
}
Decide which business class property should be used as a state property. To function, a state machine must be able to distinguish between object states. This is why you need to specify a property whose values will represent different object states. This can be either an enumeration-typed property or a reference property. In this example, the Status property is a perfect candidate. Thus, it is used as a state property, and consequently, its values will be used as state markers. Note that different states must use different marker objects. To specify a state property, override the StatePropertyName property.
public class TaskStatusStateMachine : StateMachine<Task> {
    //...
    public override string StatePropertyName {
        get { return "Status"; }
    }
}
Declare a set of allowed states and transitions between them. States are State class instances and transitions are Transition class instances. A state belongs to a state machine and has an associated caption and a marker. Each state has a collection of allowed transitions that specify possible target states. In this example, it should not be possible for a task to become completed until it is in progress, so the in progress state should not contain a completed transition.
using DevExpress.ExpressApp.StateMachine;
//...
public class TaskStatusStateMachine : StateMachine<Task> {
    //...
    private IState startState;
    public TaskStatusStateMachine(IObjectSpace objectSpace) : base(objectSpace) {
        startState = new State(this, TaskStatus.Draft);

        IState notStartedState = new State(this, "Not Started", TaskStatus.NotStarted);
        IState inProgressState = new State(this, "In Progress", TaskStatus.InProgress);
        IState pausedState = new State(this, TaskStatus.Paused);
        IState completedState = new State(this, TaskStatus.Completed);
        IState droppedState = new State(this, TaskStatus.Dropped);

        startState.Transitions.Add(new Transition(notStartedState));
        notStartedState.Transitions.Add(new Transition(startState));
        notStartedState.Transitions.Add(new Transition(inProgressState));
        inProgressState.Transitions.Add(new Transition(pausedState));
        inProgressState.Transitions.Add(new Transition(completedState));
        inProgressState.Transitions.Add(new Transition(droppedState));
        pausedState.Transitions.Add(new Transition(inProgressState));
        droppedState.Transitions.Add(new Transition(notStartedState));

        States.Add(startState);
        States.Add(notStartedState);
        States.Add(inProgressState);
        States.Add(pausedState);
        States.Add(completedState);
        States.Add(droppedState);
    }
    public override IState StartState {
        get { return startState; }
    }
}
After you have defined states, transitions, and appearance rules in a state machine constructor, add them to the machine’s States collection. Override the StartState property to specify the initial state for newly created objects.
A state machine can optionally have Conditional Appearance rules associated with its states. These rules are represented by StateAppearance instances.
public class TaskStatusStateMachine : StateMachine<Task> {
    //...
    public TaskStatusStateMachine(IObjectSpace objectSpace) : base(objectSpace) {
        //...
        StateAppearance inProgressAppearance = new StateAppearance(inProgressState);
        inProgressAppearance.TargetItems = "Subject";
        inProgressAppearance.Enabled = false;
        StateAppearance completedAppearance = new StateAppearance(completedState);
        completedAppearance.TargetItems = "Subject";
        completedAppearance.Enabled = false;
        StateAppearance pausedAppearance = new StateAppearance(pausedState);
        pausedAppearance.TargetItems = "*";
        pausedAppearance.BackColor = System.Drawing.Color.Yellow;
    }
}
Implement the IStateMachineProvider interface in the target business class. The interface’s only member - GetStateMachines method - returns a list of all state machines available for the business class.
using System.Collections.Generic;
using DevExpress.ExpressApp.EFCore;
using DevExpress.ExpressApp.StateMachine;
using DevExpress.ExpressApp.EFCore;
//...
public class Task : BaseObject, IStateMachineProvider {
    //...
    public IList<IStateMachine> GetStateMachines() {
        List<IStateMachine> result = new List<IStateMachine>();
        result.Add(new TaskStatusStateMachine(EFCoreObjectSpace.FindObjectSpaceByObject(this)));
        return result;
    }
}

// Make sure that you use options.UseChangeTrackingProxies() in your DbContext settings.
The State Machine module will display the ChangeStateAction Action in Task Views. The Action is provided by the StateMachineController.
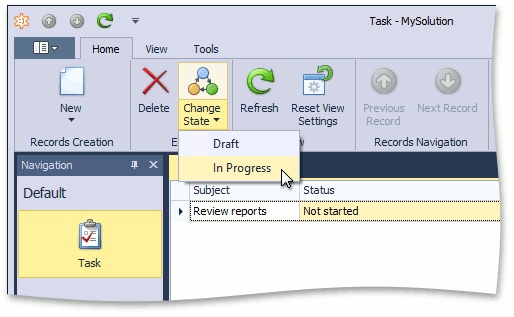
Note
The StateMachineController is not designed to execute additional logic using its TransitionExecuting and TransitionExecuted events. Instead, place your custom code in the setter of the desired business class property.
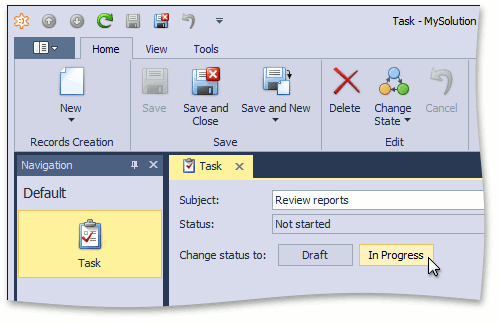
You can optionally implement the IStateMachineUISettings interface and set its ExpandActionsInDetailView property to true.
public class TaskStatusStateMachine : StateMachine<Task>, IStateMachineUISettings {
    //...
    public bool ExpandActionsInDetailView {
        get { return true; }
    }
}
In this instance, the target business class Detail Views will contain separate Simple Actions corresponding to available state transitions.