State Machine Module Overview
- 3 minutes to read
Business objects often have an associated state specified by their property values (for example, a Task object has a status that can be NotStarted, InProgress, and so on.). While this state can easily be changed by modifying corresponding property values, managing state transitions in a uniform way is not that simple. This is why XAF ships with the State Machine module, which greatly simplifies state transition management.
State Machine Capabilities
The module creates a set of Actions that correspond to state transitions and display them in corresponding Views.
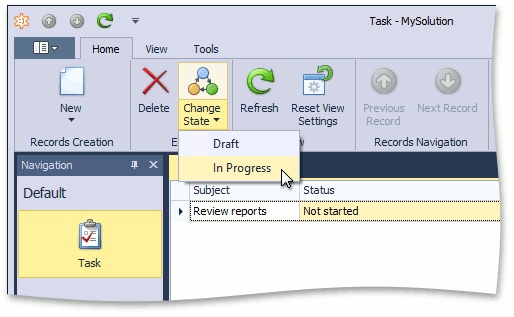
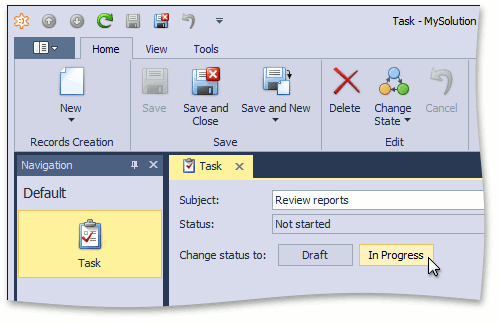
With the State Machine, you can:
- define a set of states and corresponding transitions, and associate them with a business class. You can do this in code or at runtime, as the State Machine module comes with predefined Views for state and transition management. The property whose values specify different object states can be either an enumeration-typed property or a reference property;
- define Conditional Appearance rules and associate them with particular states. This can also be done both in code and at runtime.
Important
In certain scenarios, creating a custom Controller with the SingleChoiceAction Action or a set of SimpleAction Actions can be simpler and more straightforward than defining a coded State Machine. So, if you need to define a static state management process that should not be changed by users, consider this approach first instead of using the State Machine module.
See Also:
Note
In the DataView, ServerView, InstantFeedback, and InstantFeedbackView data access modes, State Machine requests selected objects from the database each time the selection is changed.
Add the State Machine Module
To add the State Machine module to an ASP.NET Core Blazor or WinForms existing application, install the DevExpress.ExpressApp.StateMachine NuGet package and register the State Machine module in a platform-agnostic module (MySolution.Module):
public sealed class MySolutionModule : ModuleBase {
    //...
    public MySolutionModule() {
        this.RequiredModuleTypes.Add(typeof(DevExpress.ExpressApp.StateMachine.StateMachineModule));
    }
}
Note
You can add modules to your application when you use the Template Kit to create a new XAF solution. Select modules in the Additional Modules section.
- To add an extra module in code, add it to the XafApplication.Modules or ModuleBase.RequiredModuleTypes list (adding a reference to the module assembly is insufficient).
In XAF applications, you can call the AddStateMachine<TBuilder>(IModuleBuilder<TBuilder>, Action<StateMachineOptions>) method in your ASP.NET Core Blazor/WinForms application builder.