Localize an XAF Application
- 9 minutes to read
Tip
Review the Application Model Basics and Localization Basics topics before proceeding.
Choose the language you want to use in your XAF application.
Pre-installed languages: German (de), Spanish (es), and Japanese (ja). These assemblies are available in the DevExpress Local NuGet Feed (for example,
DevExpress.ExpressApp.deorDevExpress.ExpressApp.Core.All.de).Other languages:
- Use the Localization Tool to download satellite assemblies. See the Localize Standard XAF Modules and DevExpress Controls Used in an Application topic for more information on how to use this service to localize XAF modules.
- Place the downloaded assemblies in the following folders:
- In your application bin folder (for example,
\Solution1.BlazorServer\bin\Debug\net8.0\frfor French). This enables runtime localization. - In your Model Editor’s folder (for example,
C:\Program Files\DevExpress 22.1\Components\Tools\eXpressAppFrameworkNetCore\Model Editor\frfor French). This enables design-time localization.
- In your application bin folder (for example,
You can reuse satellite assemblies in any other project.
Note
Remember to deploy the required satellite assemblies when you deploy an XAF application. Refer to the Deployment Tutorial for more details.
For XAF ASP.NET Core Blazor applications, add the ApplicationBuilderExtensions.UseRequestLocalization() method call. This enables the RequestLocalizationMiddleware.
 namespace MainDemo.Blazor.ServerSide {
    public class Startup {
        // ...
        public void Configure(IApplicationBuilder app, IWebHostEnvironment env) {
            // ...
            app.UseHttpsRedirection();
            // Enable the RequestLocalizationMiddleware
            app.UseRequestLocalization();
            app.UseStaticFiles();
            app.UseRouting();
            // ...
        }
    }
}
In
appsettings.json, specify languages used in your application in theDevExpress:ExpressApp:Languagessection. You should always use the fully qualified language name (for example:xx-YYinstead ofxx). This language list is used for the following purposes:- To load satellite assemblies.
- To specify the
RequestLocalizationMiddleware‘s RequestLocalizationOptions.SupportedCultures option.
The first language in this list is the default language (specified in the RequestLocalizationOptions.DefaultRequestCulture).
{
    //
    "DevExpress": {
        "ExpressApp": {
            "Languages": "en-US;de-DE;fr-FR"
             // ...
        }
    }
}
In the module project, double-click the Model.DesignedDiffs.xafml file to invoke the Model Editor. Focus the root node and click Languages Manager… in the Language combo box on the Model Editor Toolbar. Add the target language in the invoked dialog and click OK. Restart Visual Studio to load localized values from the satellite assemblies and specify the application’s target language in the Language combo box.

All the changes for a particular language are saved to the corresponding Model.DesignedDiffs.Localization.<language code>.xafml or Model<language code>.xafml_ file. These files resemble the Model.DesignedDiffs.xafml and Model.xafml files, which store the changes made in the Application Model in the default language (English).
Ensure that the newly created Model.DesignedDiffs.Localization.XX.xafml files are processed as embedded resources (in the Property Editor, Build Action is set to Embedded resource).
Refer to the Localization Basics topic for more information.
To learn how to add a new or modify an existing translation value, refer to the following section: How to: Localize XAF Application Items Using XAF Tools.
For a Windows Forms application, specify the application language in the Model Editor for the application project. Go to the Application node and set the IModelApplication.PreferredLanguage to the required language. For more information, see Localization Basics. If you want the application language to match the user’s device language, set PreferredLanguage to (User language).
If you have custom templates, splash screens, or add custom localization strings in WinForms application, follow these articles:
Start the application to ensure that all the text values are localized.
Localize an XAF Application Directly in the Model Editor
Follow the steps below to localize the main parts of your XAF application directly in the Model Editor. Note that some translation values contain properties’ names (ObjectCaptionFormat, DisplayFormat, etc.) and should not be localized.
- Select the target language in the Model Editor Toolbar.
- Set the localized values to the Application root node’s properties.
- Expand the ActionDesign | Actions node. Set the localized values to all its child nodes’ Caption properties. The ShortCaption and the Tooltip properties are localized automatically, as they expose Caption properties’ values by default. Localize the ConfirmationMessage properties if required.
Note
If you do not use the Active Directory authentication, the Log On window (web page) UI elements localization requires particular attention. The Log On and Cancel buttons are Actions. These Actions have Logon and DialogCancel IDs and are localizable in the ActionDesign | Actions node.
- Expand the ActionDesign | DisableReasons node and set localized values to its child nodes’ Caption properties.
- Expand the BOModel node and assign localized values to its child nodes’ Caption properties. You can skip nodes of classes that are not represented in the application UI (for example, the XPBaseObject node). Note that localizing ObjectCaptionFormat properties may also be required. The Caption properties of CreatableItems, NavigationItems and Views child nodes are automatically localized as they expose values from class captions by default.
- Expand the Localization node and set localized values to its child nodes’ Value properties. The Exceptions | UserVisibleExceptions child node localization requires particular attention. You can skip the Exceptions | SystemExceptions node, as it contains exceptions addressed to developers and administrators, and is invisible to end-users in normal application operation.
- Expand the NavigationItems and localize the Default node caption.
If you use the ValidationModule module, expand the Validation node and assign localized values to the child node properties the globe glyph (
 ) denotes.
If you do not use the Active Directory authentication type, the Log On window (web page) localization requires particular attention. The AuthenticationStandardLogonParameters Detail View represents this window (web page) content, so navigate to the Views | AuthenticationStandardLogonParameters_DetailView node and set the localized value to its Caption property. Expand the Items child node and localize the LogonText node’s Text property. Localize the UserName and Passwords node captions.
Note
Do this for each separate platform-specific project. Use the Model Editor in each application project to localize UI elements on the Log On window (web page). See step 5 for instruction on how to localize Log On and Cancel Action captions. To access the message for failed login attempts, use the the Localization | Exceptions | UserVisibleExceptions | Security node.
- In an ASP.NET Core Blazor application, modify either AuthenticationStandardLogonParameters_Blazor_DetailView or NoPasswordLogonParameters_DetailView (depending on whether the password authentication is enabled).
- In a Windows Forms application, modify either AuthenticationStandardLogonParameters_Win_DetailView or NoPasswordLogonParameters_Win_DetailView (depending on whether the password authentication is enabled).
Invoke the Model Editor for the application project (Windows Forms) to see additional platform-specific Localization child nodes. For instance, in the Windows Forms application Model, you should assign localized values to Confirmations, DialogButtons and FrameTemplates child nodes.
Note
If you received the FormatException or MemberNotFoundException, ensure that you have not localized a property name in a localizable value.
Blazor Application Localization
The Blazor application uses the following localization logic:
- Blazor controls use the application’s current culture for translations.
- XAF controls use the PreferredLanguage value for translations.
- If PreferredLanguage is set to
(User language), the language is determined by the application’s current culture. No additional action is required. This is the default and recommended approach. - If PreferredLanguage is set to a specific language, XAF uses this value, while Blazor controls continue to use the user’s current culture. The PreferredLanguage property does not affect the application culture. Refer to the following topic for information on how to handle this scenario: Single Language Support.
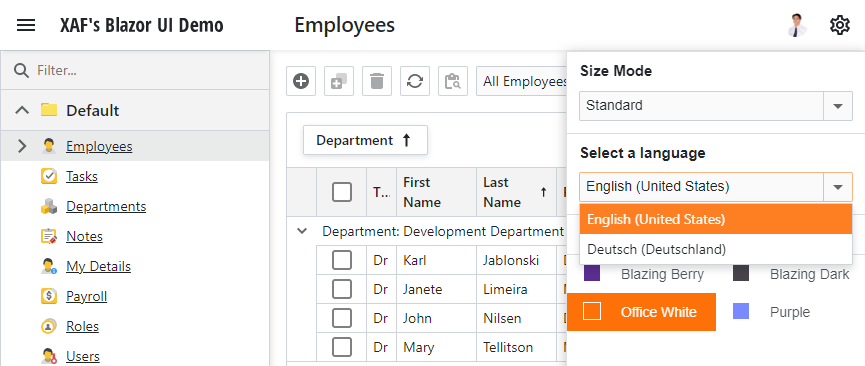
Change Language at Runtime In UI (Runtime Language Switcher)
For XAF ASP.NET Core Blazor UI applications, you can enable the Runtime Language Switcher. Ensure that PreferredLanguage is set to (User language). You can see the Language Switcher in the following locations:
The login page

The settings menu
To enable the Runtime Language Switcher, set the DevExpress: ExpressApp: ShowLanguageSwitcher value to True in appsettings.json:
{
    //
    "DevExpress": {
        "ExpressApp": {
            "Languages": "en-US;de-DE;fr-FR",
            "ShowLanguageSwitcher": true
        }
    }
}
The Languages section must contain at least two supported languages to enable the Runtime Language Switcher. These languages will be displayed in the Language Switcher’s drop-down list.
The application retrieves the language name from CultureInfo.NativeName.
Change Language at Runtime In Code
To change the XAF ASP.NET Core Blazor application language in code, use the IXafCultureInfoService.SetCultureAsync method.
The call of the SetCultureAsync method initiates the following:
- Recreation of the XafApplication in a new culture. The new culture is read from cookies in
RequestLocalizationMiddleware. - Reload of the ASP.NET Core Blazor application even if there were no changes in the culture.
The code sample below demonstrates how to use IXafCultureInfoService to change the application localization:
File:
MySolution.Blazor.Server\Controllers\GermanCultureController.cs
using DevExpress.ExpressApp;
using DevExpress.ExpressApp.Actions;
using DevExpress.ExpressApp.Blazor;
using DevExpress.ExpressApp.Blazor.Services;
using DevExpress.Persistent.Base;
// ...
public class GermanCultureController : ViewController {
    BlazorApplication BlazorApplication => (BlazorApplication)Application;
    IXafCultureInfoService CultureInfoService => (IXafCultureInfoService)BlazorApplication.ServiceProvider.GetService(typeof(IXafCultureInfoService));
    public GermanCultureController() {
        SimpleAction myAction = new SimpleAction(this, "SetGermanCulture", PredefinedCategory.Edit);
        myAction.Execute += async (s, e) => await CultureInfoService.SetCultureAsync("de-DE");
    }
}
Note
If a current thread’s culture is set to a culture that includes only the language and not the country (for example, “de” or “en”), the currency symbol renders as an international currency symbol (¤), for example: 100.00 ¤.
Refer to the following topics for details:
Current Culture in XAF ASP.NET Core Blazor Applications
In XAF ASP.NET Core Blazor applications, the current culture is set in the following order of priority:
- From a user’s cookies.
- If the culture is not set in cookies, the application uses the default culture from a user’s browser. The
Languagescollection inappsettings.jsonshould contain this culture. - If the
Languagescollection does not contain the user’s culture, the application uses the first culture from the collection.
When users change the current culture in the Language Switcher, their cookies are updated with the new culture value.
The application’s current culture depends on both of the following settings:
- The
Languagesoption inappsettings.json. - The browser’s preferred language, if the application supports multiple languages.
Single Language Support
If your application supports only a single language, specify this language in both appsettings.json and IModelApplication.PreferredLanguage. You should always use the fully qualified language name, for example: xx-YY instead of xx:
{
    //
    "DevExpress": {
        "ExpressApp": {
            "Languages": "de-DE"
                // ...
        }
    }
}

Localize Scheduler Module
To localize the Scheduler module, you need to take additional steps after you follow the general localization scenario for XAF applications described in this topic.
Use the DevExpress Localization Tool to add or modify translations for the following strings:
SchedulerStringId.AppointmentLabel_*andSchedulerStringId.Caption_*.Download updated assemblies.
Add all assemblies from the downloaded package to the corresponding language folder in your application’s bin folder (for example, \YourSolutionName.BlazorServer\bin\Debug etX.X\fr-FR and \YourSolutionName.Win\bin\Debug etX.X\fr-FR for the French language).
Build and run the application.