Localization Tool
- 19 minutes to read
The DevExpress Localization Tool is a Windows application for localizing DevExpress WinForms controls. It replaces the Localization Client to simplify resource management, improve translation quality, and support collaboration across teams and products.
Key Features
- Simpler localization string management
- Use advanced data shaping capabilities to search, filter, group, and manage localization strings.
- Enhanced translation consistency and coverage
- Locate duplicate strings, find inconsistent translations using built-in validation, review context information, and run batch operations.
- Multiple export types
Export translations as:
- Satellite assemblies
- NuGet packages
- A single merged RESX file for multiple products (replaces hundreds of assemblies)
- JSON files for JavaScript/TypeScript-based products
- Collaboration-first workflow
- Track changes, review updates, import/ export resources, and rely on built-in backups. You can work directly with RESX files, use the DevExpress Windows-based tool, or build your own localization engine.
- AI-powered translation
- Integrate your favorite AI service to automate and improve translation coverage directly within our Localization Platform.
Warning
With the release of the Localization Tool, Localization Service and Localization UI Client utilities are in maintenance mode.
Until we ensure that the Localization Tool addresses most existing customer needs effectively, the UI Localization Service will remain available, and you can use it to modify translation resources.
UI Localization Client and product-specific localization utilities will be deprecated as redundant.
Supported DevExpress Products
- WinForms, WPF
- Blazor, ASP.NET MVC 5, WebForms
- Reporting, BI Dashboard
- Cross-Platform .NET App Framework (XAF WinForms/Blazor)
- ASP.NET Core (RichEdit, Spreadsheet only)
We have long-term plans to support JavaScript/TypeScript, .NET MAUI, and VCL-based apps. We aim to make the Localization Tool a universal utility for app localization.
How It Works
Our Localization Platform loads DevExpress localization resources from the official GitHub repository or from user-selected products, assemblies, NuGet references, or project files. Users select the required DevExpress version, products, and target cultures to define localization scope.
For each culture, the tool creates and maintains a separate XML-based localization database. This database stores all translations, metadata, comments, validation states, and change history. The database supports version upgrades and reuse of translations between DevExpress releases.
<T>
  <Key>XtraSpreadsheetStringId.ConditionalFormattingRulesManagerForm_CaptionCancel</Key>
  <Path>DevExpress.Spreadsheet.Core\LocalizationRes.resx</Path>
  <English>Cancel</English>
  <German>Abbrechen</German>
  <Translation>Annuler</Translation>
  <PrevTranslation>Fermer</PrevTranslation>
  <User>User_Name</User>
  <Date>20251218 11:48</Date>
</T>
Localization strings are presented in a powerful grid-based UI that supports instant search, filtering, grouping, and bulk operations. Users can translate large volumes of strings, apply consistent translations, review similar terms, add comments, and validate results using built-in quality checks, terminology rules, and optional AI-powered translation suggestions.
For collaborative scenarios, multiple contributors can work on the same language independently. Each contributor maintains his/her own culture database and later combines results using our built-in Merge feature. Validation detects conflicts, highlights differences, and helps resolve merge issues safely.
Once translations are complete, our platform generates ready-to-use localization output with a single action. Supported export formats include signed satellite assemblies, NuGet packages, RESX, and JSON. Export paths are generated automatically and can be customized in the settings, enabling a seamless, one-click localization workflows on Windows machines.
Getting Started
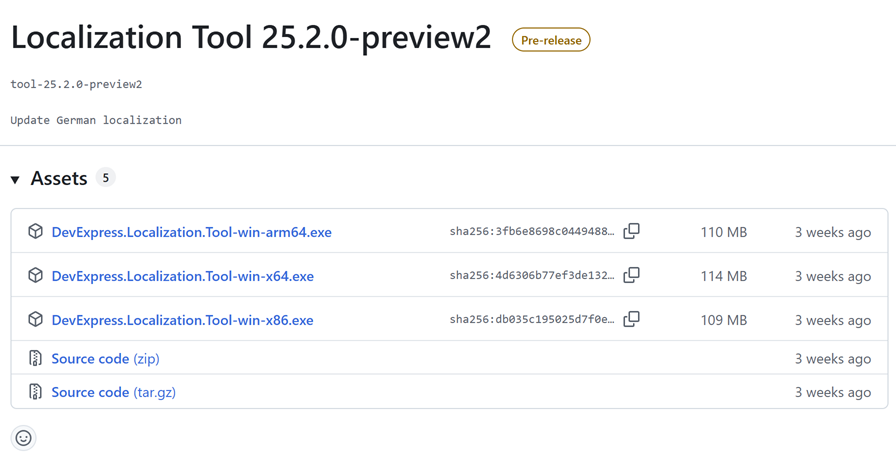
Download the Localization Tool
Download the latest version of the Localization Tool from the “DevExpress Localization Tool” section:
Configure Localization Tool Settings
Note
In this tutorial, the Localization Tool is located in the following directory: C:\DevExpressLocalizationTool. Listed paths are relative to the Tool’s location and may be different on your machine.
Run the Localization Tool. The application prompts you to select a version for translation resources. Select the required version and click Download. The application downloads RESX files and satellite assemblies for all supported languages to the folder that contains the Localization Tool.
 // RESX file location
 C:\DevExpressLocalizationTool\Sources\Localization-XX.X.X
 // Assembly location
 C:\DevExpressLocalizationTool\Resources\Satellites-XX.X.X
Important
We recommend you use the built-in resource download feature. Resource file customization may cause malfunctions and are out of our support scope.
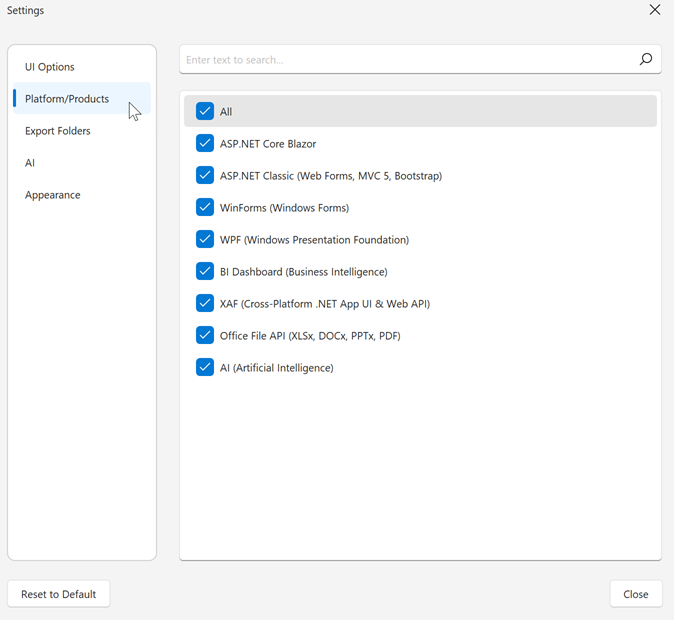
Go to Settings → Platform/Product. Load your application binary (.exe or .dll). The command reads all referenced assemblies and applies an automatic filter based on resources used in your application. This auto filter selection is recommended for .NET apps.
Note
We recommend you use the automatic resource filter. Manual filter editing is designed for advanced users only: those who work with multiple DevExpress-based projects (that may target various platforms) and know exactly which localization resources they need to translate. If you do need this kind of manual control, see Filtering.
Add a Culture
In the main application view, click Add Culture, select a language, and click Add.
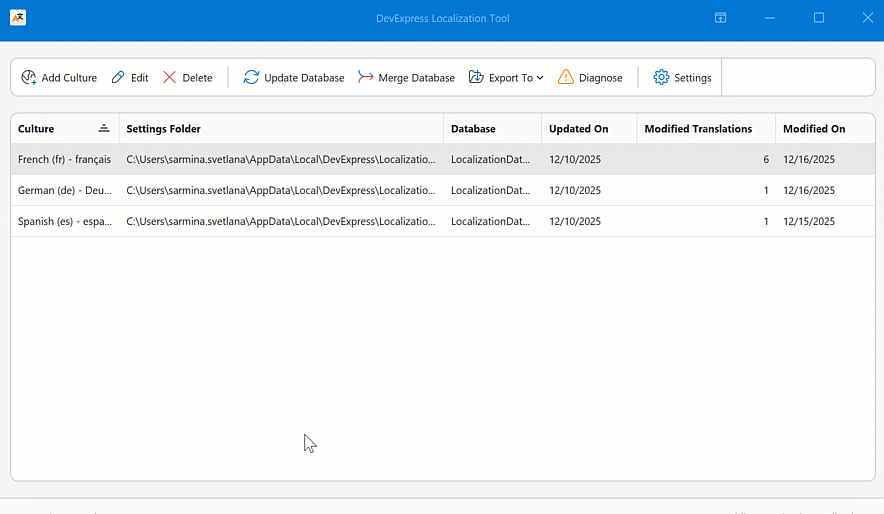
For each culture, the Localization Tool creates and maintains a separate XML-based localization database. This database stores all translations, metadata, comments, validation states, and change history. The database supports version upgrades and reuse of translations between DevExpress releases.
// Database Location
C:\Users\USER_NAME\AppData\Local\DevExpress\Localization.Tool\
Localize a Culture
Select an added culture and click Edit, or double-click the culture to open the resource editor:
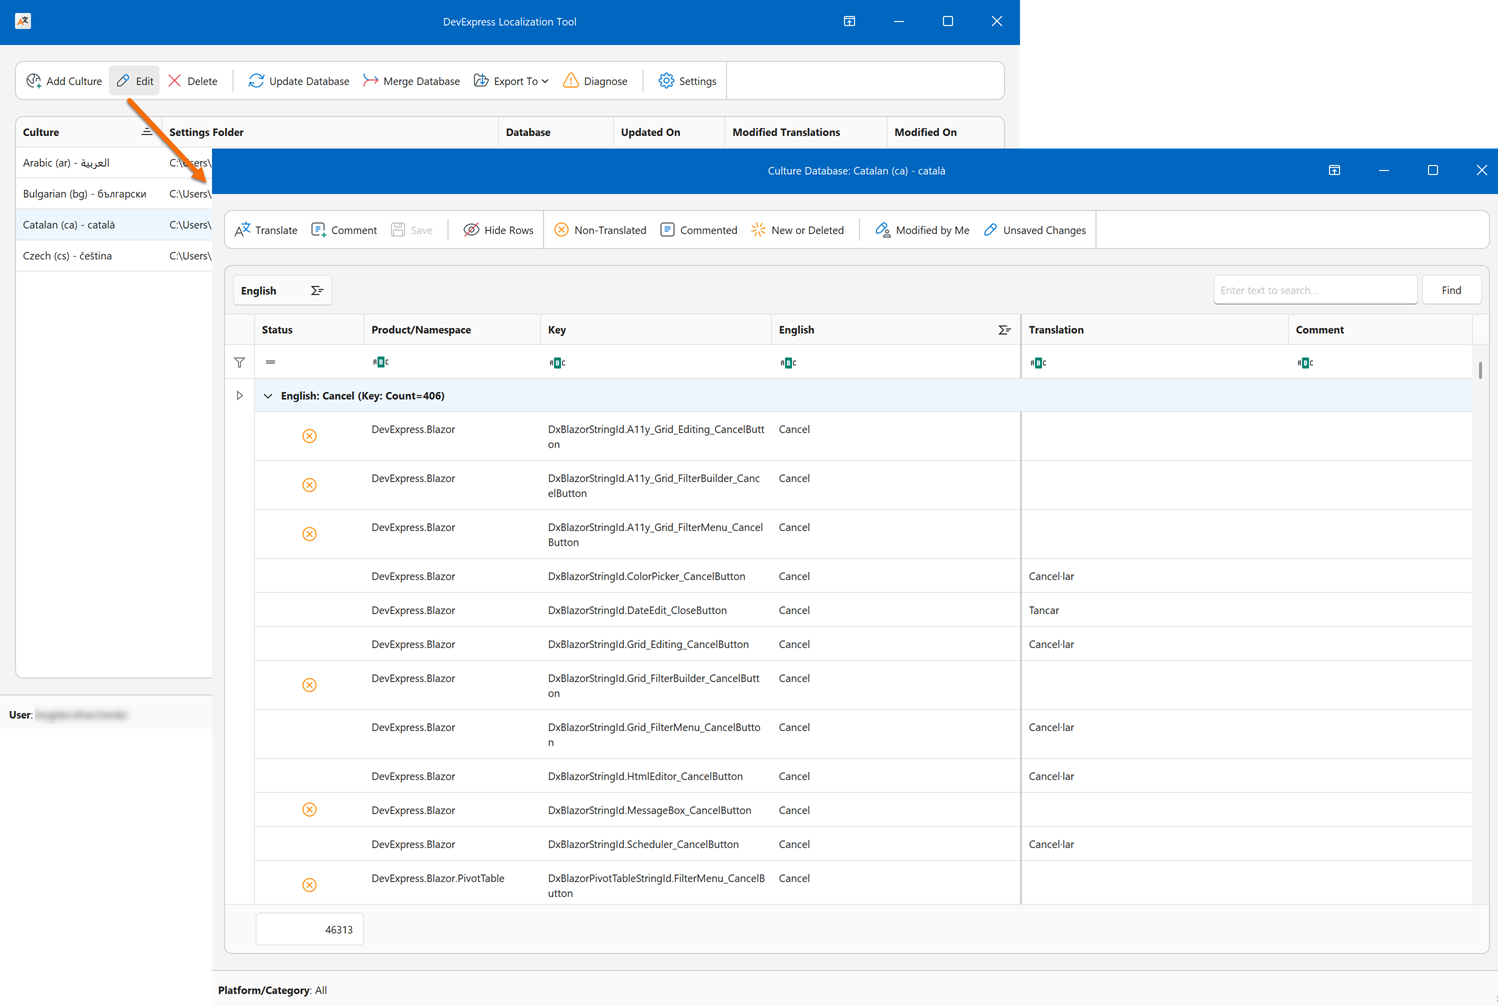
Select a row and click Add Translation in the header menu or in the popup context menu. Click Save to save changes.
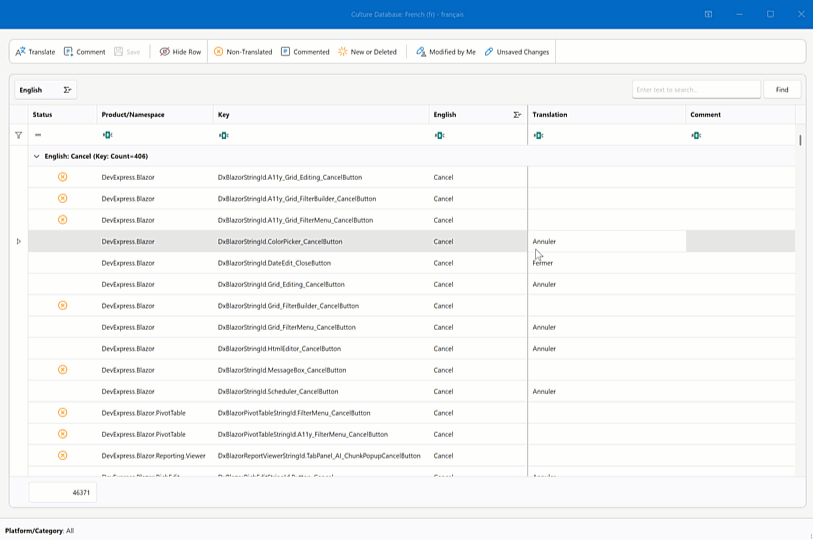
Edit Translations
Do one of the following to edit a single translation:
- Double-click a row and edit the translation in the Translate dialog.
- Click a cell in the Translation column and specify the translation.
- Select a row and click Translate in the top menu.
- Right-click a row and click Translate in the popup menu.
To edit multiple translations in a batch, do one of the following:
- Select multiple rows (hold Ctrl during selection) and click Add Translation.
- Select a group row and click Translate.
- Right-click a group row and click Translate in the popup menu.
Press Ctrl + S or click Save to save changes.
Note
Only translations with identical English strings can be edited simultaneously.
Customize UI and Shape Data
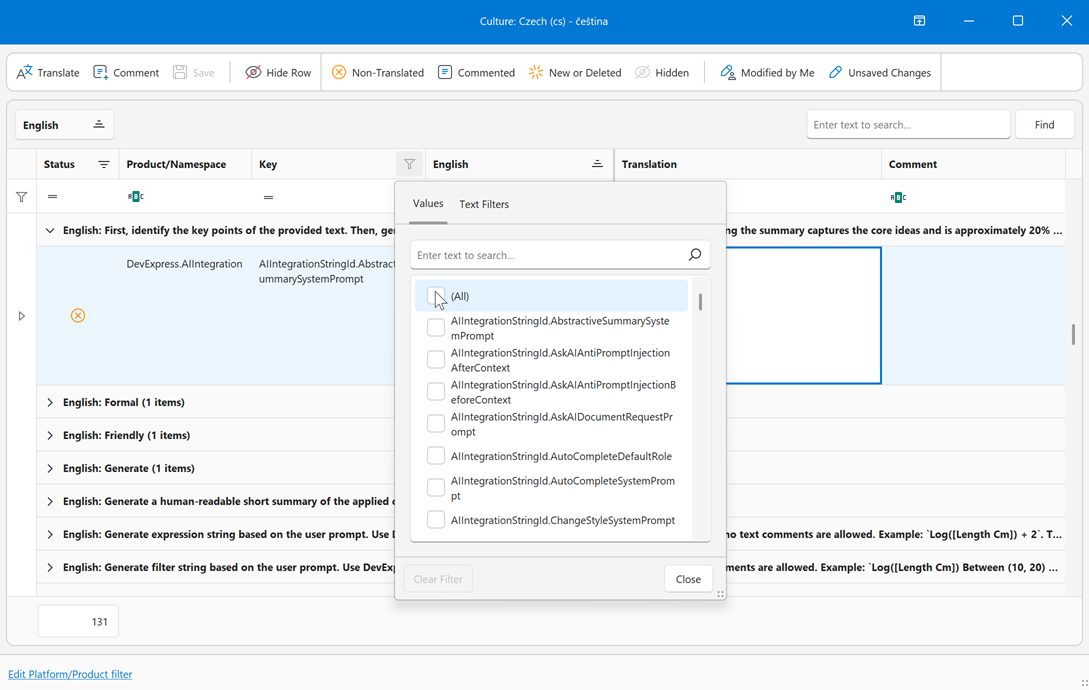
Right-click a column header and select Column Chooser in the popup menu to display or hide any of the following columns:
- Status
- Product/Namespace
- English
- Translation
- Date
- Key
- Key Prefix
- Key Prefix(ID)
- Path
- User
- Comment
You can sort, filter and/or group data, and use the built-in search box to find specific resource strings.
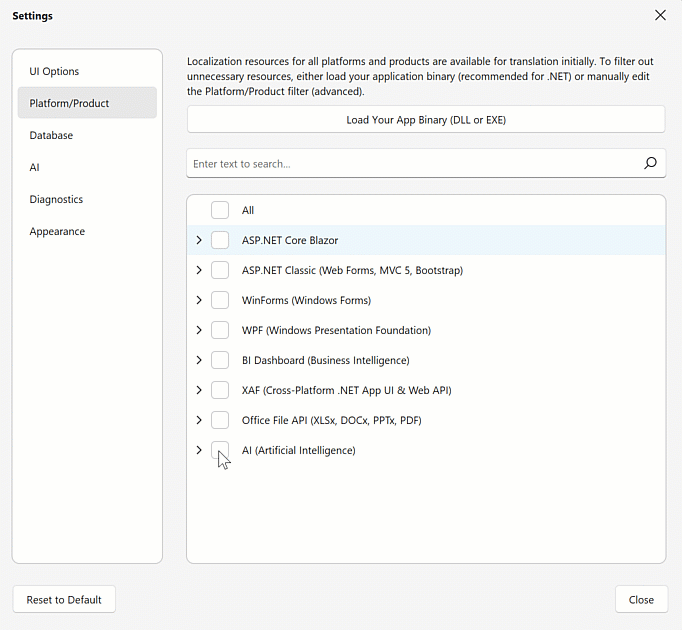
Filtering
You can filter out unused translation resources to reduce translation costs (each product resource may potentially include hundreds or thousands of strings to be localized). The recommended way is to use automatic resource detection - see Getting Started.
As an alternative, you can edit the resource filter manually:
Settings | Platform/Product Page
Note
Manual filter editing is designed for advanced users only: those who work with multiple DevExpress-based projects (that may target various platforms) and know exactly which localization resources they need to translate.
This page lists all DevExpress assemblies, split by modules. You can unselect unused assemblies to hide translation resources for these assemblies. This is a global filter that works at the data storage level. A translation contributor cannot access filtered resources in any way unless they modify the Platform/Product filter.
An assembly can be used in multiple modules. When you select an assembly (for example, DevExpress.AIIntegration), the Localization Tool selects this assembly in all modules that include it.
The resulting filter is saved to the following file: <Tool’s directory>\Data\PlatformModuleFilter.json
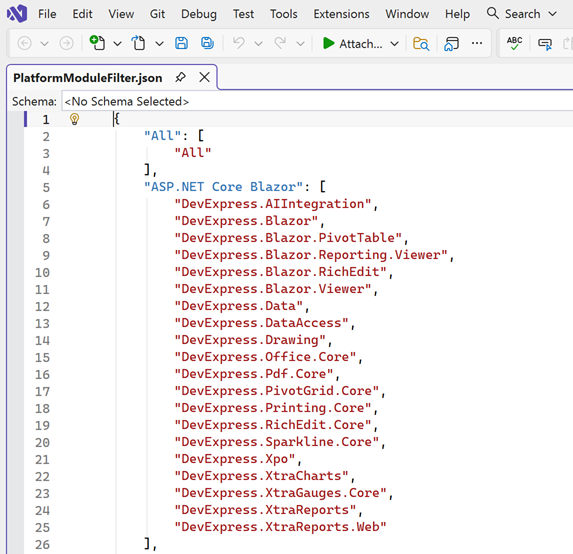
You can edit this file directly and bypass the UI editor.
// File path (assuming the Tool is located at C:\DevExpressLocalizationTool)
C:\DevExpressLocalizationTool\Data\PlatformModuleFilter.json
Tip
You can also change the Platform/Product filter on export to a merged RESX file. Strings are exported from selected assemblies only. Changes to the filter are not saved in application settings.
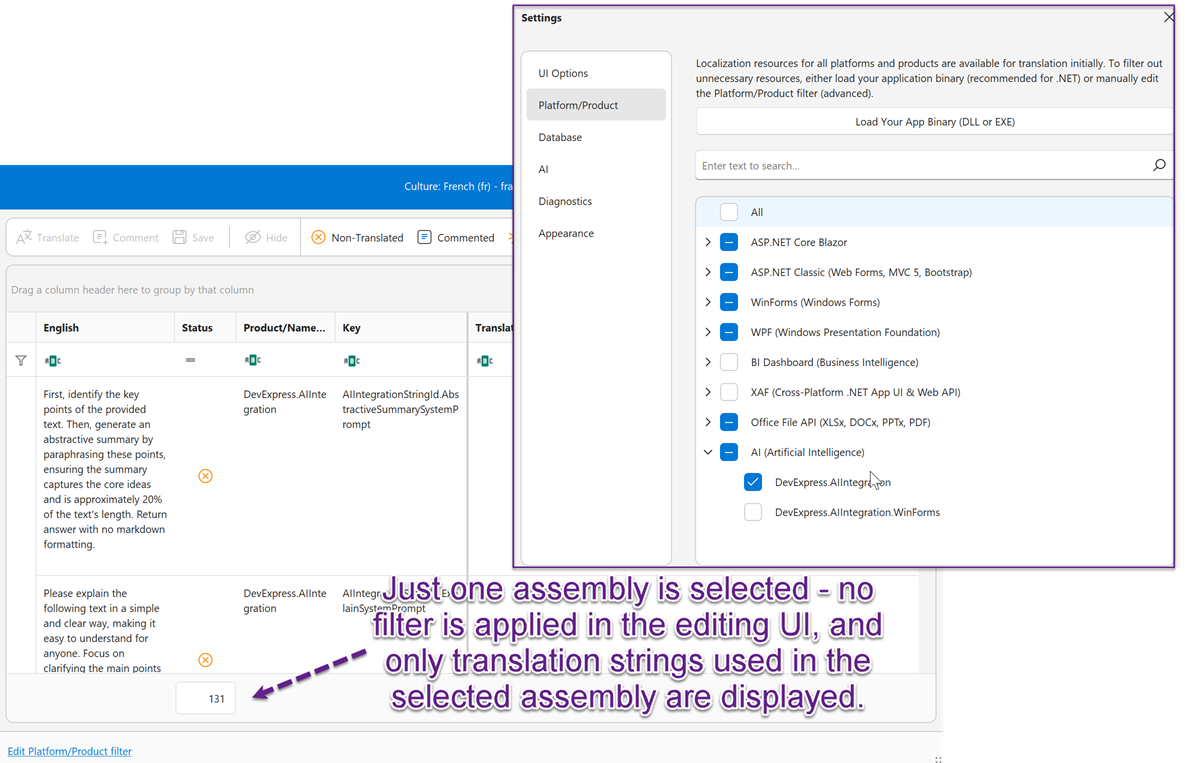
“Edit Platform/Product Filter” Command (Editing UI)
Note
Manual filter editing is designed for advanced users only: those who work with multiple DevExpress-based projects (that may target various platforms) and know exactly which localization resources they need to translate.
You can filter translation resources in the editing UI - no need to close the edited culture and open application settings. Click the Edit Platform/Product Filter command in the left bottom corner of the editing UI to open the Platform/Product settings page:
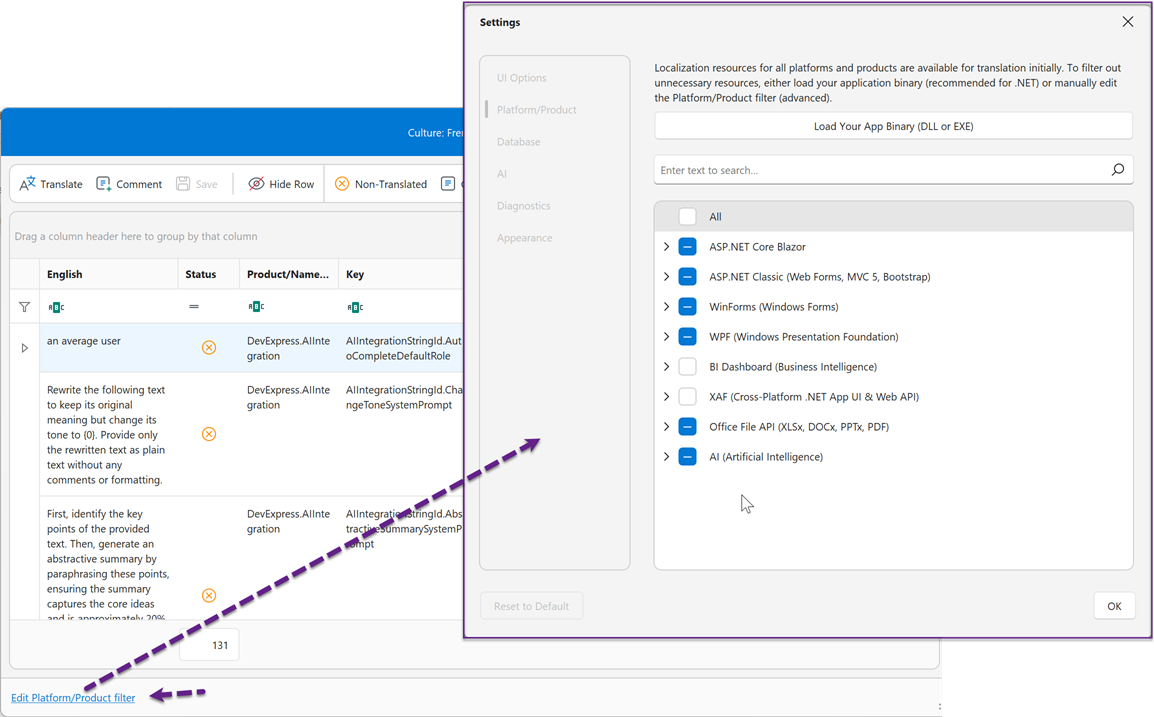
Note
The modified filter is applied to all cultures.
Grid UI Filters
Unlike the Platform/Product filter, a client-side grid filter does not affect the PlatformModuleFilter.json file or export options. Grid filters are designed for quick review of specific strings.
The editing UI includes built-in buttons for Status filters:
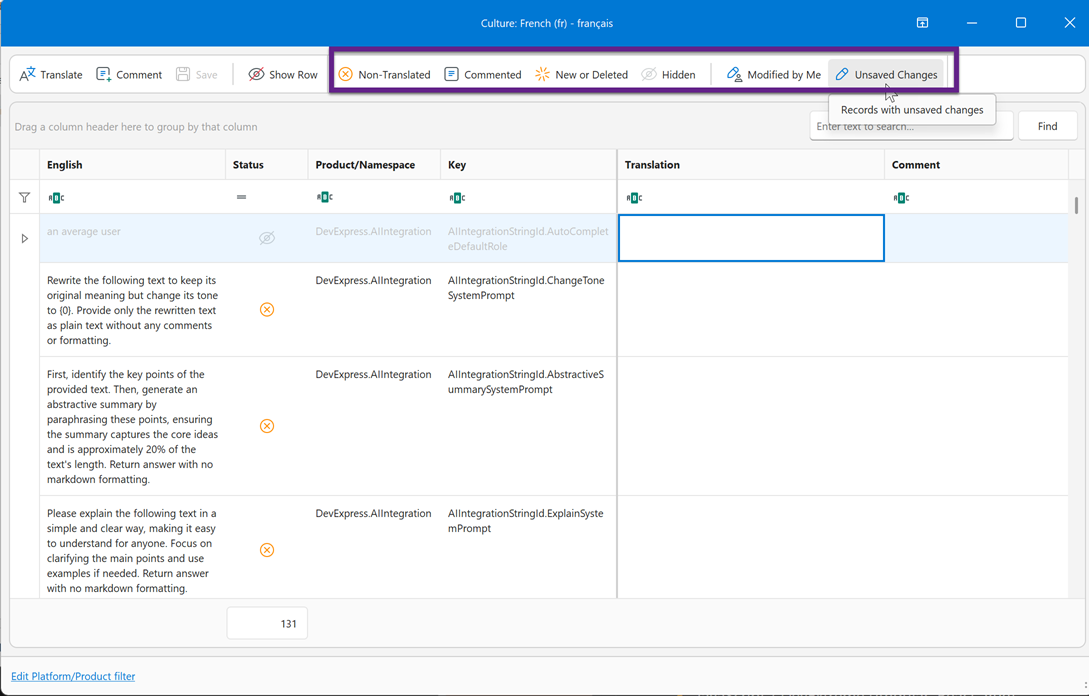
To fine-tune filters, use filter popup menus in column headers:
Export to Satellite Assemblies
Satellite assemblies store resource files separately from the main application executable to reduce the size of the main assembly. New languages are easy to add (no recompilation required), and different versions of resources can exist independently. Refer to the following help topic for more information: Satellite Resource Assemblies.
Compatible Platforms/Products
- WinForms
- WPF
- Blazor
- ASP.NET Web Forms
- ASP.NET MVC
- .NET Reports
- BI Dashboard
- .NET MAUI
- Cross-Platform .NET App Framework (XAF)
- JavaScript / DevExtreme (Angular, React, Vue)
Export Steps
Prerequisites
Download the latest version of the Localization Tool from the DevExpress localization GitHub repository under the “DevExpress Localization Tool” section:
Run the Localization Tool, select v26.1.2 in the popup window, and click Download. Resources, including assemblies, are downloaded to the Localization Tool’s directory:
 // Path used in this tutorial
 C:\DevExpressLocalizationTool
The Localization Tool does not create satellite assemblies during export. The tool updates/modifies downloaded source assemblies.
    // Assembly location
    C:\DevExpressLocalizationTool\Resources\Satellites-25.2.7\NETCore
    // For .NET Framework, select the "Framework" folder in the Satellites-25.2.7 directory
Modify Downloaded Assemblies
In this tutorial, we export a French culture for a .NET 8+ application. Corresponding assemblies are located at the following path:
C:\DevExpressLocalizationTool\Resources\Satellites-25.2.7\NETCore\fr
To localize a .NET Framework application, select an assembly folder in the “Framework” directory.
Create a French culture (see Add a Culture). Open the editing UI and make translation changes (otherwise, the Export To → Assemblies option is inactive).
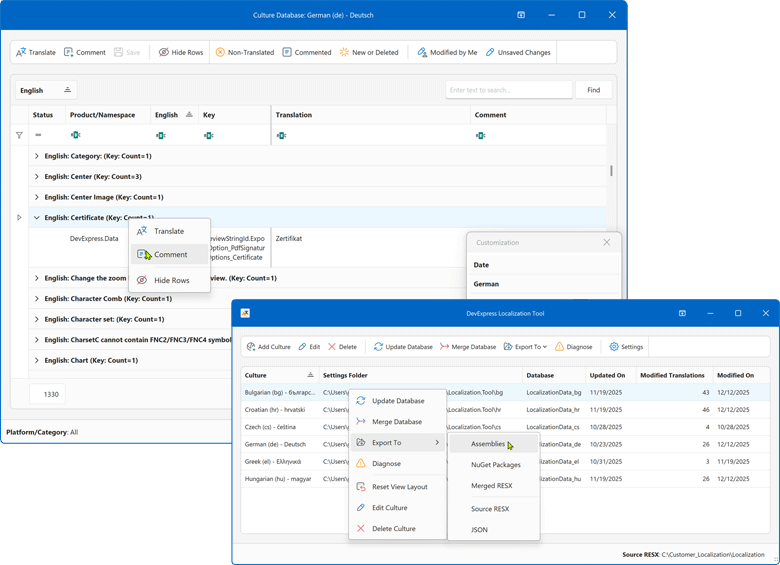
In the main menu, select the French culture and click Export To → Assemblies.
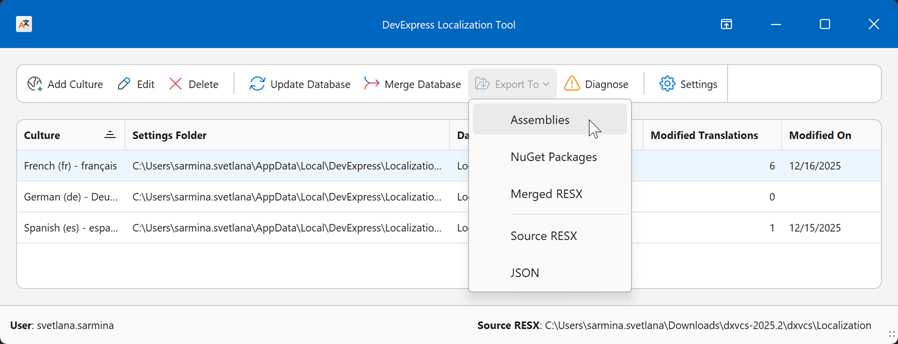
In the export dialog, select the folder with downloaded assemblies and click Export to update source assemblies with your modifications.
 // Assembly location for .NET
 C:\DevExpressLocalizationTool\Resources\Satellites-25.2.7\NETCore\fr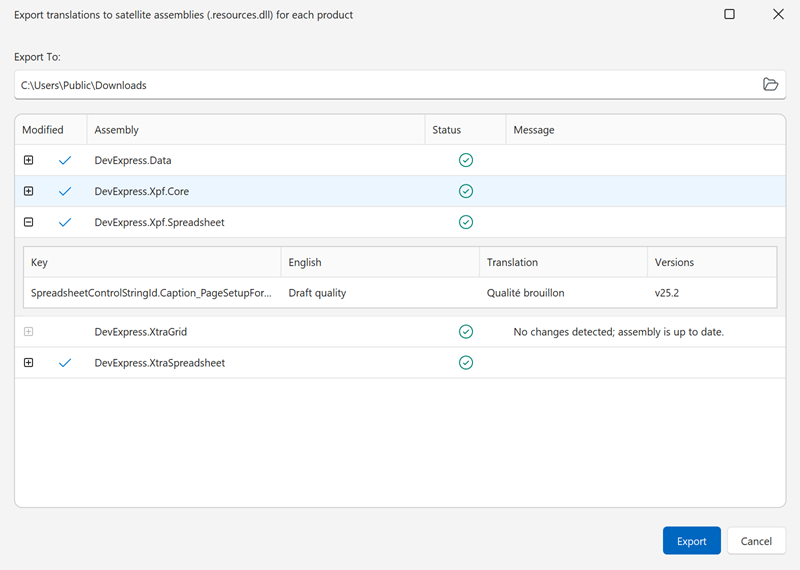
Tip
Refer to the following help topic for platform-specific information on how to localize an application with the help of satellite assemblies: Platform-Specific Localization.
Note
If you deploy a .NET Framework application to a Microsoft Internet Information Services (IIS) web server, use only Source RESX, Merged RESX, or JSON export formats.
The other formats involve modified satellite/localization assemblies. The default IIS policy blocks such assemblies. (The following error is thrown: “Could not load file or assembly ‘XXX’ or one of its dependencies. Strong name signature could not be verified…(Exception from HRESULT: 0x80131045)”.)
This limitation does not apply to other deployment environments or .NET-based apps.
Export to Merged/Single RESX
RESX files are easy to manage and do not require signing. Merged RESX files can be used together with localization assemblies included in the DevExpress installation (for example, de, es, ja).
The Export to Merged/Single RESX export option is useful when you need to modify specific strings while preserving the default translations provided by DevExpress. Modify the required strings, select Export Only Modified Resources in the export dialog, and export a small merged RESX file that contains only your changes. At runtime, your custom strings override the default localization, while all other strings continue to use the built-in translations.
Compatible Platforms/Products
- WinForms
- WPF
- Blazor
- ASP.NET Web Forms
- ASP.NET MVC
- .NET Reports
Export Steps
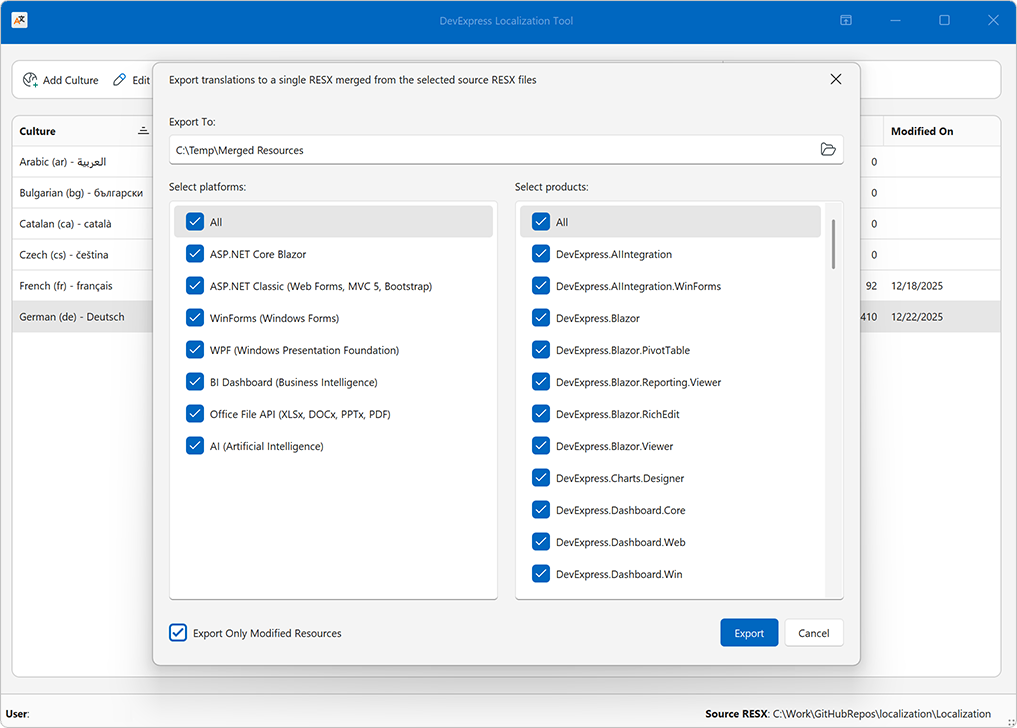
In the Localization Tool’s main menu, select a culture and click Export To → Merged RESX.

In the Export dialog:
- Specify the target folder as the export folder for resources.
- Choose platforms and products to be localized. Strings are exported from selected assemblies only. Changes to the filter are not saved in application settings.
- Click Export to save the RESX files for the original English culture and the target culture.
Tip
Check Export Only Modified Resources to reduce file size.
App Localization
Add the exported RESX files to the project folder.
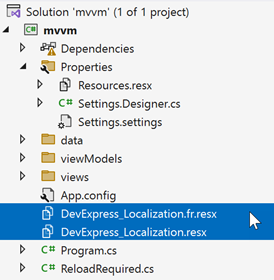
Register custom resources in the .csproj (or .vbproj) file. The following code registers the French culture:
<EmbeddedResource Update="DevExpress_Localization.resx">
<Generator>ResXFileCodeGenerator</Generator>
<LastGenOutput>DevExpress_Localization.Designer.cs</LastGenOutput>
<SubType>Designer</SubType>
</EmbeddedResource>
<EmbeddedResource Update="DevExpress_Localization.fr.resx">
<DependentUpon>DevExpress_Localization.resx</DependentUpon>
</EmbeddedResource>
<Compile Update="DevExpress_Localization.Designer.cs">
<DependentUpon>DevExpress_Localization.resx</DependentUpon>
<AutoGen>True</AutoGen>
<DesignTime>True</DesignTime>
</Compile>
Set the custom culture as the current culture and specify the custom localization manager at application startup. The following code snippet specifies the French culture in a WinForms application:
namespace myApp { internal static class Program { [STAThread] static void Main() { Application.EnableVisualStyles(); Application.SetCompatibleTextRenderingDefault(false); UserLookAndFeel.Default.SetSkinStyle(SkinStyle.WXICompact); Thread.CurrentThread.CurrentCulture = new System.Globalization.CultureInfo("fr"); Thread.CurrentThread.CurrentUICulture = new System.Globalization.CultureInfo("fr"); DevExpress.Utils.Localization.XtraLocalizer.UserResourceManager = DevExpress_Localization.ResourceManager; Application.Run(new Form1()); } } }Rebuild the project.
Export to Source/Multiple RESX (Advanced)
When you save changes for a culture, the Localization Tool updates an intermediate, XML-based localization database. This database stores all translations, metadata, comments, validation states, and change history for that culture.
Use the Export to Source/Multiple RESX export option when you need to share localization changes, merge updates into a remote repository, or manually build satellite assemblies.
The Localization Tool updates source files it prompted you to download on the first application run (see Getting Started).
Compatible Platforms/Products
- WinForms
- WPF
- Blazor
- ASP.NET Web Forms
- ASP.NET MVC
- .NET Reports
- BI Dashboard
- .NET MAUI
- Cross-Platform .NET App Framework (XAF)
- JavaScript / DevExtreme (Angular, React, Vue)
Export Steps
This tutorial exports a French culture.
Note
The Localization Tool is located in the following directory: C:\DevExpressLocalizationTool. Listed paths are relative to the Tool’s location and may be different on your machine.
Translation resources are located at the following path:
C:\DevExpressLocalizationTool\Sources\Localization-25.2.7
Create a French culture (see Add a Culture). Open the editing UI and make translation changes (otherwise, the Export To → Source RESX option is inactive).
In the Localization Tool’s main menu, select the French culture and click Export To → Source RESX:
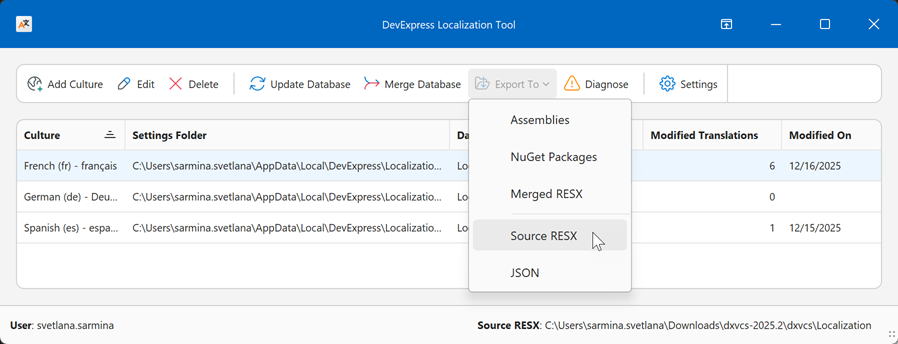
Specify the folder with source RESX localization resources:
C:\DevExpressLocalizationTool\Sources\Localization-25.2.7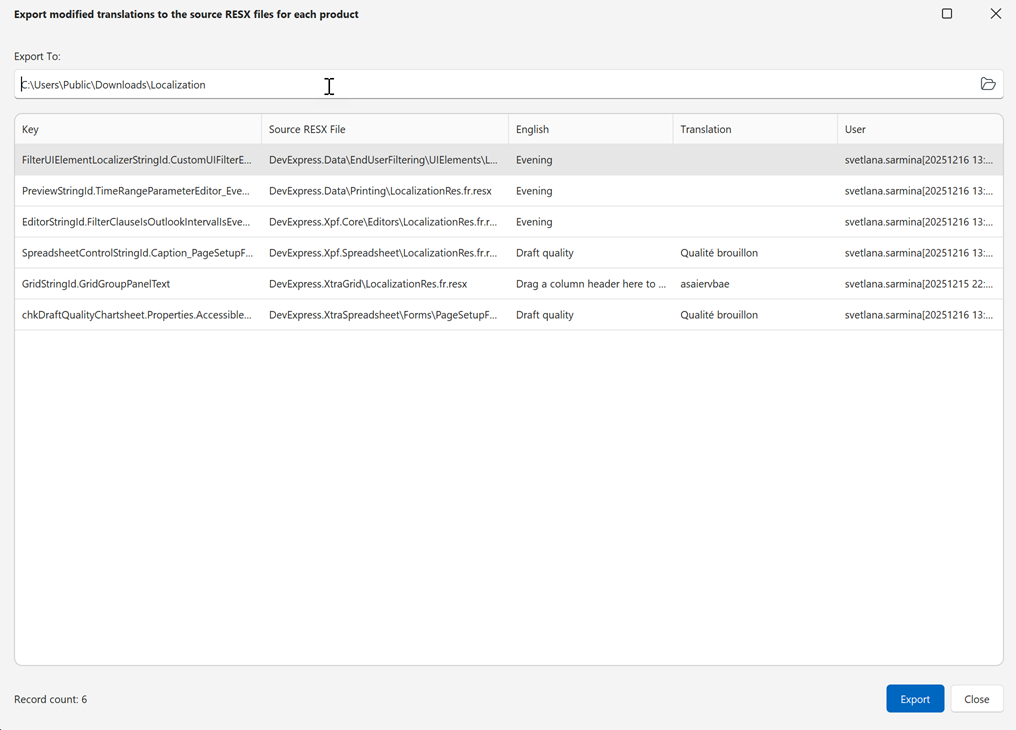
Click Export to update resources wih your modifications.
App Localization
Clone the Localization Project
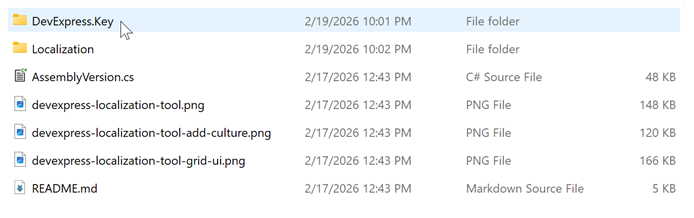
- Clone the DevExpress localization GitHub repository to a local directory. This tutorial uses the following path: C:\work\localization.
Create a DevExpress.Key directory in the cloned folder.
Extract the Public Portion of the Key
Locate a signed DevExpress assembly. For example, use the following path:
C:\Users\USERNAME.nuget\packages\devexpress.xpo\25.2.4\lib\net8.0\DevExpress.Xpo.v25.2.dll
Locate the sn.exe file at the following (or similar) path:
C:\Program Files (x86)\Microsoft SDKs\Windows\v10.0A\bin\NETFX 4.8.1 Tools\x64\sn.exe
Open Command Prompt as administrator. In Command Prompt, open the folder that contains the sn.exe file. For example:
cd C:\Program Files (x86)\Microsoft SDKs\Windows\v10.0A\bin\NETFX 4.8.1 Tools\x64Run a command with the following parameters to export the public key:
sn.exe -e <path to the signed dll> <output file>For example:
sn.exe -e "C:\Users\USERNAME\.nuget\packages\devexpress.xpo\25.2.4\lib\net8.0\DevExpress.Xpo.v25.2.dll" "C:\work\localization\DevExpress.Key\DevExpress.Key.snk"
Prepare Localization Projects for Delayed Signing
- With Visual Studio
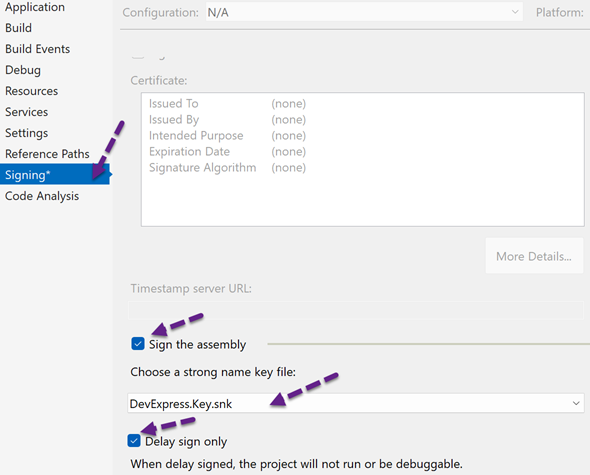
Open the following solution file in Visual Studio: C:\work\localization\Localization\Localization.sln. Right-click a project and select Properties:

Select Sign the assembly and specify the key file (.snk). Select Delay sign only. Repeat this for every project you want to build with delayed signing.
- With .props and .tartets files
Create a new file: C:\work\localization\Localization\Directory.Build.targets. Change its content as follows:
<?xml version="1.0" encoding="utf-8"?>
<Project xmlns="http://schemas.microsoft.com/developer/msbuild/2003">
<PropertyGroup Label="DevExpressDelaySigningDefaults">
    <DXLocalizationKeyFile Condition="'$(DXLocalizationKeyFile)' == ''">$(MSBuildThisFileDirectory)DevExpress.Key\DevExpress.Key.snk</DXLocalizationKeyFile>
</PropertyGroup>

<!-- Import the delay-signing props after individual projects so it overrides local settings. -->
<Import Project="$(MSBuildThisFileDirectory)DevExpress.DelaySigning.props"
        Condition="Exists('$(MSBuildThisFileDirectory)DevExpress.DelaySigning.props')" />
</Project>
Create a new file: C:\work\localization\Localization\DevExpress.DelaySigning.props. Change its content as follows:
<?xml version="1.0" encoding="utf-8"?>
<Project xmlns="http://schemas.microsoft.com/developer/msbuild/2003">
<!-- Applies delayed signing to every C# project in this tree once Localization\DevExpress.Key\DevExpress.Key.snk is present. -->
<PropertyGroup Label="DevExpressDelaySigning">
    <DXLocalizationKeyFile Condition="'$(DXLocalizationKeyFile)' == ''">$(MSBuildThisFileDirectory)DevExpress.Key\DevExpress.Key.snk</DXLocalizationKeyFile>
</PropertyGroup>

<PropertyGroup Condition="'$(MSBuildProjectExtension)' == '.csproj' and Exists('$(DXLocalizationKeyFile)')">
    <SignAssembly>true</SignAssembly>
    <DelaySign>true</DelaySign>
    <AssemblyOriginatorKeyFile>$(DXLocalizationKeyFile)</AssemblyOriginatorKeyFile>
</PropertyGroup>
</Project>
Build the Localization Solution
Open the Command Prompt with administrator privileges.
In Command Prompt, open the Localization folder that contains the Localization.sln solution.
For example:
cd C:\Work\localization\LocalizationExecute
MSBuildwith the following parameters:Localization.sln /t:Rebuild /p:Configuration=Release /p:Platform="Any CPU" /mThis command rebuilds every project, applies the shared delay-sign configuration, and outputs localized satellite assemblies to C:\Work\localization\Localization\DevExpress.DLL<culture>\*.resources.dll.
For example:
"C:\Program Files\Microsoft Visual Studio\2022\Community\MSBuild\Current\Bin\MSBuild.exe" Localization\Localization.sln /t:Rebuild /p:Configuration=Release /p:Platform="Any CPU" /m
Refer to the following help topic for platform-specific information on how to localize your application with the help of satellite assemblies: Platform-Specific Localization.
Export to JSON
Specific ASP.NET components include client-based controls that are only localized with JSON. The Localization Tool generates JSON files for Reports, RichEdit, Spreadsheet, and BI Dashboard.
Compatible platforms/products
DevExtreme widgets used in ASP.NET Core/Reporting.
Export Steps
In the main menu, select a culture and click Export To → JSON.
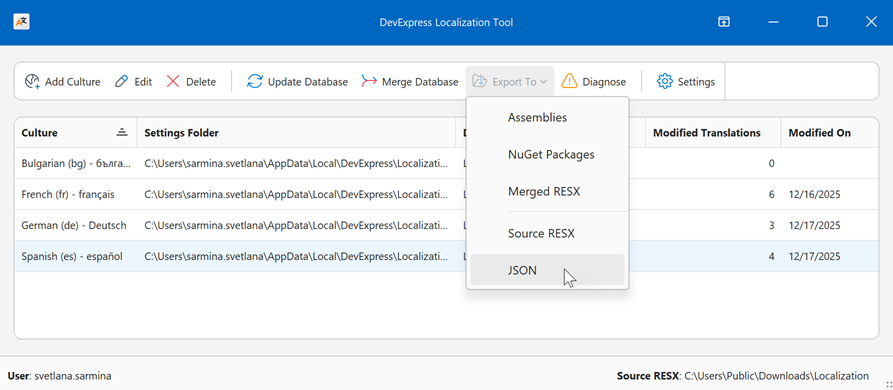
// Default export path
C:\Users\Public\<culture-name>
App Localization
Refer to the following component-specific help topics for information:
- ASP.NET Core Reports Localization
- ASP.NET Core RichEdit Localization
- ASP.NET Core Spreadsheet Localization
- ASP.NET Core BI Dashboard Localization
Export to NuGet Packages (de, es, ja only)
NuGet packages facilitate easy distribution and versioning of localization resources, support dependency management, and can include multiple cultures in one package for convenient resource management.
Note
The Localization Tool only updates existing NuGet packages. App localization with NuGet packages is only possible for pre-built localized resources (de, es, ja).
Compatible Platforms/Products
- WinForms
- WPF
- Blazor
- ASP.NET Web Forms
- ASP.NET MVC
- .NET Reports
- BI Dashboard
- .NET MAUI
- Cross-Platform .NET App Framework (XAF)
- JavaScript / DevExtreme (Angular, React, Vue)
Limitations
The following DevExpress UI components cannot be localized with NuGet packages:
- ASP.NET Core RichEdit
- ASP.NET Core Spreadsheeet
- ASP.NET (Web Forms/MVC/Bootstrap) Spreadsheet for localization of functions and context menu items
- Web Dashboard Control for Angular, React, Vue, JavaScript, and Blazor WebAssembly
- Web Reporting Controls for Angular, React, Vue, JavaScript, and Blazor WebAssembly if the application does not load localization from the server
- Web Reporting Controls for Standalone Blazor WebAssembly
- Native Report Viewer for Standalone Blazor WebAssembly
Export Steps
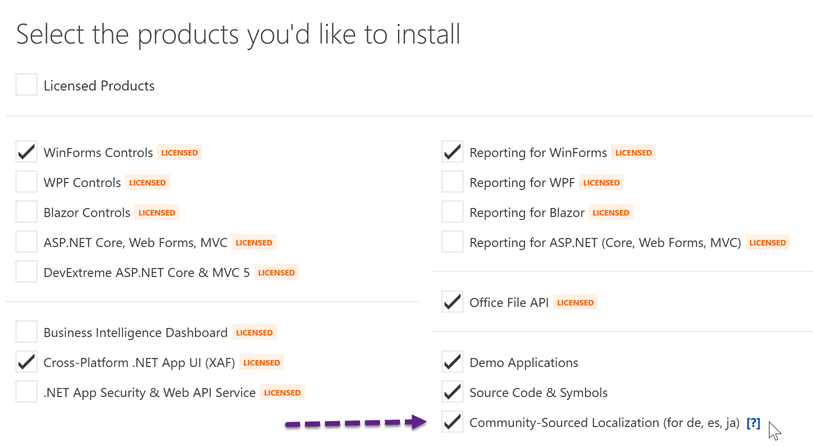
Install localization NuGet packages (if they have not been installed). Check Community-Sourced Localization in the Unified Component Installer.
Run the Localization Tool as administrator. In the main menu, select a culture and click Export To → NuGet Packages.
Note
This option is active only after you edit a translation and save changes.

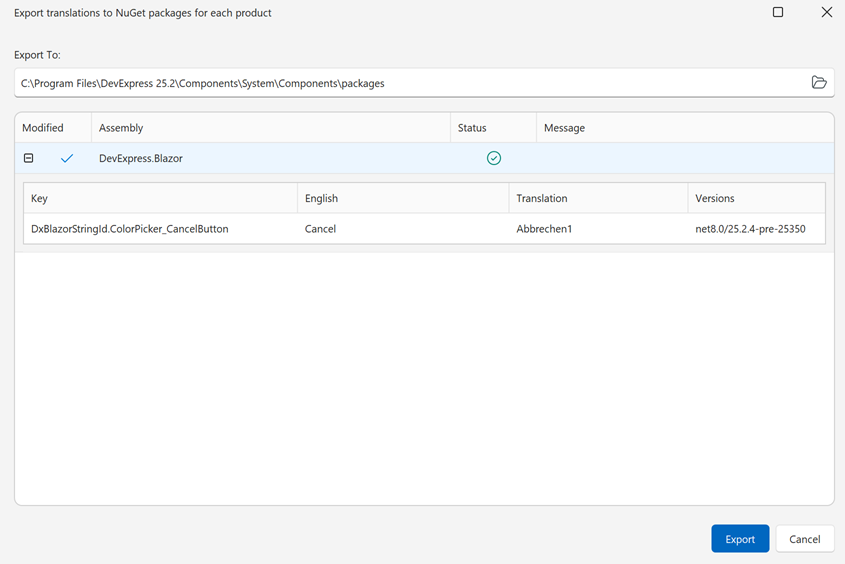
Source NuGet packages are located in the following folder: C:\Program Files\DevExpress 26.1\Components\System\Components\packages. In the Export dialog, specify this folder as the export folder (if it is not already set in Settings) and click Export.
Close Visual Studio. Clear the NuGet cache to remove older NuGet packages.
Execute the following command in the Command Prompt as administrator:
dotnet nuget locals global-packages --clear- Clear the DevExpress NuGet cache.
- Open the C:\Program Files\DevExpress 26.1\Components\Offline Packages folder.
- Delete the folder that corresponds to the modified package.
App Localization
Note
Patching a package invalidates its original NuGet signature. This does not affect application runtime behavior. However, restore or build failures and security alerts can occur, depending on NuGet settings, security policies, and supply-chain analysis tools in the environment. If the environment blocks unsigned NuGet packages, use a different export format or manually sign the modified packages.
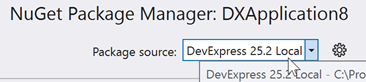
In the NuGet Package Manager, set the installer-generated local DevExpress NuGet feed as the package source.
Install the modified NuGet package with localized resources. Before installation, ensure that an older version of the package is not cached.
Collaboration Infrastructure
- Track Changes
- The Localization Tool displays information about the current and previous translations, as well as the author and date of the last change.
- Merge Translations
- The Merge Database option allows multiple authors to work on the same culture. Authors share modified database files, and a reviewer can import these changes, review modified translations, and resolve any translation conflicts.
Refer to the following help topic for mor information: Collaboration.
Version Control
An existing culture is version-independent, but each DevExpress version may have localization-related specifics (the set of localization strings may change with each version). Timely upgrades help keep full translation coverage.
Upgrade to a New Version
Refer to the following help topic for upgrade steps: Upgrade Translations to a New DevExpress Version.
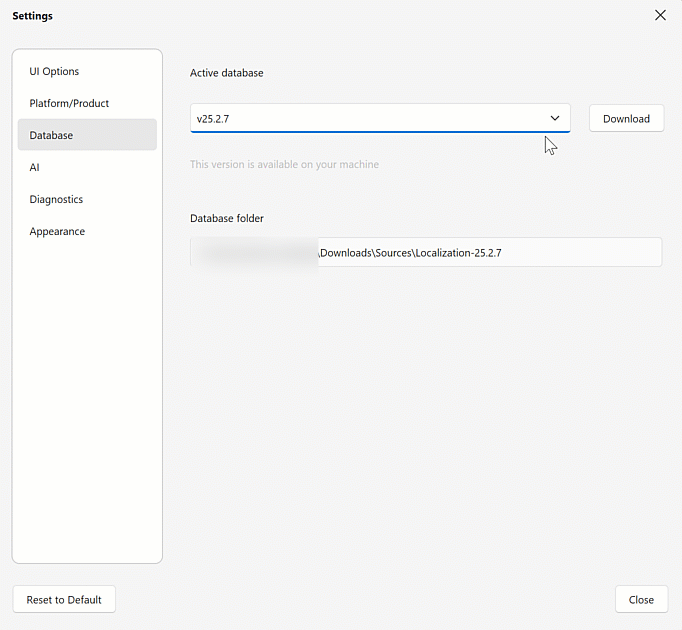
Switch DevExpress Versions in Settings (Advanced)
Note
This option is designed for advanced users only: those who work with projects that use different DevExpress versions.
Source files for multiple major versions can coexist on the same machine, but the intermediate XML database is always the same, so you need to update it each time you change the version. If a string is deleted after a version upgrade, it is deleted permanently (even if you switch back to the version in which it exists).
To manage the version in use, follow these steps:
Open the Settings | Database page and select the required version in the Active database popup. If resources for the selected version are missing, the Localization Tool prompts you to download them:
In the main application menu, select the target culture and click Update Database:

After the update operation completes, you can review related changes in the log file (optional) and adjust translations as needed.
 // Log file name
 DataUpdate[<date/time>].\<culture-name>.txt
 // Log file location (assuming the Tool is located at C:\DevExpressLocalizationTool)
 C:\DevExpressLocalizationTool\Logs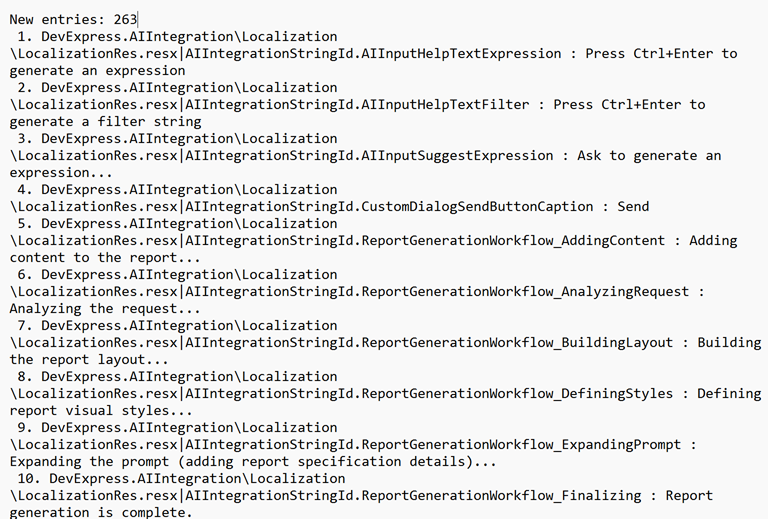
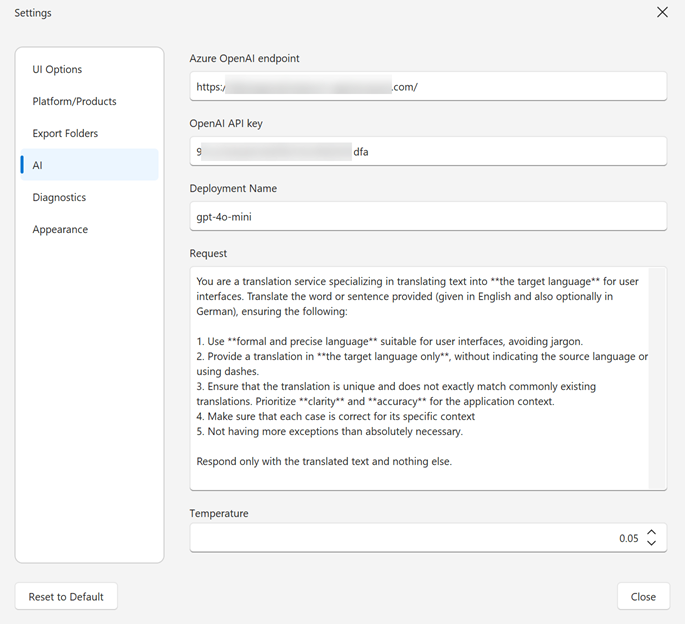
AI-powered Translation
The Localization Tool features a built-in mechanism for AI-powered translation.
Get Started
Specify the following AI-related settings in Settings → AI:
- Azure OpenAI endpoint
- OpenAI API key
- Deployment name (the AI model to use)
- Request (prompt)
- Temperature
Generate an AI translation
Select the added culture and click Edit, or double-click the culture to open the resource editor.
Select a row and click Add Translation in the header menu or in the popup context menu.
In the translation dialog, click the AI translation button
 :
: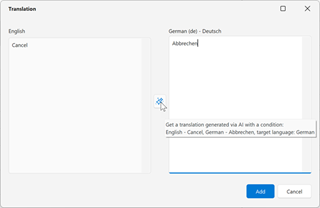
Table of Settings
Page | Setting | Description |
|---|---|---|
UI Options | Multi line editor mode | Specifies whether to use in-place or popup editor for multi-line text. |
Grid row auto height | Specifies whether grid rows adjust their height to display the entire text. | |
Skip hidden rows | Specifies whether to remove hidden rows from visible records. You can deactivate this option to restore hidden rows. | |
Synchronize product collections with data changes | Specifies whether to regenerate the collection of platforms and products on each data source update. If this setting is disabled, the data source updates slightly faster. We recommend that you enable this setting. If the product collection changes and this setting is inactive, the export process malfunctions. | |
Platform/Product | For advanced use only (see Filtering). | |
Database | Active database | For advanced use only (see Version Control). |
Database folder | Specifies the directory that contains localization resources (RESX files and satellite assemblies). | |
AI | Azure OpenAI endpoint | Specifies the Azure OpenAI endpoint. |
OpenAI API key | Specifies the Azure OpenAI API key. | |
Deployment name | Specifies the AI model to use. | |
Request | Specifies the AI prompt. | |
Temperature | Specifies the randomness and creativity of AI output. | |
Diagnostics | This page lists available diagnostic metrics. Selected diagnostic metrics are included in the diagnostic log. | |
Appearance | Use system settings | Specifies whether to use the default system skin/palette for the Localization Tool. |
Compact mode | Specifies whether to activate compact mode. | |
Skin[1] | Specifies the application skin. | |
Palette[1] | Specifies the palette for the selected skin. |