Declare Validation Rules
- 6 minutes to read
This topic describes two ways to declare and apply rules that validate business objects and their property values:
- Apply Validation Rules in Code
Use this solution if you want to modify sources of the required business classes. - Apply Validation Rules in the Model Editor
Use this solution to declare a Validation Rule for a business class whose source code cannot be modified (e.g., a business class declared in a third-party module).
Note
Before you implement one of these solutions, ensure that you added a Validation Module to a module project.
Requirements for Non-Persistent Objects
If you want to validate non-persistent objects in the Save or Delete Context, ensure that the following conditions are met.
- The non-persistent class implements the INotifyPropertyChanged interface or is inherited from the
NonPersistentBaseObjectorNonPersistentLiteObjectclass. - The static AutoSetModifiedOnObjectChangeByDefault field or AutoSetModifiedOnObjectChange property is set to
true. - You use the CreateObjectSpace(Type) method to create an Object Space.
- You call the CreateObject<ObjectType>() or GetObject(Object) method to get a non-persistent object.
- If you want to use a validated value of a non-persistent object property, you handle the BaseObjectSpace.ObjectSaving, BaseObjectSpace.ObjectSaved, or BaseObjectSpace.Committed event. These events are raised after successful validation. Note that the ActionBase.Executed event is raised before validation occurs.
Apply Validation Rules in Code
To apply a specific Rule to a class or a property, add an attribute with the same name as the required Rule. To see the full list of built-in attributes, refer to the following help topic: Validation Rules. An attribute’s parameters allow you to specify a Rule’s properties. For example, the ContextIDs parameter allows you to specify a Context for a Rule.
You can apply Rule attributes only to public members of a business class.
The code below applies the RuleCriteria Rule to the Incident persistent class and the RuleRequiredField Rule to the Incident.Subject property. Both Rules are checked when you save this object. They also check if the property values are null, because the SkipNullOrEmptyValues parameter of these Rules is set to false (for the second Rule, it is the default value).
using System.ComponentModel;
using DevExpress.Persistent.Validation;
//...
[DefaultClassOptions]
[DefaultProperty(nameof(Subject))]
[RuleCriteria("RuleCriteria for Incident", DefaultContexts.Save,
    "AssignedTo is not null", SkipNullOrEmptyValues = false)]
public class Incident : BaseObject {
    [RuleRequiredField("RuleRequiredField for Incident.Subject",
       DefaultContexts.Save)]
    public virtual string Subject { get; set; }
    public virtual Person AssignedTo { get; set; }
}

[DefaultClassOptions]
public class Person : BaseObject {
    public virtual string FirstName { get; set; }
    public virtual string LastName { get; set; }
    // ...
}

// Make sure that you use options.UseChangeTrackingProxies() in your DbContext settings.
To customize Validation Rules, use the PersistenceValidationController. Refer to its description to find an example of how to use this Controller.
If a value does not pass validation, an editor shows an error icon. The Validation Error pop-up dialog displays a brief description of each error.
In WinForms applications, a pop-up window shows the RuleSetValidationResultItem_ByTarget List View if a broken Validation Rule is detected. This List View details all broken Rules.
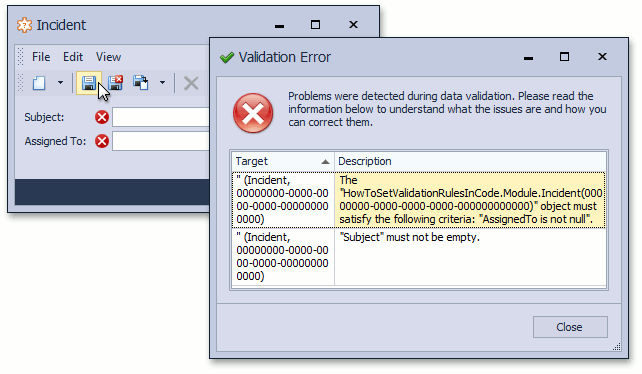
You can double click a record to view detailed information on a broken Rule and validation results.
You can also specify custom text for Rule messages. To do this, set the Rule attribute’s messageTemplate parameter in code or change the Rules | Rule node’s CustomMessageTemplate property in the Model Editor.
Apply Validation Rules in the Model Editor
You can use the Model Editor to declare a Validation Rule in the Application Model. The following Application Model nodes define Contexts and Rules:
ActionDesign | Actions | <Action>
Specify the node’s ValidationContexts property to use this Action as a Context with the specified ID.
Validation | Contexts
Use this node to localize Context captions. These captions are displayed in Views that show Rules objects. These objects contain information on Rules and Contexts used in your application. You can make these objects available in your application for administrative purposes. To localize a Context, select the Add… | ValidationContext item in the context menu of the Contexts node, and specify the
IDandCaptionproperties.Validation | ErrorMessageTemplates
This node allows you to change the default message template for a Rule type. Error messages show the new text when a Rule of this type is broken. Note that the
CustomMessageTemplateproperty of Rules | Rule nodes and a Rule attribute’sCustomMessageTemplateparameter override this text.Validation | Rules
This node contains Rules from this Module, and all referenced Modules, and allows you to define custom Rules. You can add a Rule (
RuleRequiredField,RuleRange, and so on) from the corresponding Add… context menu item and specify the new Rule’s properties. All Rules have aContextIDsproperty. Set this property to an Action’sValidationContextsproperty value or a Context identifier. You can also use the DefaultContexts.Save or DefaultContexts.Delete Context for Rules of any type.
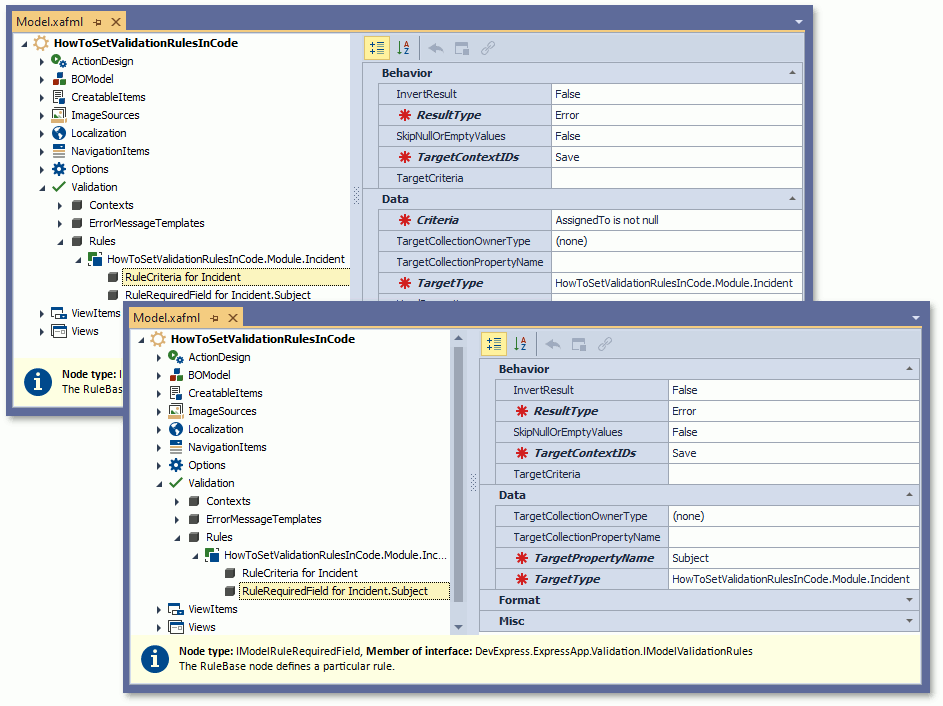
Invoke the Model Editor for a project that references a Validation Module to find information on Rules applied in code. This information is also available in a module where Rules are applied. This allows an application administrator to add and edit Rules and Contexts in the Model Editor. Note that this user must have access to the Model Editor. The following image shows how the Model Editor shows the Rules defined in the Apply Rule Attributes in Code section.
Soft Validation
You can define Soft Validation Rules - Rules that end users can ignore. Use Soft Validation to warn users that data is invalid, but allow them to commit changes anyway. Set the IRuleBaseProperties.ResultType property to Warning or Information to define an ignorable Rule in the Model Editor. To define this Rule in code, set the RuleBaseAttribute.ResultType parameter to Warning or Information. For more information on result types, refer to the following enumeration description: ValidationResultType.
Note
- Populate the IRule.UsedProperties collection with names of properties to be validated and highlighted in the UI if a warning or info Rule is broken.
- Set the ValidationModule.IgnoreWarningAndInformationRules property to
trueif you want to disable Soft Validation Rules so that a user is not notified if these Rules are broken.
The Validation | Soft Validation section of the FeatureCenter demo demonstrates how to implement and use Soft Validation. The default location of the application is %PUBLIC%\Documents\DevExpress Demos 25.2\Components\XAF\FeatureCenter.NET.XPO.
Define a Custom Rule Source
To create a custom Validation Rule Source, define a class that implements the IRuleSource interface. The interface’s IRuleSource.CreateRules method allows you to implement custom logic to instantiate Validation Rules.
Refer to the following interface description to see how to implement a custom Validation Rule Source: IRuleSource.