Create and Register a Custom Control in the Report Designer Toolbox (ASP.NET Web Forms)
- 6 minutes to read
This topic explains how to create a custom report control inherited from the XRLabel control and register the control in the End-User Report Designer Toolbox .
Prerequisites
Start with an existing Web Reporting application or create a new application as described in the following help topics:
- Add an End-User Report Designer to an ASP.NET Web Forms Application
- Create an ASP.NET Web Forms Application with a Report Designer
Create and Register a Custom Control in Visual Studio
To create a custom label control, do the following:
Add a new class (the CustomLabel class in this example), derive it from the XRLabel class, and introduce a new property
StringData. Mark this property with the Bindable attribute set to true. Override the PutStateToBrick protected method to assign the bindable property value to the VisualBrick.Text property:using System.ComponentModel; using DevExpress.XtraReports.UI; using DevExpress.Utils.Serializing; namespace CustomReportControlSample { public class CustomLabel : XRLabel { [Browsable(true), Bindable(false), Category("Data")] [XtraSerializableProperty] [DefaultValue("")] [DesignerSerializationVisibility(DesignerSerializationVisibility.Visible), EditorBrowsable(EditorBrowsableState.Always)] public string CustomNumber { get; set; } [Browsable(true), Bindable(true), Category("Data")] [XtraSerializableProperty] [DefaultValue("")] [DesignerSerializationVisibility(DesignerSerializationVisibility.Visible), EditorBrowsable(EditorBrowsableState.Always)] public string StringData { get; set; } protected override void PutStateToBrick(DevExpress.XtraPrinting.VisualBrick brick, DevExpress.XtraPrinting.PrintingSystemBase ps) { base.PutStateToBrick(brick, ps); brick.Text = StringData ?? CustomNumber; } } }Rebuild the project. The CustomLabel control appears in the Visual Studio Report Designer Toolbox.
Register a Custom Control in the Web End-User Report Designer
The following steps demonstrate how to register a custom control in the Web Report Designer Toolbox.
- Add a new CustomLabel folder to the project.
- Add a control’s icon to the folder. The icon is an image file (PNG format, 24x24 pixels) that is shown in the Report Designer Toolbox.
Add the custom-label.css file to the folder with the following content:
.dxrd-image-customreportcontrolsample_customlabel {
    background-image: url(custom-label.png);
    background-repeat: no-repeat;
}
Note
The CSS class name is based on the following pattern:
.dxrd-image-<namespace in lowercase>_<class name>
Create a content template for the custom control. For this, add the custom-label-content.html file to the CustomLabel folder with the following content:
<script type='text/html' id='custom-label-content'>
    <div data-bind="styleunit: { lineHeight: contentSizes().height / _context.zoom() }"
         style="box-sizing: border-box; letter-spacing: normal; width: 100%">
        <div class="dxrd-control-content" data-bind="text: displaySomeProperty, style: contentCss">
        </div>
    </div>
</script>
Add the custom-label.js file to the CustomLabel folder with the following JavaScript code:
function customizeToolbox(s, e, shortTypeName, fullTypeName) {
    // Obtain standard label information.
    var controlsFactory = e.ControlsFactory;
    var labelInfo = controlsFactory.getControlInfo("XRLabel");
    var stringInfo = controlsFactory.getPropertyInfo("XRLabel", "Text");
    var objectEditor = controlsFactory.getPropertyInfo("XRLabel", "Size").editor;
    var numberInfo = controlsFactory.getPropertyInfo("XRLabel", "Angle");


    // Create serialization information for custom properties.

    var addressSerializationInfos = [
        $.extend({}, stringInfo, {
            propertyName: "countryCode", modelName: "@CountryCode",
            displayName: "CountryCode", localizationId: ""
        }),
        $.extend({}, stringInfo, {
            propertyName: "city", modelName: "@City",
            displayName: "City", localizationId: ""
        }),
    ];

    var customerSerializationInfo = {
        propertyName: "customerInfo", modelName: "customerInfo",
        displayName: "Customer Information", defaultVal: "", localizationId: "",
        editor: objectEditor, info: addressSerializationInfos
    }

    var customNumberSerializationInfo = $.extend({}, numberInfo,
        {
            propertyName: "customNumber", modelName: "@CustomNumber",
            displayName: "Custom Number", defaultVal: 0, localizationId: ""
        }
    );

    var bindablePropertySerializationInfo = $.extend({}, stringInfo, {
        propertyName: "stringData", modelName: "@StringData",
        displayName: "Bindable Property", defaultVal: "", localizationId: ""
    });

    // Create the custom label's surface type.
    var CustomLabelSurface = (function (_super) {
        __extends(CustomLabelSurface, _super);
        function CustomLabelSurface(control, context) {
            _super.call(this, control, context);
            this.contenttemplate = "custom-label-content";
            this.displaySomeProperty = ko.computed(function () {
                var text = control["customNumber"] && control["customNumber"]();
                return text ? text : (control["text"] && control["text"]() || "");
            });
        }
        return CustomLabelSurface;
    })(labelInfo.surfaceType);

    // Create an object containing info about a custom label toolbox item.
    var customLabelInfo = controlsFactory.inheritControl("XRLabel", {
        surfaceType: CustomLabelSurface,
        defaultVal: {
            "@ControlType": fullTypeName,
            "@SizeF": "400,50"
        },
        toolboxIndex: 1,
        info: [customerSerializationInfo, bindablePropertySerializationInfo,
            customNumberSerializationInfo],
        popularProperties: ["customerInfo", "stringData", "customNumber"],
    });

    // Register the custom label in the Report Designer Toolbox.
    controlsFactory.registerControl(shortTypeName, customLabelInfo);

    // Adjust the custom label bindings if the report uses expression bindings,
    // that is the DataBindingMode is set to Expressions or ExpressionsAdvanced.
    var defaultExpression = controlsFactory.getPropertyInfo(shortTypeName, "Expression")
    defaultExpression.expressionName = "StringData"
    controlsFactory.setExpressionBinding(shortTypeName, "StringData",
        controlsFactory._beforePrintPrintOnPage);

    var dataBindings = controlsFactory.getPropertyInfo(shortTypeName, "Data Bindings");
    dataBindings.allDataBindings.push("StringData");
    var defaultBinding = controlsFactory.getPropertyInfo(shortTypeName, "Data Binding");
    defaultBinding.bindingName = "StringData";

    // Add a custom property to the Data category of the Property Grid.
    s.AddToPropertyGrid("Data", customerSerializationInfo);
    s.AddToPropertyGrid("Data", customNumberSerializationInfo);
}
Add the custom-label.js script file to the page and handle the client-side ASPxClientReportDesigner.CustomizeToolbox event. Add resources and libraries to the page. The resulting
Designer.aspxfile has the following content:Note
You may need to add the @Import directive to specify the CustomLabel class namespace.
<link href="CustomLabel\custom-label.css" rel="stylesheet" />
<!-- #include file = "CustomLabel\custom-label-content.html" -->
<script src="CustomLabel/tslib.min.js"></script>
<script src="CustomLabel/custom-label.js"></script>

<script type="text/javascript">
    function onCustomizeToolbox(s, e) {
        customizeToolbox(s, e, "<%= typeof(CustomReportControlSample.CustomLabel).ToString() %>",
                "<%= typeof(CustomReportControlSample.CustomLabel).AssemblyQualifiedName %>");
        var labelInfo = e.ControlsFactory.getControlInfo("XRLabel");
        labelInfo.isToolboxItem = false;
    }
</script>
<dx:ASPxReportDesigner EnableRichTextEditor="False" ID="ASPxReportDesigner1" runat="server">
    <ClientSideEvents CustomizeToolbox="onCustomizeToolbox" />
</dx:ASPxReportDesigner>
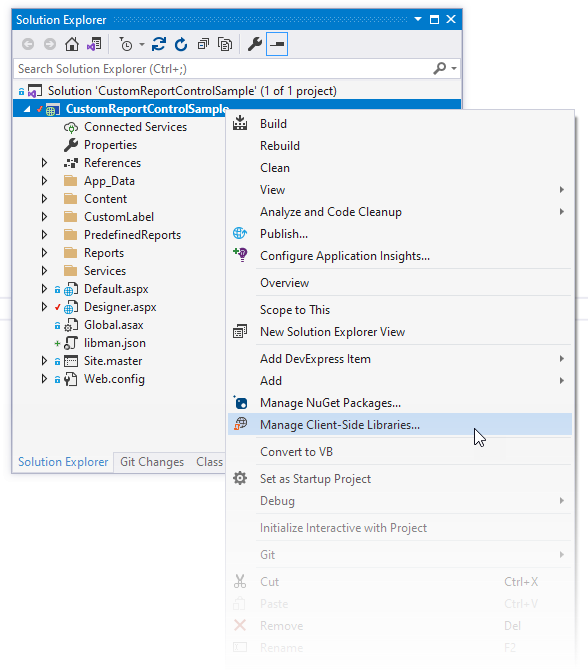
Use LibMan to Manage Client-Side Libraries
Right-click the project in the Solution Explorer and select Manage Client-Side Libraries to open the libman.json file.
Paste the following content and save the file:
{
  "version": "1.0",
  "defaultProvider": "cdnjs",
  "libraries": [
    {
      "provider": "cdnjs",
      "library": "tslib@2.2.0",
      "destination": "CustomLabel",
      "files": [
        "tslib.min.js"
      ]
    }
  ]
}
Note
If your application already uses the library listed above, remove duplicate library reference to ensure it is registered only once.
For more information on LibMan, review the following article: Use LibMan with ASP.NET Core in Visual Studio.
Remove an Existing Control from the Toolbox
You can use the CustomizeToolbox event to remove an existing control from the Toolbox. Use the getControlInfo method of the event argument’s ASPxClientReportDesignerCustomizeToolboxEventArgs.ControlsFactory property to obtain the specified control and set the IElementMetadata.isToolboxItem property to false:
function onCustomizeToolbox(s, e) {
    customizeToolbox(s, e, "<%= typeof(CustomReportControlSample.CustomLabel).ToString() %>",
            "<%= typeof(CustomReportControlSample.CustomLabel).AssemblyQualifiedName %>");
    var labelInfo = e.ControlsFactory.getControlInfo("XRLabel");
    labelInfo.isToolboxItem = false;
}
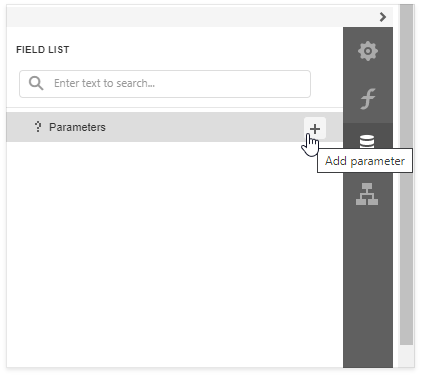
Bind the Custom Control to the Report Parameter
Run the application to invoke the End-User Designer. Create a new report, and drop the CustomLabel control from the Toolbox to the design surface.

Open the Field List and add a new report parameter with default settings:
Switch to the Expressions tab and click the ellipsis button in the StringData field to invoke the Expression Editor. Insert the report’s parameter:
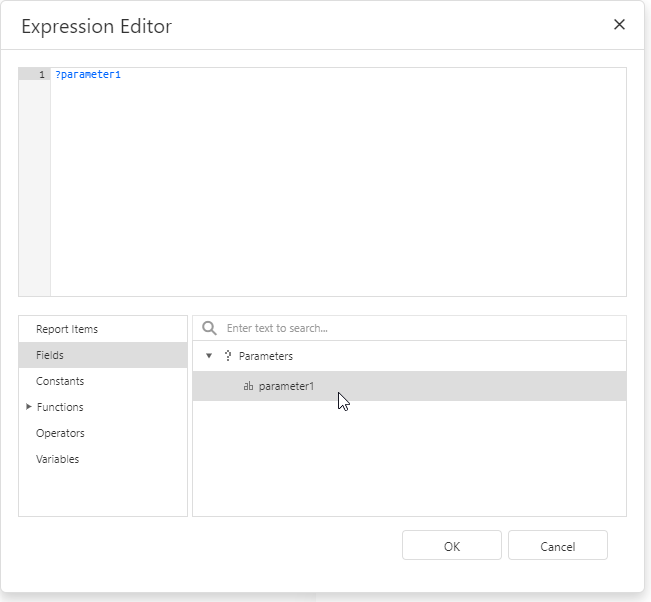
The StringData custom property is bound to the report parameter. The user can set the parameter in the Designer’s Preview or in the Document Viewer to change the StringData property of the CustomLabel control.