Fields
- 6 minutes to read
This topic consists the following sections:
Overview
The Field is a set of codes that instructs the RichEditControl to insert text or graphics into a document automatically. The field code syntax is illustrated and described below.

- Field Name - the name of the current field. Refer to the Field Codes section for a list of all available fields.
- Property - instruction/variable used in a particular field. This is an optional element.
- Switch - an additional parameter that offers more information. This is an optional element. Refer to the Format Switches section for a list of supported format switches.
The RichEditControl supports the following field types:
Non-MailMerge
Regular fields used to insert a simple data, such as DATE, TIME or PAGE. The Non-MailMerge field results are shown after the update.
MailMerge
Fields used in the Mail Merge process. They get a value only if there is a mail merge data source bound to the RichEditControl. In the resulting document, MailMerge fields are evaluated and substituted with the resulting values.
Mixed
Fields which do not require a data source to get its value, such as INCLUDEPICTURE and DOCVARIABLE They are substituted with the resulting values during mail merge.
Tip
You can use the DOCVARIABLE field to insert formatted strings or content from the RichEditDocumentServer or SubDocument objects. Refer to the How to: Insert Dynamic Content topic for a code sample.
Formula
The = (Formula) field is a code that uses mathematical formulas and numeric field values to calculate a number. The formula field syntax looks as follows:
{={NUMERIC FIELD} Operator {NUMERIC FIELD}}
The RichEditControl supports the following operators in the formula field:
- Addition (+)
- Subtraction (-)
- Multiplication (*)
- Division (/)
- Powers and Roots (^)
- Equal to (=)
- Less than (<)
- Less than or equal to (<=)
- Greater than (>)
- Greater than or equal to (>=)
- Not equal to (<>)
You can change the field’s numeric format. Refer to the Numeric Format Switch topic for a list of available format switches.
Insert and Modify Fields
Members from the table below allow you to insert and modify the field programmatically.
| Member | Description |
|---|---|
| SubDocument.BeginUpdate | Opens the document for editing. |
| BeginUpdateDocument() | Opens the document raleted to the current position for editing. |
| FieldCollection.Create | Creates a new Field object. |
| SubDocument.Fields | Provides access to the collection of fields in the current document. |
| Field.CodeRange | Gets the range containing the field codes. |
| Field.ResultRange | Gets the range containing the field result. |
| SubDocument.InsertText | Inserts the specified text at the specified position. |
| SubDocument.EndUpdate | Finalizes the modification. |
Note
A complete sample project is available at https://github.com/DevExpress-Examples/wpf-richedit-document-api-t213968.
DocumentPosition caretPosition = document.CaretPosition;
SubDocument currentDocument = caretPosition.BeginUpdateDocument();

//Create a DATE field at the caret position
currentDocument.Fields.Create(caretPosition, "DATE");
currentDocument.EndUpdate();

for (int i = 0; i < currentDocument.Fields.Count; i++)
{
    string fieldCode = document.GetText(currentDocument.Fields[i].CodeRange);
    if (fieldCode == "DATE")
    {
        //Retrieve the range obtained by the field code
        DocumentPosition position = currentDocument.Fields[i].CodeRange.End;

        //Insert the format switch to the end of the field code range
        currentDocument.InsertText(position, @"\@ ""M/d/yyyy h:mm am/pm""");
    }
}

//Update all document fields
currentDocument.Fields.Update();
Tip
You can insert the desired field to the document header or footer. Use the Section.BeginUpdateHeader - Section.EndUpdateHeader or Section.BeginUpdateFooter - Section.EndUpdateFooter paired methods to obtain the header or footer.
Update Fields
Most fields are updated automatically when the document is saved or printed, or during the mail merge operation. Use the Field.Update method to update the field on demand. Specify the UpdateField property to set what document fields should be updated automatically when loading the document, as shown in the code snippet below:
<dxre:RichEditControl.ImportOptions>
    <dxre:DXRichEditDocumentImportOptions>
        <!---This code sample shows how to set UpdateField options to the OpenXml documents-->
        <!---You can specify these options to any available document format that supports fields-->
        <dxre:DXRichEditDocumentImportOptions.OpenXmlOptions>
            <dxre:DXRichEditOpenXmlDocumentImporterOptions>
                <dxre:DXRichEditOpenXmlDocumentImporterOptions.UpdateFieldOptions>
                    <dxre:DXRichEditUpdateFieldOptions Date="True" Time="False"/>
                </dxre:DXRichEditOpenXmlDocumentImporterOptions.UpdateFieldOptions>
            </dxre:DXRichEditOpenXmlDocumentImporterOptions>
        </dxre:DXRichEditDocumentImportOptions.OpenXmlOptions>
    </dxre:DXRichEditDocumentImportOptions>
</dxre:RichEditControl.ImportOptions>
Set the field’s Field.Locked property to true to prevent a specific field from being updated. Use the DXRichEditFieldOptions.UpdateLockedFields option to allow updating locked fields.
The DOCVARIABLE field is not updated during mail merge or document insertion. Handle the RichEditControl.CalculateDocumentVariable event to update the DOCVARIABLE fields’ values.
The RichEditControl.CalculateDocumentVariable event does not occur for a locked DOCVARIABLE field, and the field value remains unchanged. Set the DXRichEditFieldOptions.UpdateLockedFields option to the UpdateLockedFields.DocVariableOnly value to update DOCVARIABLE fields.
Tip
A complete sample project is available in the DevExpress Code Examples database at http://www.devexpress.com/example=e3282.
Field Options
Use the Field.ShowCodes property to change the target field’s display mode.
Note
A complete sample project is available at https://github.com/DevExpress-Examples/wpf-richedit-document-api-t213968.
document.LoadDocument("Documents//MailMergeSimple.docx", DevExpress.XtraRichEdit.DocumentFormat.OpenXml);
for (int i = 0; i < document.Fields.Count; i++)
{
    document.Fields[i].ShowCodes = true;
}
Tip
You can also use ShowAllFieldCodesCommand or ShowAllFieldResultsCommand commands to change the fields’ display mode.
Use the RichEditControl.FieldOptions property to specify how RichEditControl should process and display document fields, as shown in the code snippet below:
<dxre:RichEditControl.FieldOptions>
     <dxre:DXRichEditFieldOptions HighlightColor="#FFE84C4C" HighlightMode="Always" UpdateFieldsInTextBoxes="True"/>
</dxre:RichEditControl.FieldOptions>
Set the DXRichEditDocumentCapabilitiesOptions.Fields property to DocumentCapability.Hidden or DocumentCapability.Disabled to restrict inserting fields to the document.
Operate Fields in the User Interface
To simplify many common tasks when working with fields, the Rich Editor UI provides the following commands and shortcuts:
| Task | UI Command / Shortcut Key |
|---|---|
| Insert a field | Press CTRL+F9. |
| Show field codes | Press ALT+F9 or click the Show All Field Codes button in the Mail Merge ribbon tab or bar group. |
| Update field values | Select a range containing fields and press F9. |
| Show spaces and formatting marks | Press CTRL+SHIFT+8. |
End users can update or toggle the code of the document field from the context menu or by using the Mail Merge ribbon tab. Refer to the Lesson 1 - Create a Simple Rich Text Editor topic for details on how to provide a Ribbon UI for the RichEditControl.
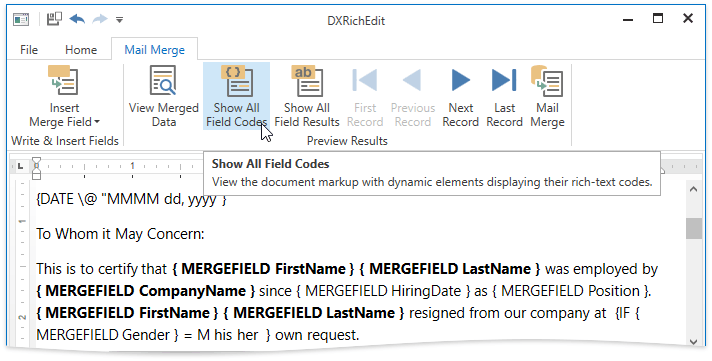
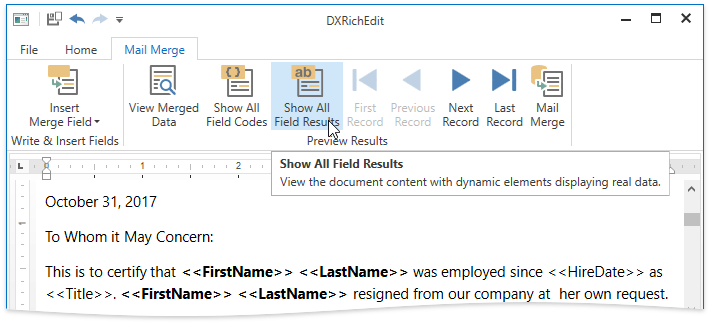
MERGEFIELD Display Modes
When the Show All Field Results button is clicked (or the ShowAllFieldResultsCommand is executed), the MERGEFIELD field is shown as a placeholder:
End users can click View Merged Data to display the MERGEFIELD code result:
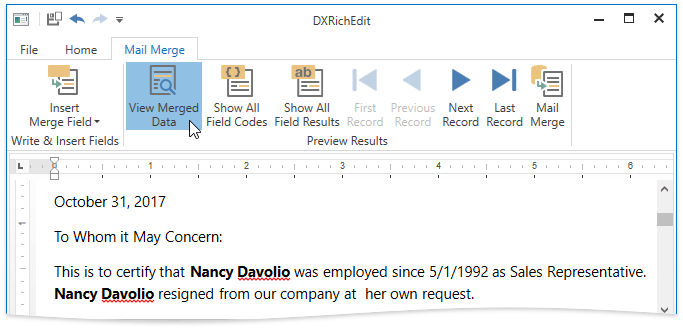
Set the DXRichEditMailMergeOptions.ViewMergedData to true or execute the ToggleViewMergedDataCommand command to achieve this task programmatically.