Edit Data and Validate Input
- 16 minutes to read
The Grid allows users to edit its data either by using the edit form or by showing the edit form in a pop-up window. This topic describes how to enable data editing, validate user input, and customize edit-related options.

Enable Editing
Follow the steps below to allow users to add, edit, and delete data rows.
1. Show UI Elements
Declare a DxGridCommandColumn object in the Columns template. This column displays the predefined New, Edit, and Delete command buttons. To hide unnecessary buttons, disable the NewButtonVisible, EditButtonVisible, and/or DeleteButtonVisible options.
<DxGrid Data="GridDataSource"
        ...>
    <Columns>
        <DxGridCommandColumn />
        @*...*@
    </Columns>
</DxGrid>
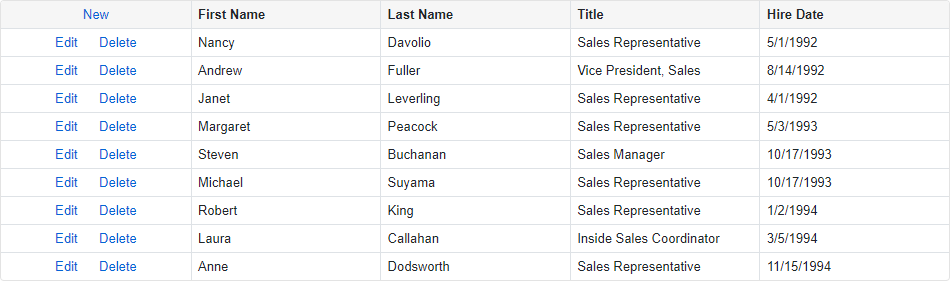
Once a user clicks the New or Edit button, the edit form appears. When the user clicks the Delete button, the delete confirmation dialog is shown.
You can define the command column’s CellDisplayTemplate and HeaderTemplate to implement custom command elements. You can also create external command elements outside the Grid. Handle click events of these elements and call the following methods:
- StartEditNewRowAsync
- Displays the edit form used to create a new data row.
- StartEditRowAsync | StartEditDataItemAsync
- Display the edit form used to modify the specified row or data item.
- ShowRowDeleteConfirmation | ShowDataItemDeleteConfirmation
- Display the delete confirmation dialog for the specified row or data item.
2. Create an Edit Form
Use the EditFormTemplate to define the edit form content. The default edit form shows only the predefined Save and Cancel buttons.
The Grid creates an edit model based on a bound data item. You can also create a custom edit model. Use the template’s context parameter to access the EditModel and DataItem. In the template, place data editors and implement two-way binding between editor values and edit model fields. An edit model field updates every time a user changes the corresponding editor value.
Note
If you place a templated component in the edit form, ensure that you specify the Context parameter explicitly either for the Grid or for the component used in the edit form. Otherwise, the error occurs.
The following snippet uses the DxFormLayout component to display DevExpress editors for all visible data columns:
<DxGrid Data="GridDataSource"
        ...>
    <Columns>
        <DxGridCommandColumn />
        @*...*@
    </Columns>
    <EditFormTemplate Context="editFormContext">
        @{
            var employee = (Employee)editFormContext.EditModel;
        }
        <DxFormLayout>
            <DxFormLayoutItem Caption="First Name:">
                <DxTextBox @bind-Text="@employee.FirstName" />
            </DxFormLayoutItem>
            <DxFormLayoutItem Caption="Last Name:">
                <DxTextBox @bind-Text="@employee.LastName" />
            </DxFormLayoutItem>
            <DxFormLayoutItem Caption="Title:">
                <DxTextBox @bind-Text="@employee.Title" />
            </DxFormLayoutItem>
            <DxFormLayoutItem Caption="Hire Date:">
                <DxDateEdit @bind-Date="@employee.HireDate" />
            </DxFormLayoutItem>
        </DxFormLayout>
    </EditFormTemplate>
</DxGrid>

You can also disable the EditFormButtonsVisible option to hide the predefined Save and Cancel buttons and implement your own buttons. Note the following specifics:
- The Save button should be of the submit type. For instance, you can use the DxButton component and enable its SubmitFormOnClick option.
- In the Cancel button’s click handler, call the CancelEditAsync method.
3. Save Changes and Reload Data
Handle the events listed below to process changes.
- EditModelSaving
This event fires when a user submits the edit form and validation is passed. Handle this event to check user input and access permissions and post changes to an underlying data source.
Use the event argument’s EditModel property to access the edit model that stores all changes. The DataItem property returns the data item. The IsNew property identifies whether the edit model corresponds to a new or existing row.
Once the event handler is executed, the edit form is closed. If you do not save changes to the data source and want to keep the edit form open, set the event argument’s Cancel property to
true.- DataItemDeleting
This event fires when a user confirms the delete operation in the delete confirmation dialog. Handle this event to check user access permissions and delete a data item from an underlying data source.
The event argument’s DataItem property returns the data item that should be removed.
If the data item is currently selected in the Grid and you do not remove this item from the data source, set the Cancel property to
trueto keep the data item selected.
Grid data should be reloaded after you post updates to the data source in the EditModelSaving or DataItemDeleting event handler. The following scenarios are possible:
- Change a Data Instance
- Change an instance of a field/property bound to the Data parameter if you post updates to the underlying service (such as a DbContext EF Core). The Grid reloads its data in response to this change. The example below demonstrates this scenario.
- Keep a Data Instance
Do not change a field/property instance bound to the Data parameter in the following cases:
- You use a Server Mode data source or GridDevExtremeDataSource.
- You edit a bound data collection directly (for instance, use the
AddandRemovemethods, access elements by indexes, and so on).
The Grid refreshes its data after the event handler is executed.
- Reload Manually
- You can call the Grid’s Reload() method in the event handler to reload data manually. In this case, set the Reload event argument to
falseto prevent unnecessary repeated reload.
The following example saves changes to an underlying DbContext EF Core object:
<DxGrid Data="GridDataSource"
        EditModelSaving="OnEditModelSaving"
        DataItemDeleting="OnDataItemDeleting"
        KeyFieldName="EmployeeId">
        @* ... *@
</DxGrid>

@code {
    IEnumerable<object> GridDataSource { get; set; }
    @* ... *@
    async Task OnEditModelSaving(GridEditModelSavingEventArgs e) {
        var editModel = (Employee)e.EditModel;
        // Re-query a data item from the database.
        var dataItem = e.IsNew ? new Employee() : Northwind.Employees.Find(editModel.EmployeeId);
        // Assign changes from the edit model to the data item.
        if (dataItem != null) {
            dataItem.FirstName = editModel.FirstName;
            dataItem.LastName = editModel.LastName;
            dataItem.Title = editModel.Title;
            dataItem.HireDate = editModel.HireDate;
            // Post changes to the database.
            if (e.IsNew)
                await Northwind.AddAsync(dataItem);
            await Northwind.SaveChangesAsync();
            // Reload the entire Grid.
            GridDataSource = await Northwind.Employees.ToListAsync();
        }
    }

    async Task OnDataItemDeleting(GridDataItemDeletingEventArgs e) {
        // Re-query a data item from the database.
        var dataItem = Northwind.Employees.Find((e.DataItem as Employee).EmployeeId);
        if (dataItem != null) {
            // Remove the data item from the database.
            Northwind.Remove(dataItem);
            await Northwind.SaveChangesAsync();
            // Reload the entire Grid.
            GridDataSource = await Northwind.Employees.ToListAsync();
        }
    }
    @* ... *@
}
4. Specify a Key Field
The Grid compares and identifies data items to ensure correct edit and delete operations. If your data object has a primary key, assign it to the KeyFieldName or KeyFieldNames property. Otherwise, the Grid uses standard .NET value equality comparison to identify data items.
<DxGrid Data="GridDataSource"
        EditModelSaving="OnEditModelSaving"
        DataItemDeleting="OnDataItemDeleting"
        KeyFieldName="EmployeeId">
        @* ... *@
</DxGrid>
Complete Code
@using Microsoft.EntityFrameworkCore
@inject IDbContextFactory<NorthwindContext> NorthwindContextFactory
@implements IDisposable

<DxGrid Data="GridDataSource"
        EditModelSaving="OnEditModelSaving"
        DataItemDeleting="OnDataItemDeleting"
        KeyFieldName="EmployeeId">
    <Columns>
        <DxGridCommandColumn />
        <DxGridDataColumn FieldName="FirstName" />
        <DxGridDataColumn FieldName="LastName" />
        <DxGridDataColumn FieldName="Title" />
        <DxGridDataColumn FieldName="HireDate" />
    </Columns>
    <EditFormTemplate Context="editFormContext">
        @{
            var employee = (Employee)editFormContext.EditModel;
        }
        <DxFormLayout>
            <DxFormLayoutItem Caption="First Name:">
                <DxTextBox @bind-Text="@employee.FirstName" />
            </DxFormLayoutItem>
            <DxFormLayoutItem Caption="Last Name:">
                <DxTextBox @bind-Text="@employee.LastName" />
            </DxFormLayoutItem>
            <DxFormLayoutItem Caption="Title:">
                <DxTextBox @bind-Text="@employee.Title" />
            </DxFormLayoutItem>
            <DxFormLayoutItem Caption="Hire Date:">
                <DxDateEdit @bind-Date="@employee.HireDate" />
            </DxFormLayoutItem>
        </DxFormLayout>
    </EditFormTemplate>
</DxGrid>

@code {
    IEnumerable<object> GridDataSource { get; set; }
    NorthwindContext Northwind { get; set; }

    protected override async Task OnInitializedAsync() {
        Northwind = NorthwindContextFactory.CreateDbContext();
        GridDataSource = await Northwind.Employees.ToListAsync();
    }

    async Task OnEditModelSaving(GridEditModelSavingEventArgs e) {
        var editModel = (Employee)e.EditModel;
        // Re-query a data item from the database.
        var dataItem = e.IsNew ? new Employee() : Northwind.Employees.Find(editModel.EmployeeId);
        // Assign changes from the edit model to the data item.
        if (dataItem != null) {
            dataItem.FirstName = editModel.FirstName;
            dataItem.LastName = editModel.LastName;
            dataItem.Title = editModel.Title;
            dataItem.HireDate = editModel.HireDate;
            // Post changes to the database.
            if (e.IsNew)
                await Northwind.AddAsync(dataItem);
            await Northwind.SaveChangesAsync();
            // Reload the entire Grid.
            GridDataSource = await Northwind.Employees.ToListAsync();
        }
    }

    async Task OnDataItemDeleting(GridDataItemDeletingEventArgs e) {
        // Re-query a data item from the database.
        var dataItem = Northwind.Employees.Find((e.DataItem as Employee).EmployeeId);
        if (dataItem != null) {
            // Remove the data item from the database.
            Northwind.Remove(dataItem);
            await Northwind.SaveChangesAsync();
            // Reload the entire Grid.
            GridDataSource = await Northwind.Employees.ToListAsync();
        }
    }

    public void Dispose() {
        Northwind?.Dispose();
    }
}
Edit Modes
Use the EditMode option to choose one of the following edit modes:
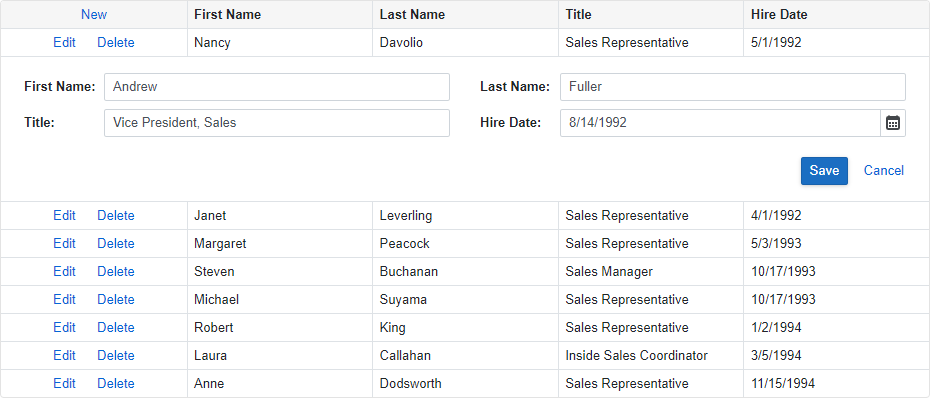
- GridEditMode.EditForm (Default)
The Grid displays the edit form instead of the edited row.
In this mode, you can use the EditNewRowPosition property to specify the position of the edit form for a new row (at the top or at the bottom).
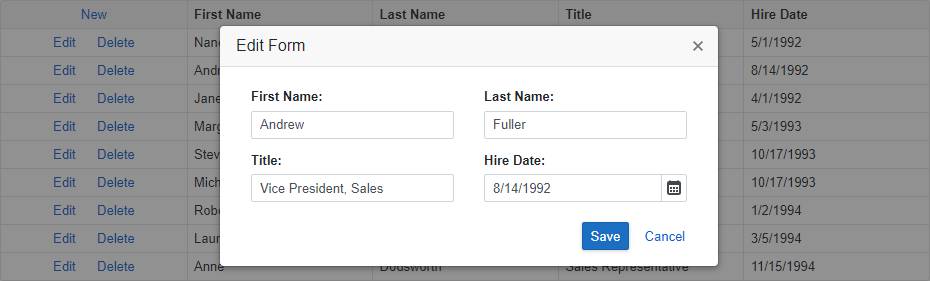
- GridEditMode.PopupEditForm
The Grid displays the edit form in a pop-up window.
You can use the PopupEditFormCssClass property to assign a CSS class. The PopupEditFormHeaderText property allows you to change text in the edit form header.
<DxGrid Data="GridDataSource"
        EditMode="GridEditMode.PopupEditForm"
        ...>
    @*...*@
</DxGrid>
Validate User Input
The Grid allows you to validate input data and display errors.
Important
You should not rely on grid input validation alone to secure your Blazor-powered app. Grid validation is designed to improve usability. A threat actor can bypass validation and send malicious data to the server. To minimize security related threats/risks, you must validate user input using multiple strategies. Refer to the following topic for more information: Validate User Input.
Built-In Validation
The Grid uses the DataAnnotationsValidator to validate user input based on data annotation attributes defined in an edit model.
using System;
using System.Collections.Generic;
using System.ComponentModel.DataAnnotations;
// ...
    public partial class Employee {
        public int EmployeeId { get; set; }
        [Required]
        public string LastName { get; set; }
        [Required]
        public string FirstName { get; set; }
        [Required]
        public string Title { get; set; }
        public string TitleOfCourtesy { get; set; }
        public Nullable<System.DateTime> BirthDate { get; set; }
        [Required]
        [Range(typeof(DateTime), "1/1/2000", "1/1/2020",
        ErrorMessage = "HireDate must be between {1:d} and {2:d}")]
        public Nullable<System.DateTime> HireDate { get; set; }
        // ...
    }
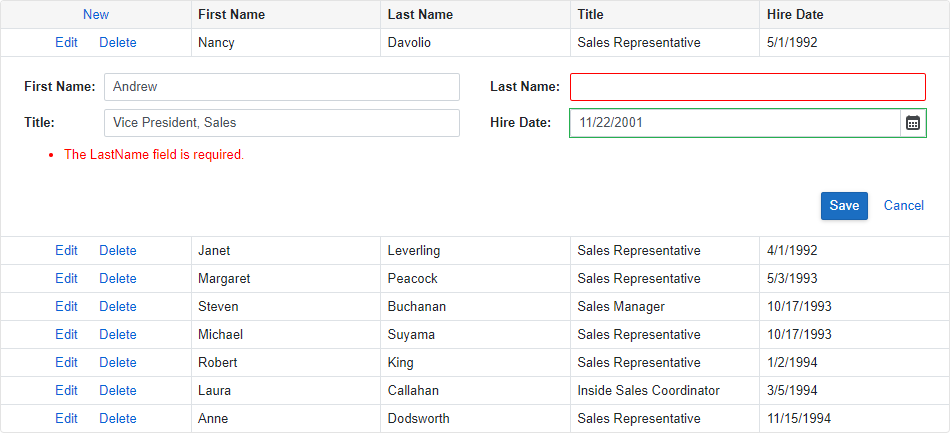
When you define the EditFormTemplate, use Blazor’s standard ValidationMessage component to display messages for individual data editors or the ValidationSummary component to summarize validation messages.
<DxGrid ...>
    <Columns>
        @* ... *@
    </Columns>
    <EditFormTemplate Context="editFormContext">
        @{
            var employee = (Employee)editFormContext.EditModel;
        }
        <DxFormLayout>
            <DxFormLayoutItem Caption="First Name:">
                <DxTextBox @bind-Text="@employee.FirstName" />
            </DxFormLayoutItem>
            <DxFormLayoutItem Caption="Last Name:">
                <DxTextBox @bind-Text="@employee.LastName" />
            </DxFormLayoutItem>
            <DxFormLayoutItem Caption="Title:">
                <DxTextBox @bind-Text="@employee.Title" />
            </DxFormLayoutItem>
            <DxFormLayoutItem Caption="Hire Date:">
                <DxDateEdit @bind-Date="@employee.HireDate" />
            </DxFormLayoutItem>
            <DxFormLayoutItem ColSpanMd="12">
                <ValidationSummary />
            </DxFormLayoutItem>
        </DxFormLayout>
    </EditFormTemplate>
</DxGrid>
Once a user removes focus from data editors or attempts to submit the edit form, the editors become marked with colored outlines: green indicates valid values, red – invalid values.
Custom Validation
You can create custom validator components as described in the following Microsoft topic: Validator components.
To enable custom validation in the Grid, declare validator components in one of the following templates:
- CustomValidators
- In this case, declared validators override the standard
DataAnnotationsValidator. If you need to useDataAnnotationsValidatorin addition to custom validators, declare it in theCustomValidatorstemplate explicitly. - EditFormTemplate
- In this case, the Grid uses the standard
DataAnnotationsValidatorand the declared custom validators. Do not place theDataAnnotationsValidatorin the edit form template to avoid duplicated validation messages.
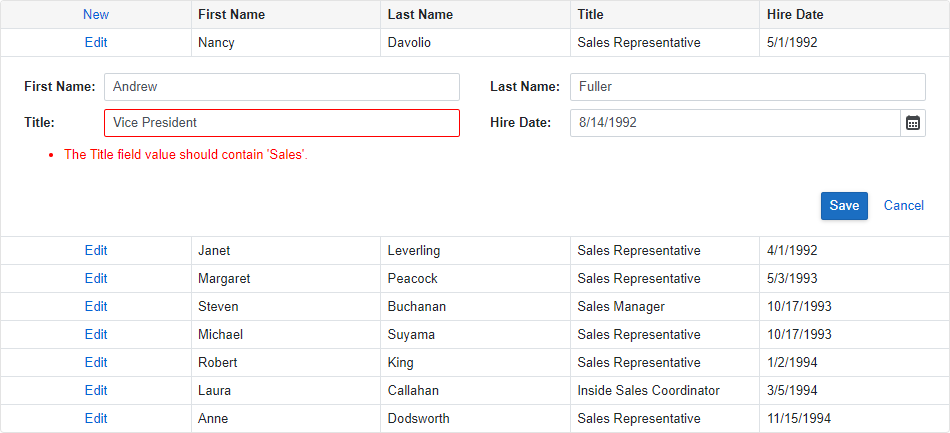
The following snippet uses the custom validator to check the Title field value.
@using Microsoft.EntityFrameworkCore
@inject IDbContextFactory<NorthwindContext> NorthwindContextFactory
@implements IDisposable

<DxGrid Data="GridDataSource"
        EditModelSaving="OnEditModelSaving"
        KeyFieldName="EmployeeId">
    <Columns>
        <DxGridCommandColumn DeleteButtonVisible="false"/>
        <DxGridDataColumn FieldName="FirstName" />
        <DxGridDataColumn FieldName="LastName" />
        <DxGridDataColumn FieldName="Title" />
        <DxGridDataColumn FieldName="HireDate" />
    </Columns>
    <EditFormTemplate Context="editFormContext">
        @{
            var employee = (Employee)editFormContext.EditModel;
        }
        <DxFormLayout>
            <DxFormLayoutItem Caption="First Name:">
                <DxTextBox @bind-Text="@employee.FirstName" />
            </DxFormLayoutItem>
            <DxFormLayoutItem Caption="Last Name:">
                <DxTextBox @bind-Text="@employee.LastName" />
            </DxFormLayoutItem>
            <DxFormLayoutItem Caption="Title:">
                <DxTextBox @bind-Text="@employee.Title" />
            </DxFormLayoutItem>
            <DxFormLayoutItem Caption="Hire Date:">
                <DxDateEdit @bind-Date="@employee.HireDate" />
            </DxFormLayoutItem>
            <DxFormLayoutItem ColSpanMd="12">
                <ValidationSummary />
            </DxFormLayoutItem>
        </DxFormLayout>
    </EditFormTemplate>
    <CustomValidators>
        <MyCustomValidator @ref="customValidator"/>
    </CustomValidators>
</DxGrid>

@code {
    IEnumerable<object> GridDataSource { get; set; }
    NorthwindContext Northwind { get; set; }
    private MyCustomValidator customValidator;

    protected override async Task OnInitializedAsync() {
        Northwind = NorthwindContextFactory.CreateDbContext();
        GridDataSource = await Northwind.Employees.ToListAsync();
    }

    async Task OnEditModelSaving(GridEditModelSavingEventArgs e) {
        var editModel = (Employee)e.EditModel;
        var dataItem = e.IsNew ? new Employee() : Northwind.Employees.Find(editModel.EmployeeId);
        if (dataItem != null) {
            customValidator.ClearErrors();
            var errors = new Dictionary<string, List<string>>();
            if (editModel.Title == null || !editModel.Title.Contains("Sales")) {
                errors.Add(nameof(editModel.Title),
                    new() {
                    "The Title field value should contain 'Sales'."
                });
            }
            if (errors.Any()) {
                customValidator.DisplayErrors(errors);
                e.Cancel = true;
                return;
            }
            dataItem.FirstName = editModel.FirstName;
            dataItem.LastName = editModel.LastName;
            dataItem.Title = editModel.Title;
            dataItem.HireDate = editModel.HireDate;
            if (e.IsNew)
                await Northwind.AddAsync(dataItem);
            await Northwind.SaveChangesAsync();
            GridDataSource = await Northwind.Employees.ToListAsync();
        }
    }

    public void Dispose() {
        Northwind?.Dispose();
    }
}
Disable Validation
Set the ValidationEnabled option to false to disable input validation in DevExpress data editors located in the edit form.
<DxGrid Data="GridDataSource"
        ...
        ValidationEnabled="false">
    @* ... *@
</DxGrid>
Initialize New Rows
You can display predefined values in data editors when a user adds a new row.
- Handle the CustomizeEditModel event.
- Check the event argument’s IsNew property to identify new rows.
- Use the EditModel to access the edit model and initialize model field values.
The following snippet specifies the predefined value for the HireDate field:
<DxGrid Data="GridDataSource"
        EditModelSaving="OnEditModelSaving"
        DataItemDeleting="OnDataItemDeleting"
        KeyFieldName="EmployeeId"
        CustomizeEditModel="Grid_CustomizeEditModel">
        @* ... *@
</DxGrid>

@code {
    IEnumerable<object> GridDataSource { get; set; }
    @* ... *@
    async Task Grid_CustomizeEditModel(GridCustomizeEditModelEventArgs e) {
        if (e.IsNew) {
            var editModel = (Employee)e.EditModel;
            editModel.HireDate = DateTime.Today;
        }
    }
    @* ... *@
}
Create a Custom Edit Model
The Grid creates an edit model based on a bound data item, but the Grid cannot do this in the following cases:
- A data item class does not have a parameterless constructor.
- Data item fields bound to Grid columns are read-only.
Handle the CustomizeEditModel event to create a custom edit model or customize an automatically-generated edit model. Use the event argument’s DataItem property to access a data item. Assign your custom edit model to the event argument’s EditModel property.
In the EditModelSaving event handler and the EditFormTemplate, cast the EditModel property value to your custom edit model class.
<DxGrid Data="GridDataSource"
        EditModelSaving="OnEditModelSaving"
        DataItemDeleting="OnDataItemDeleting"
        KeyFieldName="EmployeeId"
        CustomizeEditModel="Grid_CustomizeEditModel">
    <Columns>
    @* ... *@
    </Columns>
    <EditFormTemplate Context="editFormContext">
        @{
            var employee = (EmployeeEditModel)editFormContext.EditModel;
        }
        @* ... *@
    </EditFormTemplate>
</DxGrid>

@code {
    IEnumerable<object> GridDataSource { get; set; }
    @* ... *@
    class EmployeeEditModel {
        public int? EmployeeId { get; set; }
        [Required, MaxLength(64)]
        public string LastName { get; set; }
        [Required, MaxLength(64)]
        public string FirstName { get; set; }
        public string Title { get; set; }
        public DateTime? HireDate { get; set; }
    }

    async Task OnEditModelSaving(GridEditModelSavingEventArgs e) {
        var editModel = (EmployeeEditModel)e.EditModel;
        @* ... *@
    }
    @* ... *@
    async Task Grid_CustomizeEditModel(GridCustomizeEditModelEventArgs e) {
        var dataItem = (Employee)e.DataItem;
        if (dataItem == null)
            e.EditModel = new EmployeeEditModel { };
        else {
            e.EditModel = new EmployeeEditModel {
                EmployeeId = dataItem.EmployeeId,
                FirstName = dataItem.FirstName,
                LastName = dataItem.LastName,
                Title = dataItem.Title,
                HireDate = dataItem.HireDate
            };
        }
    }
    @* ... *@
}
Respond to Edit Start and Cancel
Handle the following events to create a custom response to edit start and cancel actions:
- EditStart
- Fires when the edit form appears to add a new row or edit an existing row.
- EditCanceling
- Fires when the edit form closes and discards changes.