Validate Input
- 13 minutes to read
You can add any standalone data editor or the Form Layout component to Blazor’s standard EditForm. This form validates user input based on data annotation attributes defined in a model and indicates errors.
Important
You should not rely on form validation alone to secure your Blazor-powered app. Form validation is designed to improve usability. A threat actor can bypass validation and send malicious data to the server. To minimize security related threats/risks, you must validate user input using multiple strategies. Refer to the following topic for more information: Validate User Input.
The following table lists data editors and their properties that you can validate in the EditForm.
Data Editor | Property |
|---|---|
Common Steps
Do the following to enable input validation:
Create a model and apply data annotation attributes to model fields.
using System.ComponentModel.DataAnnotations;

public class MyModel
{
    [Required]
    [StringLength(10, ErrorMessage = "Name is too long.")]
    public string Name { get; set; }
    // ...
}
Declare the EditForm component and assign a model object to the EditForm’s Model property. The edit context is constructed based on this model. To supply the edit context explicitly, assign it to the EditContext property and do not specify the Model property.
<EditForm Model="@model" ...>
</EditForm>

@code {
    private MyModel model = new MyModel();
    // ...
}
Create the DataAnnotationsValidator component to enable validation based on annotation attributes.
<EditForm Model="@model" ...>
    <DataAnnotationsValidator />
    @*...*@
</EditForm>
Add standalone data editors or the Form Layout with data editors to the
EditForm. Use the @bind attribute to implement two-way binding between editor properties and model fields that have data annotations. The edit context is updated once input values are changed.<EditForm Model="@model" ...> <DataAnnotationsValidator /> <DxFormLayout > <DxFormLayoutItem Caption="Name:" ColSpanMd="6" > <DxTextBox @bind-Text="@model.Name" /> </DxFormLayoutItem > </DxFormLayout> @*...*@ </EditForm>If you handle an editor’s
<PropertyName>Changedevent and cannot use two-way binding, specify the<PropertyName>Expression.<DxTextBox Text="@model.Name" TextExpression="@(() => model.Name)" TextChanged="@TextChanged"> </DxTextBox> @code { void TextChanged(string textValue) { // ... } }An exception occurs if you do not use two-way binding or the
<PropertyName>Expression.If you place the Form Layout component in the
EditForm, specify a unique value for theEditForm‘s Context property to avoid a name conflict. Otherwise, Blazor adds implicit Context parameters with the same name to theEditFormand each layout item.<EditForm Model="@model" Context="EditFormContext" ...> @*...*@ </EditForm>Use the ValidationMessage component to display messages for individual data editors or the ValidationSummary component to summarize validation messages.
<DxFormLayout >
    @*...*@
    <DxFormLayoutItem ColSpanMd="12">
        <ValidationSummary />
    </DxFormLayoutItem>
</DxFormLayout>
If you want to respond to form submission, specify the
EditForm‘s OnValidSubmit and OnInvalidSubmit callbacks. They are triggered when the form passed and failed validation, respectively. For instance, you can post valid values to an underlying data source. Alternatively, you can specify the OnSubmit callback to check field values and trigger validation manually.<EditForm Model="@model" ... OnValidSubmit="@HandleValidSubmit" OnInvalidSubmit="@HandleInvalidSubmit"> @*...*@ </EditForm>Add a DxButton or DxToolbarItem object to the markup and set the object’s
SubmitFormOnClickproperty to true. The form is submited when a user clicks this button or item.<DxFormLayout > @*...*@ <DxFormLayoutItem ColSpanMd="12"> <DxButton SubmitFormOnClick="true" Text="Submit" RenderStyle="@ButtonRenderStyle.Secondary" /> </DxFormLayoutItem> </DxFormLayout>
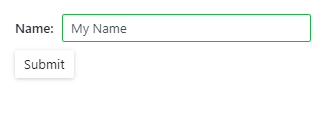
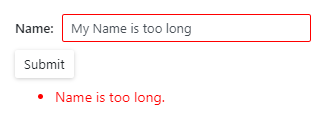
The EditForm validates input values based on the edit context once a user attempts to submit this form. Editors become marked with colored outlines: green indicates valid values, red - invalid values.
Valid Value | Invalid Value |
|---|---|
|
|
For more information, refer to the official Microsoft documentation: Forms and validation.
Custom Validation Attributes
You can also implement a custom validation attribute.
- Create a ValidationAttribute class descendant.
- Override the IsValid method to implement custom validation logic. This method has two overloads: one overload accepts only the object that should be validated; the other also accepts a ValidationContext object that stores additional information about the validation operation.
- Apply the AttributeUsage class to the custom attribute to specify how the attribute can be used.
- Apply the custom attribute to a model field.
For more information, refer to the official Microsoft documentation: Custom attributes.
using System.ComponentModel.DataAnnotations;

public class Starship
{
    // ...

    [DateInPastAttribute(ErrorMessage = "The Production Date value cannot be later than today.")]
    public DateTime ProductionDate { get; set; }
}

[AttributeUsage(AttributeTargets.Property | AttributeTargets.Field | AttributeTargets.Parameter,
                AllowMultiple = false)]
public class DateInPastAttribute: ValidationAttribute
{
    public override bool IsValid(object value)
    {
        return (DateTime)value <= DateTime.Today;
    }
}
Form Layout
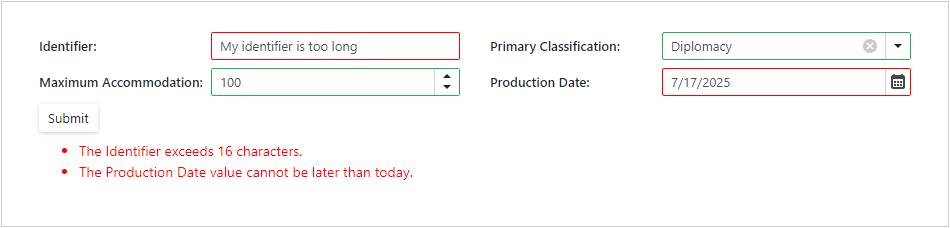
The following example validates user input in the Form Layout component with four layout items. These items contain the following data editors: Text Box, ComboBox, Spin Edit, and Date Edit.
One layout item contains the ValidationSummary component that displays all the error messages. The last layout item contains the Button that submits the form.
<EditForm Model="@starship" OnValidSubmit="@HandleValidSubmit" OnInvalidSubmit="@HandleInvalidSubmit"
          Context="EditFormContext">
    <DataAnnotationsValidator />
    <DxFormLayout >
        <DxFormLayoutItem Caption="Identifier:" ColSpanMd="6" >
            <DxTextBox @bind-Text="@starship.Identifier" />
        </DxFormLayoutItem >
        <DxFormLayoutItem Caption="Primary Classification:" ColSpanMd="6" >
                <DxComboBox
                            NullText="Select classification ..."
                            ClearButtonDisplayMode="DataEditorClearButtonDisplayMode.Auto"
                            @bind-Value="@starship.Classification"
                            Data="@(new List<string>() { "Defense", "Exploration", "Diplomacy" })"
                />
        </DxFormLayoutItem >
        <DxFormLayoutItem Caption="Maximum Accommodation:" ColSpanMd="6" >
            <DxSpinEdit Id="accommodation" @bind-Value="@starship.MaximumAccommodation" />
        </DxFormLayoutItem >
        <DxFormLayoutItem Caption="Production Date:" ColSpanMd="6" >
            <DxDateEdit @bind-Date="@starship.ProductionDate" />
        </DxFormLayoutItem>
        <DxFormLayoutItem ColSpanMd="12">
            <ValidationSummary />
        </DxFormLayoutItem>
        <DxFormLayoutItem ColSpanMd="12">
            <DxButton SubmitFormOnClick="true" Text="Submit" RenderStyle="@ButtonRenderStyle.Secondary" />
        </DxFormLayoutItem>
    </DxFormLayout>
</EditForm>

@code {
    private Starship starship=new Starship();

    private void HandleValidSubmit() {
        Console.WriteLine("OnValidSubmit");
    }
    private void HandleInvalidSubmit() {
        Console.WriteLine("OnInvalidSubmit");
    }
}
Standalone Data Editors
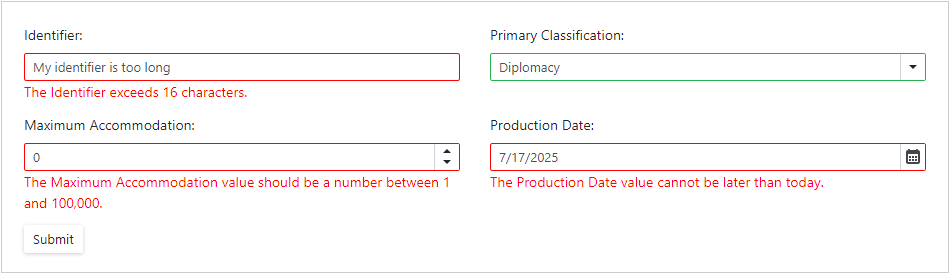
The following example validates user input in standalone Text Box, ComboBox, Spin Edit, and Date Edit. The ValidationMessage component is used to display error messages for each editor.
<EditForm Model="@starship" OnValidSubmit="@HandleValidSubmit" OnInvalidSubmit="@HandleInvalidSubmit">
    <DataAnnotationsValidator />
    <div class="row">
        <div class="col-md-6" style="padding-bottom: 12px">
            <label for="identifier">Identifier: </label>
            <DxTextBox Id="identifier" @bind-Text="@starship.Identifier" />
            <ValidationMessage For="@(() => starship.Identifier)" />
        </div>
        <div class="col-md-6" style="padding-bottom: 12px">
            <label for="classification">Primary Classification: </label>
            <DxComboBox Id="classification" NullText="Select classification ..."
                        ClearButtonDisplayMode="DataEditorClearButtonDisplayMode.Auto"
                        Data="@(new List<Classification>() { new Classification(1, "Defense"),
                                                             new Classification(2, "Exploration"),
                                                             new Classification(3, "Diplomacy") })"
                        TextFieldName="Value"
                        ValueFieldName="Id"
                        @bind-Value="@starship.Classification" />
            <ValidationMessage For="@(() => starship.Classification)" />
        </div>
        <div class="col-md-6" style="padding-bottom: 12px">
            <label for="accommodation">Maximum Accommodation: </label>
            <DxSpinEdit Id="accommodation" @bind-Value="@starship.MaximumAccommodation" />
            <ValidationMessage For="@(() => starship.MaximumAccommodation)" />
        </div>
        <div class="col-md-6" style="padding-bottom: 12px">
            <label for="productionDate">Production Date: </label>
            <DxDateEdit @bind-Date="@starship.ProductionDate" />
            <ValidationMessage For="@(() => starship.ProductionDate)" />
        </div>
        <div class="col-md-12">
            <DxButton SubmitFormOnClick="true" Text="Submit" RenderStyle="@ButtonRenderStyle.Secondary" />
        </div>
    </div>
</EditForm>

@code {
    private Starship starship = new Starship();

    private void HandleValidSubmit() {
        Console.WriteLine("OnValidSubmit");
    }
    private void HandleInvalidSubmit() {
        Console.WriteLine("OnInvalidSubmit");
    }
}
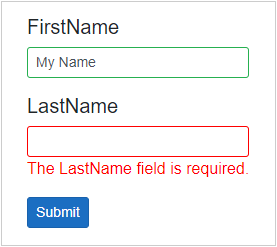
Data Editors Inside Another Component
To validate user input in a data editor that is placed in another Blazor component, do the following:
Create a custom Blazor component and add a data editor. Define parameters that are passed to the editor’s
<PropertyName>and<PropertyName>Expressionproperties and handle the<PropertyName>Changedevent as shown below. The following code snippet createsMyComponentwith a Text Box:<DxTextBox Text="@MyValue" TextChanged="@((v) => MyValue = v)" TextExpression="@MyValueExpression" /> @code { private string _value; [Parameter] public string MyValue { get => _value; set { if (_value == value) return; _value = value; MyValueChanged.InvokeAsync(value); } } [Parameter] public EventCallback<string> MyValueChanged { get; set; } [Parameter] public Expression<Func<string>> MyValueExpression { get; set; } }Register the System.Linq.Expressions namespace in the
_Imports.razorfile to use the Expression class.@using System.Linq.ExpressionsApply data annotation attributes to model fields and add the
MyComponentto the EditForm.<EditForm Model="@customer" OnValidSubmit="@HandleValidSubmit" OnInvalidSubmit="@HandleInvalidSubmit" Context="EditFormContext"> <DataAnnotationsValidator /> <div class="container"> <div class="col"> <div class="row"><h5>@nameof(customer.FirstName)</h5></div> <div class="row"> <div class="form-group"> <MyComponent @bind-MyValue="@customer.FirstName" /> <ValidationMessage For="@(() => customer.FirstName)" /> </div> </div> </div> <div class="col"> <div class="row"><h5>@nameof(customer.LastName)</h5></div> <div class="row"> <div class="form-group"> <MyComponent @bind-MyValue="@customer.LastName" /> <ValidationMessage For="@(() => customer.LastName)" /> </div> </div> </div> <div class="row"> <div class="col"> <div class="form-group "> <DxButton SubmitFormOnClick="true" Text="Submit" RenderStyle="@ButtonRenderStyle.Primary" /> </div> </div> </div> </div> </EditForm>
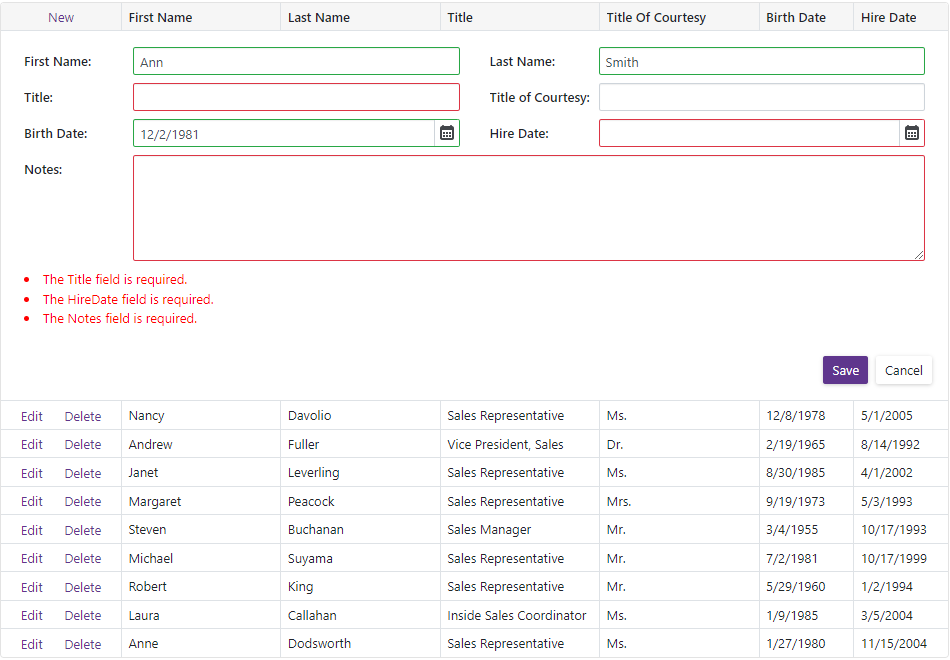
Grid Edit Form
The Grid uses the DataAnnotationsValidator to validate user input in the EditFormTemplate based on data annotation attributes of the model. Use Blazor’s standard ValidationMessage and ValidationSummary components to display validation messages.
    @inject NwindDataService NwindDataService

    <DxGrid @ref="Grid"
            Data="DataSource"
            PageSize="12"
            KeyFieldName="EmployeeId"
            EditModelSaving="Grid_EditModelSaving"
            DataItemDeleting="Grid_DataItemDeleting">
        <Columns>
            <DxGridCommandColumn Width="120px" />
            <DxGridDataColumn FieldName="FirstName" MinWidth="80" />
            <DxGridDataColumn FieldName="LastName" MinWidth="80" />
            <DxGridDataColumn FieldName="Title" MinWidth="100" />
            <DxGridDataColumn FieldName="TitleOfCourtesy" MinWidth="120" />
            <DxGridDataColumn FieldName="BirthDate" Width="10%" MinWidth="80" />
            <DxGridDataColumn FieldName="HireDate" Width="10%" MinWidth="80" />
        </Columns>
        <EditFormTemplate Context="EditFormContext">
            @{
                var employee = (EditableEmployee)EditFormContext.EditModel;
            }
            <DxFormLayout ItemSizeMode="SizeMode.Small" CssClass="w-100">
                <DxFormLayoutItem Caption="First Name:" ColSpanMd="6">
                    <DxTextBox @bind-Text="@employee.FirstName" />
                </DxFormLayoutItem>
                <DxFormLayoutItem Caption="Last Name:" ColSpanMd="6">
                    <DxTextBox @bind-Text="@employee.LastName" />
                </DxFormLayoutItem>
                <DxFormLayoutItem Caption="Title:" ColSpanMd="6">
                    <DxTextBox @bind-Text="@employee.Title" />
                </DxFormLayoutItem>
                <DxFormLayoutItem Caption="Title of Courtesy:" ColSpanMd="6">
                    <DxTextBox @bind-Text="@employee.TitleOfCourtesy" />
                </DxFormLayoutItem>
                <DxFormLayoutItem Caption="Birth Date:" ColSpanMd="6">
                    <DxDateEdit @bind-Date="@employee.BirthDate" />
                </DxFormLayoutItem>
                <DxFormLayoutItem Caption="Hire Date:" ColSpanMd="6">
                    <DxDateEdit @bind-Date="@employee.HireDate" />
                </DxFormLayoutItem>
                <DxFormLayoutItem Caption="Notes:" ColSpanMd="12">
                    <DxMemo @bind-Text="@employee.Notes" Rows="5" />
                </DxFormLayoutItem>
                <DxFormLayoutItem ColSpanMd="12">
                    <ValidationSummary />
                </DxFormLayoutItem>
            </DxFormLayout>
        </EditFormTemplate>
    </DxGrid>
    @* ... *@

@code {
    IEnumerable<EditableEmployee> DataSource { get; set; }
    IGrid Grid { get; set; }

    protected override async Task OnInitializedAsync() {
        DataSource = await NwindDataService.GetEmployeesEditableAsync();
    }
    protected override async Task OnAfterRenderAsync(bool firstRender) {
        if(firstRender)
            await Grid.StartEditNewRowAsync();
    }
    async Task Grid_EditModelSaving(GridEditModelSavingEventArgs e) {
        var editableEmployee = (EditableEmployee)e.EditModel;

        if(e.IsNew)
            await NwindDataService.InsertEmployeeAsync(editableEmployee);
        else
            await NwindDataService.UpdateEmployeeAsync((EditableEmployee)e.DataItem, editableEmployee);
        await UpdateDataAsync();
    }
    async Task Grid_DataItemDeleting(GridDataItemDeletingEventArgs e) {
        await NwindDataService.RemoveEmployeeAsync((EditableEmployee)e.DataItem);
        await UpdateDataAsync();
    }
    async Task UpdateDataAsync() {
        DataSource = await NwindDataService.GetEmployeesEditableAsync();
    }
}
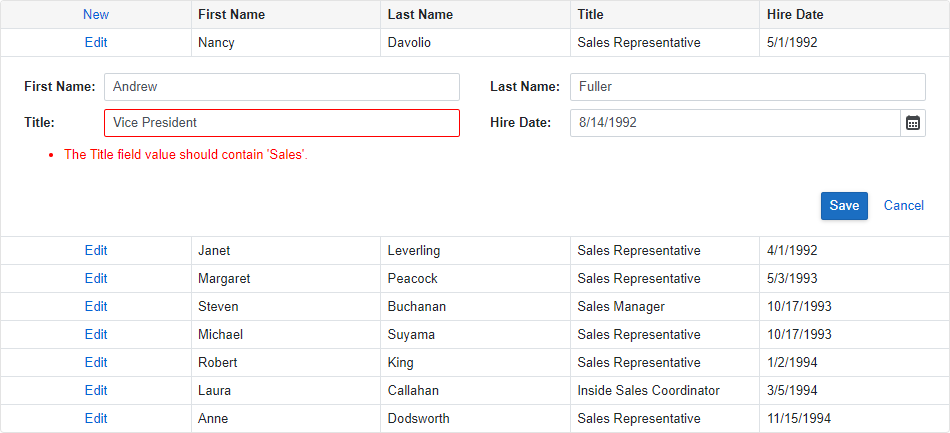
You can also create custom validator components as described in the following Microsoft topic: Validator components. Declare them in the Grid’s EditFormTemplate or CustomValidators templates. The following snippet uses the custom validator to check the Title field value.
@using Microsoft.EntityFrameworkCore
@inject IDbContextFactory<NorthwindContext> NorthwindContextFactory
@implements IDisposable

<DxGrid Data="GridDataSource"
        EditModelSaving="OnEditModelSaving"
        KeyFieldName="EmployeeId">
    <Columns>
        <DxGridCommandColumn DeleteButtonVisible="false"/>
        <DxGridDataColumn FieldName="FirstName" />
        <DxGridDataColumn FieldName="LastName" />
        <DxGridDataColumn FieldName="Title" />
        <DxGridDataColumn FieldName="HireDate" />
    </Columns>
    <EditFormTemplate Context="editFormContext">
        @{
            var employee = (Employee)editFormContext.EditModel;
        }
        <DxFormLayout>
            <DxFormLayoutItem Caption="First Name:">
                <DxTextBox @bind-Text="@employee.FirstName" />
            </DxFormLayoutItem>
            <DxFormLayoutItem Caption="Last Name:">
                <DxTextBox @bind-Text="@employee.LastName" />
            </DxFormLayoutItem>
            <DxFormLayoutItem Caption="Title:">
                <DxTextBox @bind-Text="@employee.Title" />
            </DxFormLayoutItem>
            <DxFormLayoutItem Caption="Hire Date:">
                <DxDateEdit @bind-Date="@employee.HireDate" />
            </DxFormLayoutItem>
            <DxFormLayoutItem ColSpanMd="12">
                <ValidationSummary />
            </DxFormLayoutItem>
        </DxFormLayout>
    </EditFormTemplate>
    <CustomValidators>
        <MyCustomValidator @ref="customValidator"/>
    </CustomValidators>
</DxGrid>

@code {
    IEnumerable<object> GridDataSource { get; set; }
    NorthwindContext Northwind { get; set; }
    private MyCustomValidator customValidator;

    protected override async Task OnInitializedAsync() {
        Northwind = NorthwindContextFactory.CreateDbContext();
        GridDataSource = await Northwind.Employees.ToListAsync();
    }

    async Task OnEditModelSaving(GridEditModelSavingEventArgs e) {
        var editModel = (Employee)e.EditModel;
        var dataItem = e.IsNew ? new Employee() : Northwind.Employees.Find(editModel.EmployeeId);
        if (dataItem != null) {
            customValidator.ClearErrors();
            var errors = new Dictionary<string, List<string>>();
            if (editModel.Title == null || !editModel.Title.Contains("Sales")) {
                errors.Add(nameof(editModel.Title),
                    new() {
                    "The Title field value should contain 'Sales'."
                });
            }
            if (errors.Any()) {
                customValidator.DisplayErrors(errors);
                e.Cancel = true;
                return;
            }
            dataItem.FirstName = editModel.FirstName;
            dataItem.LastName = editModel.LastName;
            dataItem.Title = editModel.Title;
            dataItem.HireDate = editModel.HireDate;
            if (e.IsNew)
                await Northwind.AddAsync(dataItem);
            await Northwind.SaveChangesAsync();
            GridDataSource = await Northwind.Employees.ToListAsync();
        }
    }

    public void Dispose() {
        Northwind?.Dispose();
    }
}
Refer to the following topic for more information on validation in the Grid component and step-by-step instructions: Edit Data and Validate Input.