How to: Display Master-Detail Data (XPO)
- 4 minutes to read
In this example, you’ll learn how to create a Customers-Orders data-aware web application that stores and modifies data in a database. ASPxGridView is used to display master-detail data, implemented via eXpress Persistent Objects for .NET.
- Define Persistent Classes
- Connect to a Database Server
- Retrieve Data From the Database
- Create Master and Detail ASPxGridViews
- Set up a Master-Detail Relationship
- Result
1. Define Persistent Classes
using DevExpress.Xpo;

public class Customer : XPObject {
    public Customer(Session session) : base(session) { }
    string fCustomerName;
    public string CustomerName {
        get { return fCustomerName; }
        set { SetPropertyValue<string>("CustomerName", ref fCustomerName, value); }
    }

    [Association("Customer-Orders", typeof(Order)), Aggregated]
    public XPCollection Orders { get { return GetCollection("Orders"); } }
}

public class Order : XPObject {
    public Order(Session session) : base(session) { }
    string fProductName;
    public string ProductName {
        get { return fProductName; }
        set { SetPropertyValue<string>("ProductName", ref fProductName, value); }
    }

    DateTime fOrderDate;
    public DateTime OrderDate {
        get { return fOrderDate; }
        set { SetPropertyValue<DateTime>("OrderDate", ref fOrderDate, value); }
    }

    [Association("Customer-Orders")]
    public Customer Customer;
}
Note
For detailed information on creating XPObjects, see Tutorial 1 - Your First Data-Aware Application with XPO and Tutorial 2 - Relations (One to Many).
2. Connect to a Database Server
To connect XPO to a database server, create an IDataLayer object. The code that creates the data layer must be placed inside the Application_Start event handler in the Global.asax module of your Web Site. For more information, see Connecting XPO to a Database Server (ASP.NET).
void Application_Start(object sender, EventArgs e) {
    string conn = DevExpress.Xpo.DB.AccessConnectionProvider.GetConnectionString(
  Server.MapPath("~\\App_Data\\Customer.mdb"));
    DevExpress.Xpo.Metadata.XPDictionary dict = new DevExpress.Xpo.Metadata.ReflectionDictionary();
    // Initialize the XPO dictionary.
    dict.GetDataStoreSchema(typeof(Customer).Assembly);
    DevExpress.Xpo.DB.IDataStore store = DevExpress.Xpo.XpoDefault.GetConnectionProvider(conn,
                        DevExpress.Xpo.DB.AutoCreateOption.SchemaAlreadyExists);
    DevExpress.Xpo.XpoDefault.DataLayer = new DevExpress.Xpo.ThreadSafeDataLayer(dict, store);
    DevExpress.Xpo.XpoDefault.Session = null;
}
Note
For detailed information, see Tutorial 5 - An ASP .NET Application for Data Editing.
3. Retrieve Data From the Database
To retrieve data from the database, use the XpoDataSource components.
Master: Customers
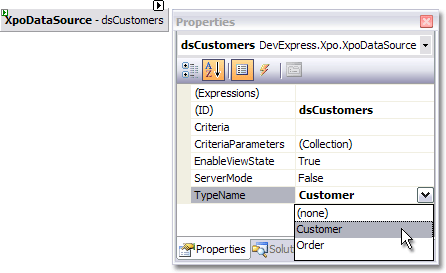
Set its TypeName property to Customer.
Detail: Orders
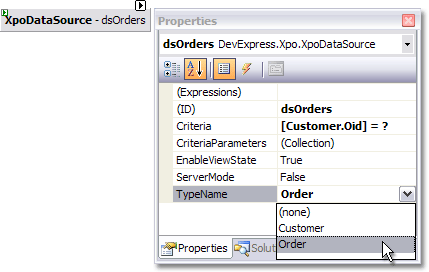
Set its TypeName to Order.
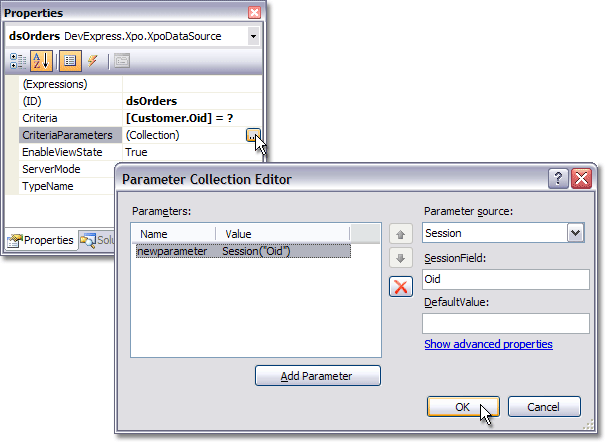
Use the Criteria property to specify the filter condition. Set this property to ‘[Customer.Oid] = ?’.
Invoke the Parameter Collection Editor, and add a criteria parameter. This parameter gets its value at runtime from the “Oid” Session field.
Handle the page’s Init event to bind XpoDataSource components to a database.
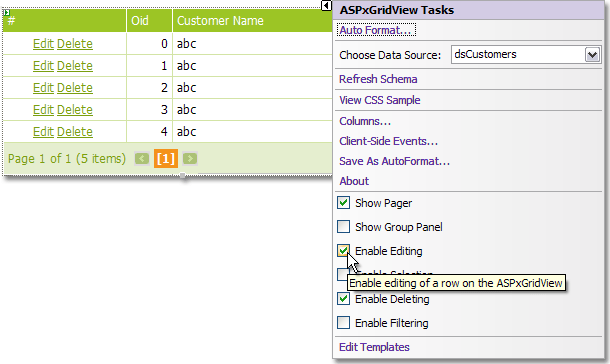
4. Create Master and Detail ASPxGridViews
Create two ASPxGridView controls. Bind the first grid (master) to the dsCustomers. Bind the second grid (detail) to the dsOrders. Enable editing and deleting in both grids.
5. Set up a Master-Detail Relationship
Invoke the master ASPxGridView’s Template Designer by clicking the Edit Templates task. Select the DetailRow template. Drag the detail grid onto the Detail Row template.
Handle the detail grid’s ASPxGridBase.BeforePerformDataSelect event to specify session values.
using DevExpress.Web.ASPxGridView;

protected void detailGrid_BeforePerformDataSelect(object sender, EventArgs e) {
    Session["Oid"] = (sender as ASPxGridView).GetMasterRowKeyValue();
}
When finished, select the End Template Editing task and enable the master grid’s ASPxGridViewDetailSettings.ShowDetailRow option.
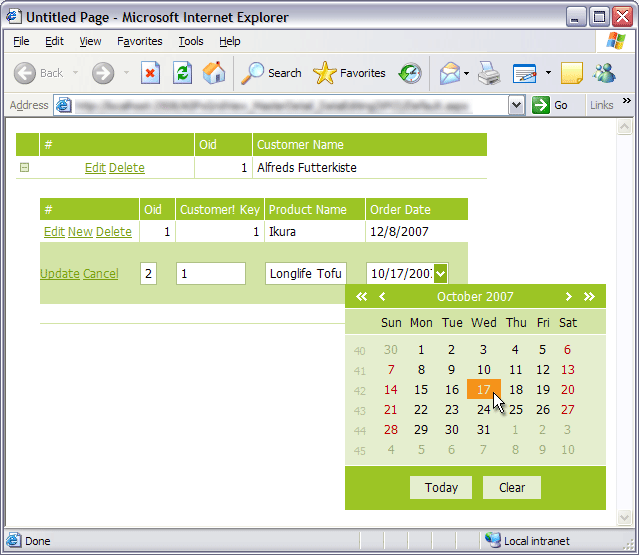
6. Result
The image below illustrates the result.