End-to-End Tests with xUnit
- 2 minutes to read
You can use the xUnit framework to create and run functional tests for XAF applications. There are two ways to create such tests in XAF applications: with the Wizard (recommended) or manually. The following sections describe each option in more detail.
Step 1—Add the Selenium Driver to Your System
Tip
You can skip this step if you test only WinForms XAF applications.
XAF exposes API that allows you to use the Selenium driver to interact with browser and individual web page elements.
To run functional tests for ASP.NET Core Blazor XAF Applications, install browser drivers.
- For Google Chrome: download “chromedriver.exe” from https://developer.chrome.com/docs/chromedriver/downloads.
- For Microsoft Edge: download “msedgedriver.exe” from https://developer.microsoft.com/en-us/microsoft-edge/tools/webdriver/?form=MA13LH.
Selenium requires a path to the downloaded driver. Add a folder with that driver to the system’s PATH variable.
Step 2—Create a Test Project
Add a Test Project to a New Application
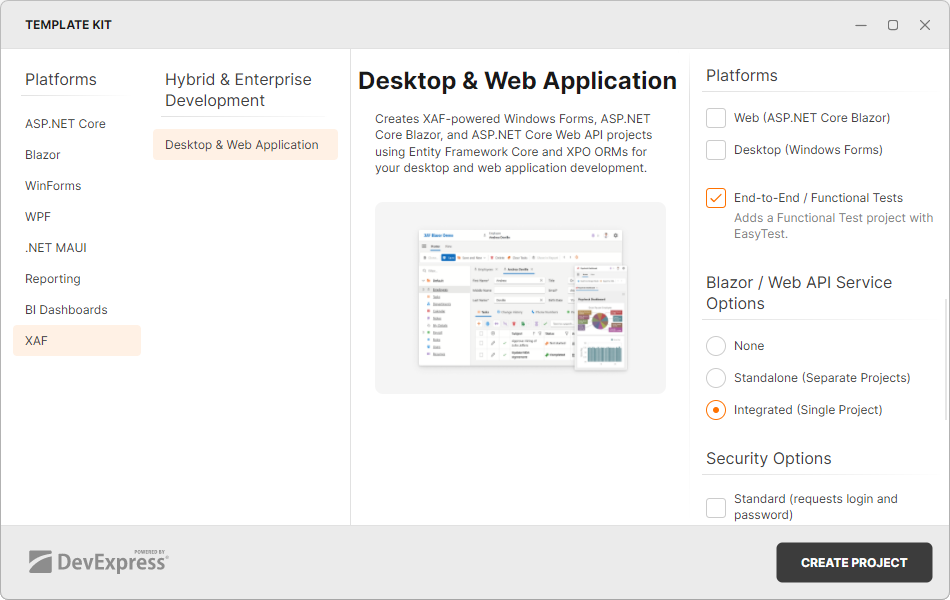
When you create a new solution, select the End-to-End / Functional Tests check box in the Template Kit to add an integrated functional test project in the solution.
Add a Test Project to Existing Application
Add a new xUnit Test Project to your solution.
In the project file, change the following:
<PropertyGroup>
    <!-- Set a target framework for Blazor -->
    <TargetFramework>net10.0</TargetFramework>


    <!-- Set a target framework for .NET Desktop (and Blazor)  -->
    <TargetFramework>net10.0-windows</TargetFramework>
    <UseWindowsForms>true</UseWindowsForms>
</PropertyGroup>
Add EasyTest references.
<ItemGroup>
<PackageReference Include="DevExpress.ExpressApp.EasyTest.BlazorAdapter" Version="26.1.3" />
<PackageReference Include="DevExpress.ExpressApp.EasyTest.WinAdapter" Version="26.1.3" />
</ItemGroup>
Configure end-to-end tests. For this purpose, add a new
Tests.csfile to your test project.using DevExpress.EasyTest.Framework; using Xunit; [assembly: CollectionBehavior(DisableTestParallelization = true)] namespace YourSolutionName.Module.E2E.Tests; public class YourSolutionNameTests : IDisposable { const string BlazorAppName = "YourSolutionNameBlazor"; const string WinAppName = "YourSolutionNameWin"; const string AppDBName = "YourSolutionName"; EasyTestFixtureContext FixtureContext { get; } = new EasyTestFixtureContext(); public YourSolutionNameTests() { FixtureContext.RegisterApplications( new BlazorApplicationOptions(BlazorAppName, string.Format(@"{0}\..\..\..\..\YourSolutionName.Blazor.Server", Environment.CurrentDirectory)), new WinApplicationOptions(WinAppName, string.Format(@"{0}\..\..\..\..\YourSolutionName.Win\bin\EasyTest\net8.0-windows\YourSolutionName.Win.exe", Environment.CurrentDirectory)) ); FixtureContext.RegisterDatabases(new DatabaseOptions(AppDBName, "YourSolutionNameEasyTest", server: @"(localdb)\mssqllocaldb")); } public void Dispose() { FixtureContext.CloseRunningApplications(); } }Add test code to the
Tests.csfile. For example:[Theory] [InlineData(BlazorAppName)] public void TestBlazorApp(string applicationName) { FixtureContext.DropDB(AppDBName); var appContext = FixtureContext.CreateApplicationContext(applicationName); appContext.RunApplication(); appContext.GetForm().FillForm(("User Name", "Admin")); appContext.GetAction("Log In").Execute(); Assert.True(appContext.Navigate("My Details")); Assert.True(appContext.Navigate("Role")); Assert.True(appContext.Navigate("Users")); }
Step 3—Run Tests
- Switch the solution configuration to
EasyTest. - Build the solution.
- Right-click the solution and select Run Tests.