Configure the OAuth2 Azure Authentication for the Web API (CTP)
- 6 minutes to read
Important
We do not recommend that you use the Web API in production code. We made this service available to gather feedback from anyone who considers it for future use.
The Web API supports the OAuth2 Azure Authentication. To use it, set up an Azure Active Directory (Azure AD) tenant. After you obtain a tenant, register the Web API with the Microsoft identity platform. When you configure platform settings for the Web API, select Single-page application as the Web application type and set the following Redirect URI: https://localhost:44318/swagger/oauth2-redirect.html.
Enable Authentication in a New Project
Use the Solution Wizard to create a Web API project. Enable the OAuth2 Azure Authentication on the Choose Security page:
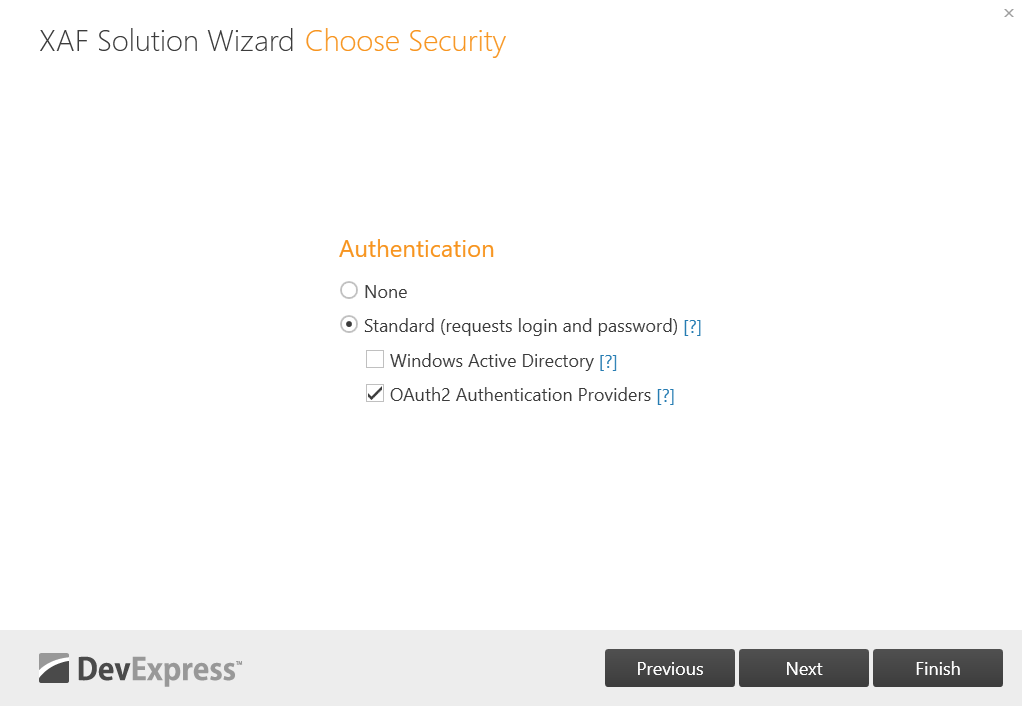
The wizard generates Azure AD authentication scaffolding code.
Update the generated code as follows:
Specify your Azure AD settings in the “Authentication” section of the appsettings.json file:
File: MySolution.WebApi\appsettings.json
// ...
"Authentication": {
    // ...
    "AzureAd": {
        "Instance": "https://login.microsoftonline.com/",
        "Domain": "abcdabcd-abcd-abcd-abcd-abcdabcdabcd", // This value is an example - replace it with your tenant domain.
        "TenantId": "organizations", // Use 'common', 'organizations', or the tenant Id obtained from the Azure portal.
        "ClientId": "11111111-1111-1111-1111-111111111111", // This value is an example - replace it with your client Id (application ID obtained from the Azure portal).
        "CallbackPath": "/ms_auth"
    }
},
// ...
Configure scopes according to your Azure settings. See the following topic for details: Quickstart: Configure an application to expose a web API.
File: MySolution.WebApi\Startup.cs
    AuthorizationCode = new OpenApiOAuthFlow() {
        // ...
        Scopes = new Dictionary<string, string> {
            { "api://11111111-1111-1111-1111-111111111111/WebApi", "Read WebApi"}
        }
    }
In the options.Events.OnAuthenticated delegate, implement the authentication logic. The auto-generated code maps an OAuth provider user to an application user. If this code suits your requirements, comment out
return.See the following topic for more information: How to: Use Active Directory and OAuth2 Authentication Providers in ASP.NET Core Blazor Applications.
File: MySolution.Blazor.Server\Startup.cs
options.Events.OnAuthenticated = (externalAuthenticationContext) => {
    // When a user successfully logs in with an OAuth provider, you can get their unique user key.
    //return;
    if (externalAuthenticationContext.AuthenticatedUser == null &&
    externalAuthenticationContext.Principal.Identity.AuthenticationType != SecurityDefaults.PasswordAuthentication &&
    externalAuthenticationContext.Principal.Identity.AuthenticationType != SecurityDefaults.WindowsAuthentication && !(externalAuthenticationContext.Principal is WindowsPrincipal)) {
        const bool autoCreateUser = true;
    // ...
    }
See the following section for information on how to test the OAuth2 Azure authentication: Use the Swagger UI to Test the OAuth2 Azure Authentication.
Enable Authentication in an Existing Project
Follow the steps below to add the OAuth2 Azure authentication to an existing Web API or Blazor Server project.
Step 1. Install the Required NuGet Packages
Install the following NuGet Packages:
- DevExpress.ExpressApp.Security.Xpo - to the MySolution.WebApi and MySolution.Module projects;
- Microsoft.Identity.Web.UI - to MySolution.WebApi.
See the following topic for details: Install DevExpress Controls Using NuGet Packages.
Step 2. Modify appsettings.json
Add the AzureAd option to the Authentication section in the appsettings.json file and specify your Azure AD credentials.
File: MySolution.WebApi\appsettings.json (MySolution.Blazor.Server\appsettings.json)
// ...
"Authentication": {
    "AzureAd": {
        "Instance": "https://login.microsoftonline.com/",
        "Domain": "abcdabcd-abcd-abcd-abcd-abcdabcdabcd", // This value is an example, replace it with your tenant domain.
        "TenantId": "organizations", // Use 'common', 'organizations', or the tenant Id obtained from the Azure portal.
        "ClientId": "11111111-1111-1111-1111-111111111111", // This value is an example, replace it with your client Id (application ID obtained from the Azure portal).
        "CallbackPath": "/ms_auth"
    }
},
// ...
Step 3. Modify Startup.cs
Add the following code to the ConfigureServices method to enable authentication:
File: MySolution.WebApi\Startup.cs (MySolution.Blazor.Server\Startup.cs)
// ...
using DevExpress.ExpressApp.Security;
using DevExpress.Persistent.BaseImpl.PermissionPolicy;
using DevExpress.ExpressApp;
using System.Security.Claims;
using Microsoft.Identity.Web;
using Microsoft.AspNetCore.Authorization;
using Microsoft.AspNetCore.Authentication.JwtBearer;
using System.Security.Principal;
// ...
public void ConfigureServices(IServiceCollection services) {
    // ...
    services.AddXafSecurity(options => {
        options.RoleType = typeof(PermissionPolicyRole);
        options.UserType = typeof(MySolution.Module.BusinessObjects.ApplicationUser);
        options.UserLoginInfoType = typeof(MySolution.Module.BusinessObjects.ApplicationUserLoginInfo);
        options.Events.OnSecurityStrategyCreated = securityStrategy => ((SecurityStrategy)securityStrategy).RegisterXPOAdapterProviders();
        options.SupportNavigationPermissionsForTypes = false;
    })
    .AddAuthenticationStandard(options => {
        options.IsSupportChangePassword = true;
    })
    .AddExternalAuthentication<HttpContextPrincipalProvider>(options => {
        options.Events.OnAuthenticated = (externalAuthenticationContext) => {
            // When a user successfully logs in with an OAuth provider, you can get their unique user key.
            //return;
            if(externalAuthenticationContext.AuthenticatedUser == null &&
            externalAuthenticationContext.Principal.Identity.AuthenticationType != SecurityDefaults.PasswordAuthentication &&
            externalAuthenticationContext.Principal.Identity.AuthenticationType != SecurityDefaults.WindowsAuthentication && !(externalAuthenticationContext.Principal is WindowsPrincipal)) {
                const bool autoCreateUser = true;

                IObjectSpace objectSpace = externalAuthenticationContext.LogonObjectSpace;
                ClaimsPrincipal externalUser = (ClaimsPrincipal)externalAuthenticationContext.Principal;

                var userIdClaim = externalUser.FindFirst("sub") ?? externalUser.FindFirst(ClaimTypes.NameIdentifier) ?? throw new InvalidOperationException("Unknown user id");
                string providerUserId = userIdClaim.Value;

                var userLoginInfo = FindUserLoginInfo(externalUser.Identity.AuthenticationType, providerUserId);
                if(userLoginInfo != null || autoCreateUser) {
                    externalAuthenticationContext.AuthenticatedUser = userLoginInfo?.User ?? CreateApplicationUser(externalUser.Identity.Name, providerUserId);
                }

                object CreateApplicationUser(string userName, string providerUserId) {
                    if(objectSpace.FirstOrDefault<MySolution.Module.BusinessObjects.ApplicationUser>(user => user.UserName == userName) != null) {
                        throw new ArgumentException($"The username ('{userName}') was already registered within the system");
                    }
                    var user = objectSpace.CreateObject<MySolution.Module.BusinessObjects.ApplicationUser>();
                    user.UserName = userName;
                    user.SetPassword(Guid.NewGuid().ToString());
                    user.Roles.Add(objectSpace.FirstOrDefault<PermissionPolicyRole>(role => role.Name == "Default"));
                    ((ISecurityUserWithLoginInfo)user).CreateUserLoginInfo(externalUser.Identity.AuthenticationType, providerUserId);
                    objectSpace.CommitChanges();
                    return user;
                }
                ISecurityUserLoginInfo FindUserLoginInfo(string loginProviderName, string providerUserId) {
                    return objectSpace.FirstOrDefault<MySolution.Module.BusinessObjects.ApplicationUserLoginInfo>(userLoginInfo =>
                                        userLoginInfo.LoginProviderName == loginProviderName &&
                                        userLoginInfo.ProviderUserKey == providerUserId);
                }
            }
        };
    });
    const string customBearerSchemeName = "CustomBearer";
    var authentication = services.AddAuthentication(customBearerSchemeName);
    authentication
    .AddJwtBearer(customBearerSchemeName, options => {
    options.TokenValidationParameters = new TokenValidationParameters() {
    ValidIssuer = Configuration["Authentication:Jwt:Issuer"],
    ValidAudience = Configuration["Authentication:Jwt:Audience"],
    IssuerSigningKey = new SymmetricSecurityKey(Encoding.UTF8.GetBytes(Configuration["Authentication:Jwt:IssuerSigningKey"]))
    };
    });
    authentication.AddMicrosoftIdentityWebApi(Configuration, configSectionName: "Authentication:AzureAd");

    services.AddAuthorization(options => {
        options.DefaultPolicy = new AuthorizationPolicyBuilder(
            JwtBearerDefaults.AuthenticationScheme)
                .RequireAuthenticatedUser()
                .RequireXafAuthentication()
                .Build();
    });
// ...
}
Use the AddSecurityDefinition and AddSecurityRequirement methods to add the OAuth2 Azure authentication to the Swagger UI.
File: MySolution.WebApi\Startup.cs (MySolution.Blazor.Server\Startup.cs)
services.AddSwaggerGen(c => {
    //...
    c.SchemaFilter<XpoSchemaFilter>();
    var azureAdAuthorityUrl = $"{Configuration["Authentication:AzureAd:Instance"]}{Configuration["Authentication:AzureAd:TenantId"]}";
    c.AddSecurityDefinition("OAuth2", new OpenApiSecurityScheme
    {
        Type = SecuritySchemeType.OAuth2,
        Flows = new OpenApiOAuthFlows()
        {
            AuthorizationCode = new OpenApiOAuthFlow()
            {
                AuthorizationUrl = new Uri($"{azureAdAuthorityUrl}/oauth2/v2.0/authorize"),
                TokenUrl = new Uri($"{azureAdAuthorityUrl}/oauth2/v2.0/token"),
                Scopes = new Dictionary<string, string> {
                    // Configure scopes according to https://docs.microsoft.com/en-us/azure/active-directory/develop/quickstart-configure-app-expose-web-apis
                    {"api://11111111-1111-1111-1111-111111111111/WebApi", "Read WebApi"}
                }
            }
        }
    });
    c.AddSecurityRequirement(new OpenApiSecurityRequirement() {
        {
            new OpenApiSecurityScheme {
                Name = "OAuth2",
                Scheme = "OAuth2",
                Reference = new OpenApiReference {
                    Type = Microsoft.OpenApi.Models.ReferenceType.SecurityScheme,
                    Id = "OAuth2"
                },
                In = ParameterLocation.Header
            },
            new string[0]
        }
    });
});
Also, modify the UseSwaggerUI method as follows:
File: MySolution.WebApi\Startup.cs (MySolution.Blazor.Server\Startup.cs)
public void Configure(IApplicationBuilder app, IWebHostEnvironment env) {
    // ...
    app.UseSwaggerUI(c => {
        c.SwaggerEndpoint("/swagger/v1/swagger.json", "MySolution WebApi v1");
        c.OAuthClientId(Configuration["Authentication:AzureAd:ClientId"]);
        c.OAuthUsePkce();
    });
    // ...
}
Step 4. Add the ApplicationUser and ApplicationUserLoginInfo Business Objects
XAF requires the ApplicationUser and ApplicationUserLoginInfo business objects to store user information. Add these business objects to the MySolution.Module project as described in Step 1 of the following section: Use Active Directory and OAuth2 Authentication Providers in ASP.NET Core Blazor Applications: Common Steps.
Use the Swagger UI to Test the OAuth2 Azure Authentication
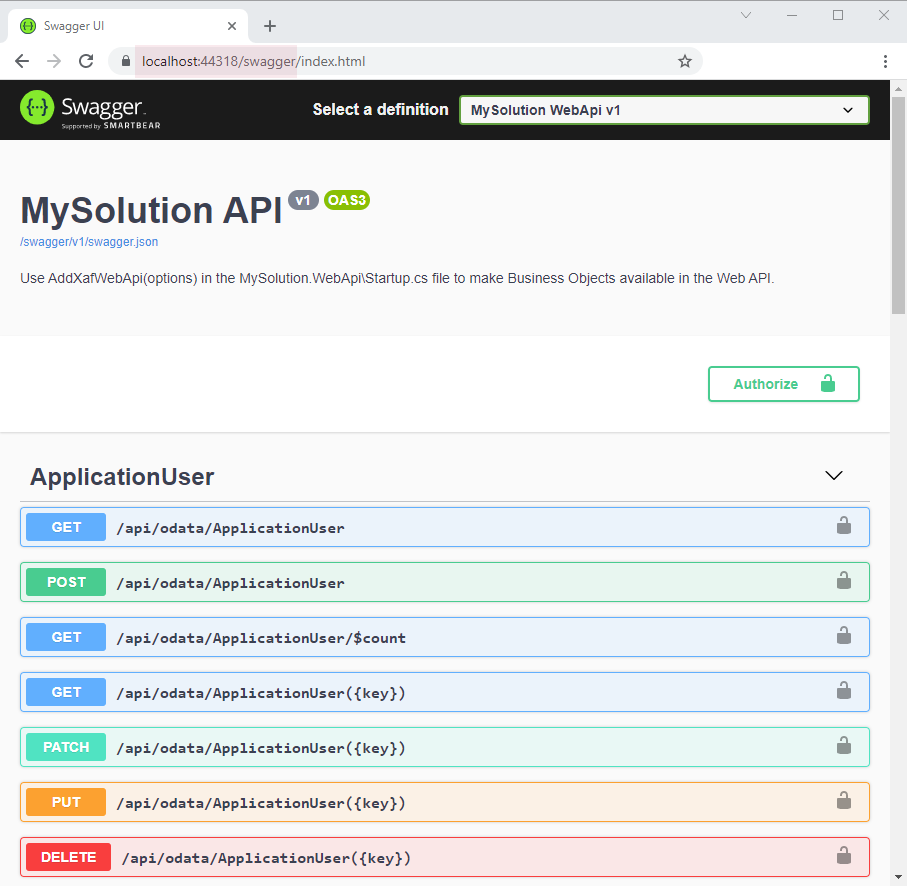
If your solution includes a Web API project, right-click the project in the Solution Explorer and choose Debug | Start new instance to run the Web API project. A browser displays the page with the available endpoints.
If your solution includes a startup Blazor Server project with the Web API, run the application. Add /swagger to the application address (for example, https://localhost:44318/swagger ) and press Enter to display a page with available endpoints.
Refer to the following link for more information on the page’s UI: Swagger UI.
Click the Authorize button:
 . In the Available authorizations window, select a scope and click the Authorize button:
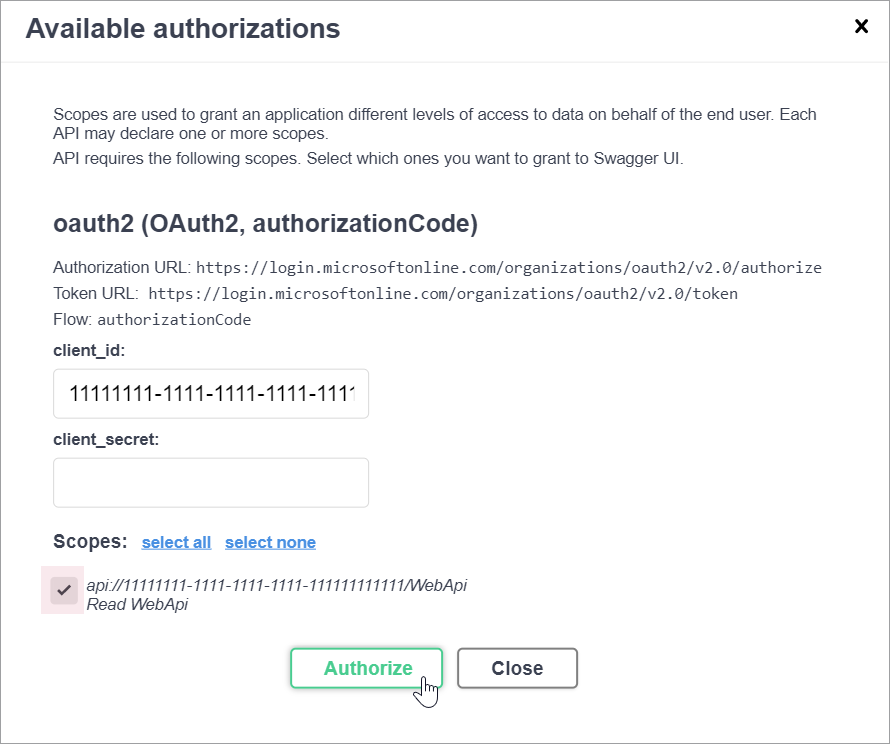
Refer to the following topic for information on how to create Web API endpoints: Create Endpoints and Test the Web API.