Configure the JWT Authentication for the Web API (CTP)
- 6 minutes to read
Important
We do not recommend that you use the Web API in production code. We made this service available to gather feedback from anyone who considers it for future use.
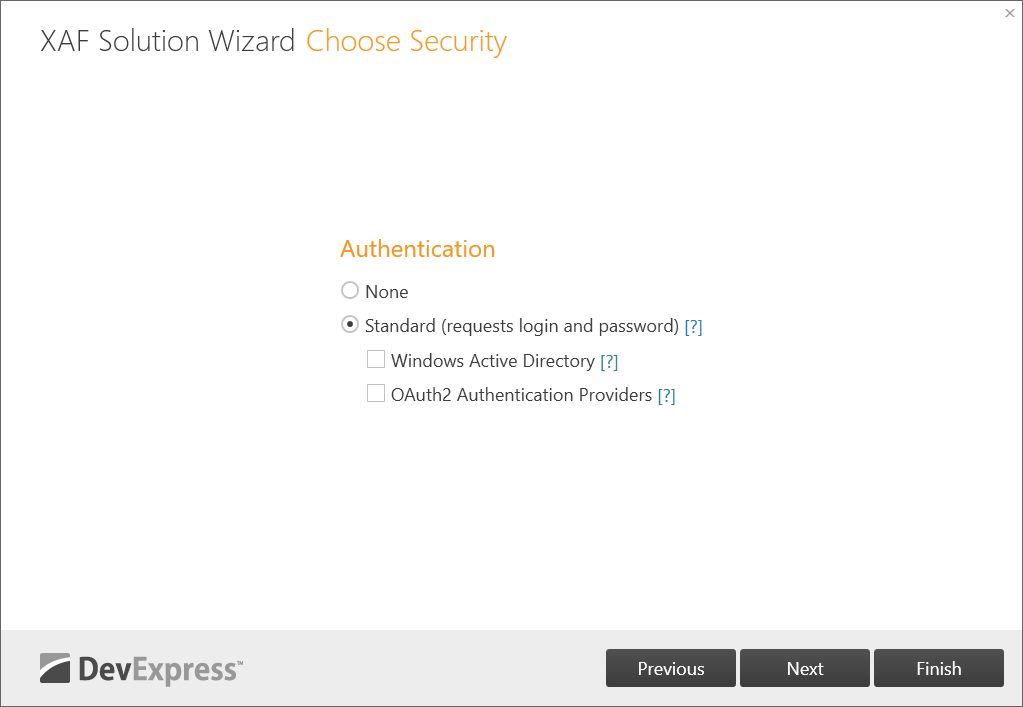
Enable Authentication in a New Project
Use the Solution Wizard to create a Web API project with the JWT authentication. If you choose Standard authentication on the Choose Security page, the wizard generates JWT authentication scaffolding code.
You can replace the autogenerated IssuerSigningKey value with your JWT signing key and change other JWT settings in the appsettings.json file.
File: MySolution.WebApi\appsettings.json (MySolution.Blazor.Server\appsettings.json)
// ...
"Authentication": {
    "Jwt": {
    "Issuer": "XafSecurity",
    "Audience": "http://localhost:4200",
    "IssuerSigningKey": "c1d2e0a7-405b-40be-9b36-fa93469b673a"
    }
}
// ...
See the following section for information on how to test the JWT authentication: Use the Swagger UI to Test the JWT Authentication.
Enable Authentication in an Existing Project
To add the JWT authentication to an existing Web API or Blazor Server project, follow the steps below.
Step 1. Install the Required NuGet Packages
Install the following NuGet packages to the MySolution.WebApi (MySolution.Blazor.Server) and MySolution.Module projects:
- DevExpress.ExpressApp.Security.Xpo;
- Microsoft.AspNetCore.Authentication.JwtBearer.
See the following topic for details: Install DevExpress Controls Using NuGet Packages.
Step 2. Modify appsettings.json
Add the Jwt option to the Authentication section in the appsettings.json file.
File: MySolution.WebApi\appsettings.json (MySolution.Blazor.Server\appsettings.json)
// ...
"Authentication": {
    "Jwt": {
    "Issuer": "XafSecurity",
    "Audience": "http://localhost:4200",
    "IssuerSigningKey": "c1d2e0a7-405b-40be-9b36-fa93469b673a"
    }
},
// ...
When you set Issuer to XafSecurity, XAF uses ClaimTypes.NameIdentifier as the AuthenticatedUser value. To use Principal from the options.Events.Authenticate delegate as the AuthenticatedUser value, call the AddExternalAuthentication<HttpContextPrincipalProvider>(options) extension method and set the AuthenticatedUser value manually.
File: MySolution.WebApi\Startup.cs (MySolution.Blazor.Server\Startup.cs)
public class Startup {
    // ...
    public void ConfigureServices(IServiceCollection services) {
        // ...
        services.AddXafSecurity(options => {
            // ...
        })
        AddExternalAuthentication<HttpContextPrincipalProvider>(options => {
            options.Events.Authenticate = (objectSpace, principal) => {
            var identityClaim = ((ClaimsPrincipal)principal).FindFirst(c => c.Type == ClaimTypes.NameIdentifier);
            if(identityClaim != null) {
                var userKey = objectSpace.GetObjectKey(typeof(ApplicationUser), identityClaim.Value);
                return objectSpace.GetObjectByKey<ApplicationUser>(userKey);
            }
            return null;
            };
        })
    }
}
// ...
The IssuerSigningKey value is an autogenerated key. You can replace it with your JWT signing key.
Step 3. Modify Startup.cs
Add the following code to the ConfigureServices method to enable authentication:
File: MySolution.WebApi\Startup.cs (MySolution.Blazor.Server\Startup.cs)
using DevExpress.ExpressApp.Security;
using Microsoft.AspNetCore.Authorization;
using DevExpress.Persistent.BaseImpl.PermissionPolicy;
// ...
public void ConfigureServices(IServiceCollection services) {
    //...
    services.AddXafSecurity(options => {
        options.RoleType = typeof(PermissionPolicyRole);
        options.UserType = typeof(MySolution.Module.BusinessObjects.ApplicationUser);
        options.UserLoginInfoType = typeof(MySolution.Module.BusinessObjects.ApplicationUserLoginInfo);
        options.Events.OnSecurityStrategyCreated = securityStrategy => ((SecurityStrategy)securityStrategy).RegisterXPOAdapterProviders();
        options.SupportNavigationPermissionsForTypes = false;
    }).AddExternalAuthentication<HttpContextPrincipalProvider>()
    .AddAuthenticationStandard(options => {
        options.IsSupportChangePassword = true;
    });
    var authentication = services.AddAuthentication(JwtBearerDefaults.AuthenticationScheme);
    // The AddJwtBearer method adds JWT credentials to the XAF authentication.
    authentication
        .AddJwtBearer(options => {
            options.TokenValidationParameters = new TokenValidationParameters() {
                ValidIssuer = Configuration["Authentication:Jwt:Issuer"],
                ValidAudience = Configuration["Authentication:Jwt:Audience"],
                IssuerSigningKey = new SymmetricSecurityKey(Encoding.UTF8.GetBytes(Configuration["Authentication:Jwt:IssuerSigningKey"]))
            };
        });
    services.AddAuthorization(options => {
        options.DefaultPolicy = new AuthorizationPolicyBuilder(
            JwtBearerDefaults.AuthenticationScheme)
                .RequireAuthenticatedUser()
                .RequireXafAuthentication()
                .Build();
    });
    // ...
    services.AddSwaggerGen(c => {
        c.EnableAnnotations();
        c.SwaggerDoc("v1", new OpenApiInfo {
            Title = "MySolution API",
            Version = "v1",
            Description = @"Use AddXafWebApi(options) in the MySolution.WebApi\Startup.cs file to make Business Objects available in the Web API."
        });
        c.SchemaFilter<XpoSchemaFilter>();
        // The AddSecurityDefinition and AddSecurityRequirement methods enable the JWT authentication for the Swagger UI.
        c.AddSecurityDefinition("JWT", new OpenApiSecurityScheme() {
            Type = SecuritySchemeType.Http,
            Name = "Bearer",
            Scheme = "bearer",
            BearerFormat = "JWT",
            In = ParameterLocation.Header
        });
        c.AddSecurityRequirement(new OpenApiSecurityRequirement()
            {
                {
                    new OpenApiSecurityScheme() {
                        Reference = new OpenApiReference() {
                            Type = Microsoft.OpenApi.Models.ReferenceType.SecurityScheme,
                            Id = "JWT"
                        }
                    },
                    new string[0]
                },
        });
    });
Step 4. Add a JWT Authentication Service
You can implement your own JWT service, or use the JWT service that the Solution Wizard generates. You can find the auto-generated service code below. To use this JWT service, create the JWT folder in the MySolution.WebApi (MySolution.Blazor.Server) project and add the AuthenticationController.cs file to this folder.
File: MySolution.WebApi\JWT\AuthenticationController.cs (MySolution.Blazor.Server\JWT\AuthenticationController.cs)
using System;
using System.Collections.Generic;
using System.IdentityModel.Tokens.Jwt;
using System.Security.Claims;
using System.Text;
using DevExpress.ExpressApp;
using DevExpress.ExpressApp.Blazor.Utils;
using DevExpress.ExpressApp.Security;
using DevExpress.ExpressApp.WebApi.Services;
using Microsoft.AspNetCore.Mvc;
using Microsoft.Extensions.Configuration;
using Microsoft.IdentityModel.Tokens;
using Swashbuckle.AspNetCore.Annotations;
using MySolution.Module.BusinessObjects;

namespace MySolution.WebApi.JWT {
    [ApiController]
    [Route("api/[controller]")]
    public class AuthenticationController : ControllerBase {
        private readonly ISecurityAuthenticationService securityAuthenticationService;
        private readonly IObjectConverter objectConverter;
        private readonly IConfiguration configuration;
        public AuthenticationController(ISecurityAuthenticationService securityAuthenticationService, IObjectConverter objectConverter, IConfiguration configuration) {
            this.securityAuthenticationService = securityAuthenticationService;
            this.objectConverter = objectConverter;
            this.configuration = configuration;
        }
        [HttpPost("Authenticate")]
        public IActionResult Authenticate(
            [FromBody]
            [SwaggerRequestBody(@"For example: <br /> { ""userName"": ""Admin"", ""password"": """" }")]
            AuthenticationStandardLogonParameters logonParameters
        ) {
            ApplicationUser user;
            try {
                user = (ApplicationUser)securityAuthenticationService.Authenticate(logonParameters);
            }
            catch(Exception ex) {
                if(ex is IUserFriendlyException) {
                    return Unauthorized(ex.Message);
                }
                else {
                    return Unauthorized();
                }
            }
            IList<Claim> claims = new List<Claim>();
            claims.Add(new Claim(ClaimTypes.NameIdentifier, user.Oid.ToString()));
            // You can save logonParameters for further use.
            claims.Add(new Claim("LogonParams", objectConverter.Pack(logonParameters)));
            var issuerSigningKey = new SymmetricSecurityKey(Encoding.UTF8.GetBytes(configuration["Authentication:Jwt:IssuerSigningKey"]));
            var token = new JwtSecurityToken(
                issuer: configuration["Authentication:Jwt:Issuer"],
                audience: configuration["Authentication:Jwt:Audience"],
                claims: claims,
                expires: DateTime.Now.AddHours(2),
                signingCredentials: new SigningCredentials(issuerSigningKey, SecurityAlgorithms.HmacSha256)
            );
            return Ok(new JwtSecurityTokenHandler().WriteToken(token));
        }
    }
}
Step 5. Add the ApplicationUser and ApplicationUserLoginInfo Business Objects
XAF requires the ApplicationUser and ApplicationUserLoginInfo business objects to store user information. Add these business objects to the MySolution.Module project as described in Step 1 of the following section: Use Active Directory and OAuth2 Authentication Providers in ASP.NET Core Blazor Applications: Common Steps.
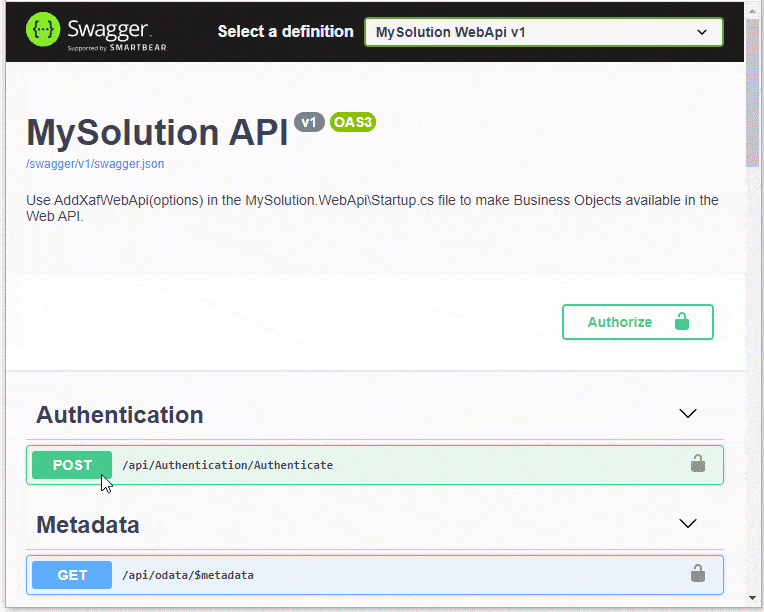
Use the Swagger UI to Test the JWT Authentication
1.If your solution includes a Web API project, right-click the project in the Solution Explorer and choose Debug | Start new instance to run the Web API project. A browser displays the page with the available endpoints.
If your solution includes a startup Blazor Server project with the Web API, run the application. Add /swagger to the application address (for example, https://localhost:44318/swagger ) and press Enter to display a page with available endpoints.
Refer to the following link for more information on the page’s UI: Swagger UI.
Expand the Post Authentication endpoint and click the Try it out button.
In the displayed form, enter the userName and password for an authorized user. In a template application, use Admin as the user name and an empty string as the password.
Copy the public key from the Response body, click the Authorize button
 to open the Available authorizations form, and paste the public key in the Value editor to enable the JWT authentication.
Refer to the following topic for information on how to create Web API endpoints: Create Endpoints and Test the Web API.