Set a One-to-Many Relationship (XPO)
- 3 minutes to read
In this lesson, you will learn how to set a one-to-many relationship between business objects. The Contact and Department business objects will be related by a one-to-many relationship. For this purpose, the Contacts property will be added to the Department class representing the “Many” part of the relationship. You will then learn the basics of automatic user interface construction for referenced objects.
Note
Before proceeding, take a moment to review the following lessons.
To implement the “One” part of the Department-Contacts relationship, decorate the Contact class’ Department property with the AssociationAttribute.
[DefaultClassOptions] public class Contact : Person { //... private Department department; [Association("Department-Contacts")] public Department Department { get {return department;} set {SetPropertyValue("Department", ref department, value);} } //... }For information on the Association attribute, refer to the Set a Many-to-Many Relationship (XPO) lesson.
To implement the “Many” part of the Department-Contacts relationship, add the Contacts property to the Department class and decorate this property with the Association attribute.
public class Department : BaseObject { //... [Association("Department-Contacts")] public XPCollection<Contact> Contacts { get { return GetCollection<Contact>("Contacts"); } } }Note
If you have CodeRush installed, you can use Code Templates when implementing business classes. Using Code Templates decreases code creation time, because it helps avoid having to type the entire code manually and allows you to create regular code sections with only a few keystrokes. To learn about the built-in Code Templates for eXpress Persistent Objects, refer to the XPO and XAF Templates topic.
Run the WinForms or ASP.NET application. Invoke a Detail View for a Department object (see the previous lesson “Set a Many-to-Many Relationship (XPO)”). You can see the Contacts group. To add objects to the Contacts collection, use the New (
 ) or Link (
 ) buttons in this tab. The Link button allows for the adding of references to existing Contact objects.
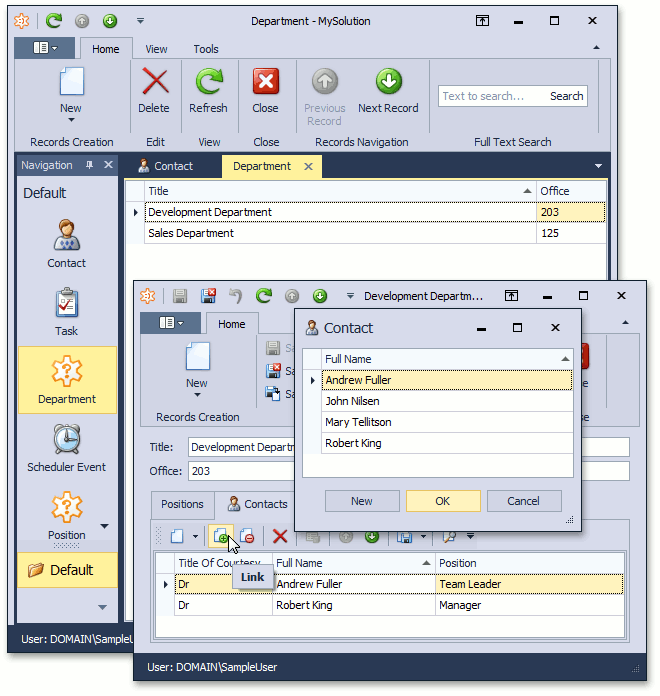
To remove a reference to an object from this collection, use the Unlink (
 ) button.
Tip
If you create a new Department and then create a new Contact in the Contacts collection, an associated Department is not immediately visible in the Detail View of the newly created Contact. The link between these objects is added later, when you save the Contact. You can change this behavior using the XafApplication.LinkNewObjectToParentImmediately property. When it is set to true, the link will be created and saved immediately after you click New.
You can see the code demonstrated in this lesson in the MySolution.Module | Business Objects | Contact.cs (Contact.vb) file of the Main Demo installed with XAF. The MainDemo application is installed in %PUBLIC%\Documents\DevExpress Demos 18.2\Components\eXpressApp Framework\MainDemo by default. The ASP.NET version of this demo is available online at https://demos.devexpress.com/XAF/MainDemo.
Next Lesson: Initialize a Property After Creating an Object (XPO)