Report Designer Integration into a DevExtreme application
- 3 minutes to read
Tip
Online Example: How to use the Web Report Designer within a DevExtreme application
You can integrate the End-User Web Report Designer into a DevExtreme application by creating two projects: a server (backend) project in ASP.NET MVC implementation and a client (frontend) DevExtreme application that includes all the necessary styles, scripts, and HTML-templates.
Note
Perform the steps in the Creating a Server Side for the Report Designer topic to create a backend part.
This document describes how to configure a client DevExtreme project and adjust the solution settings:
- Create a new basic DevExtreme single-page application in the same solution.
Download all necessary client resources using Bower. Create the bower.json file in your application’s root folder and add the following code in this file:
{
    "name": "report-designer-example",
    "dependencies": {
      "xtrareportsjs": "~17.2.3"
    }
}
Ensure that you specify the reporting controls’ version.
Open the console, navigate to your application folder and run the following command:
bower installAfter installation is completed, you can find all the libraries in the bower_components folder.
Include the following folders and files to the project to provide IntelliSense support for the added client resources:
- bower_components/xtrareportsjs/html
- bower_components/xtrareportsjs/js
- bower_components/xtrareportsjs/css
- bower_components/jquery-ui/juery-ui.min.js
- bower_components/jquery-ui/themes/base/juery-ui.min.css
Add links to Bower resources to the index.html file. Note that this sample uses a script with a predefined localization dictionary.
<!-- ... -->
<link href="bower_components/xtrareportsjs/css/report-designer-light.min.css" rel="stylesheet" />
<link href="bower_components/jquery-ui/themes/base/jquery-ui.min.css" rel="stylesheet" />
<link rel="dx-template" type="text/html" href="bower_components/xtrareportsjs/html/report-designer.html" />
<script src="bower_components/jquery-ui/jquery-ui.min.js"></script>
<script src="bower_components/xtrareportsjs/js/dx-designer.js"></script>
<script src="bower_components/xtrareportsjs/js/report-designer.js"></script>
<script src="bower_components/xtrareportsjs/js/localization/report-designer.en.js"></script>
<!-- ... -->
Make sure that you meet all the requirements for deploying the control on the client. Refer to Report Designer Requirements and Limitations for a list of necessary client resources.
Add a new View (for example, the reportDesigner.html) to the views folder and specify the HTML template using the dxReportDesigner binding with the designerOptions parameter.
<div data-options="dxView : { name: 'reportDesigner', title: 'Report Designer' } ">
    <div data-options="dxContent : { targetPlaceholder: 'content' } " class="dx-content-background">
        <div data-bind="dxReportDesigner: designerOptions"></div>
    </div>
</div>
Create a corresponding ViewModel for providing the required data to the View. Add a JavaScript file with the same name as the View’s name option (the reportDesigner.js file in this example).
ClientSideDevExtremeProject.reportDesigner = function (params, viewInfo) {
    "use strict";

    const host = 'http://localhost:54111/',
    reportUrl = "Products",
    designerOptions = {
        reportUrl, // The URL of a report that is opened in the Report Designer when the application starts.
        requestOptions: { // Options for processing requests from the Report Designer.
            host, // URI of your backend project.
            getDesignerModelAction: "/ReportDesigner/GetReportDesignerModel" // Action that returns the Report Designer model.
        }
    }

    return { designerOptions: designerOptions };
};
Link files created in the previous steps in the index.html file.
<link rel="dx-template" type="text/html" href="views/reportDesigner.html" />
<script type="text/javascript" src="views/reportDesigner.js"></script>
Add navigation to the added View in the app.config.js file as demonstrated below.
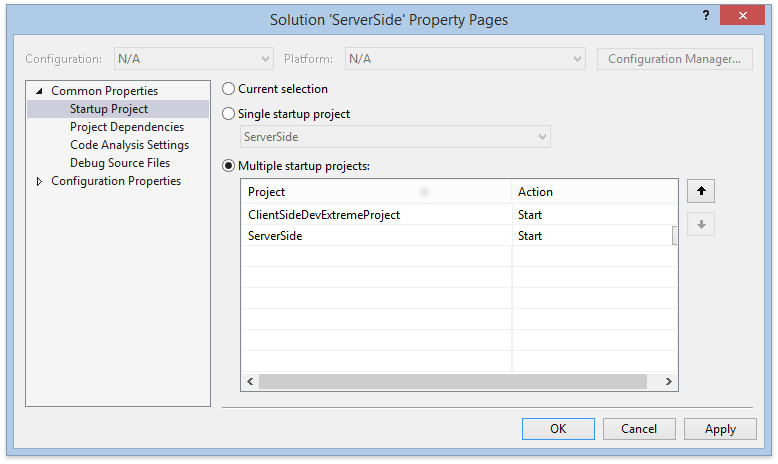
"navigation": [
  // ...
  {
    "title": "Report Designer",
    "onExecute": "#reportDesigner",
    "icon": "reportdesigner"
  }
]
For the solution to work correctly, run both backend and frontend projects on the solution’s startup. Right-click the solution in the Solution Explorer and select Properties. In the invoked Solution Property Pages dialog, select multiple startup projects as shown below.
You can disable the DevExtreme device-simulating tool for the client project by opening the project settings and unchecking the Run in simulator option in the Debug tab.
