Document Viewer Integration into a DevExtreme application
- 3 minutes to read
Tip
Online Example: How to use the HTML5 Document Viewer within a DevExtreme application
You can integrate the HTML5 Document Viewer into a DevExtreme application by creating two projects: a server (backend) project in ASP.NET MVC implementation and a client (frontend) DevExtreme application that includes all the necessary styles, scripts, and HTML-templates.
Note
Perform the steps in the Creating a Server Side for the Web Document Viewer topic to create a backend part.
This document describes how to configure a client DevExtreme project and adjust the solution settings:
- Create a new basic DevExtreme single-page application in the same solution.
Download all the necessary client resources using Bower. Create the bower.json file in your application’s root folder and add the following code to this file:
{
    "name": "html5-document-viewer-example",
    "dependencies": {
      "xtrareportsjs": "~17.2.3"
    }
}
Ensure that you specify the reporting controls’ version.
Open the console, navigate to your application folder and run the following command:
bower installAfter installation is completed, you can find all the libraries in the bower_components folder.
Include the following folders and files to the project to provide IntelliSense support for the added client resources:
- bower_components/xtrareportsjs/html
- bower_components/xtrareportsjs/js
- bower_components/xtrareportsjs/css
- bower_components/jquery-ui/juery-ui.min.js
- bower_components/jquery-ui/themes/base/juery-ui.min.css
Add links to Bower resources to the index.html file. Note that this sample uses a script with a predefined localization dictionary.
<!-- ... -->
<link href="bower_components/xtrareportsjs/css/web-document-viewer-light.min.css" rel="stylesheet" />
<link href="bower_components/jquery-ui/themes/base/jquery-ui.min.css" rel="stylesheet" />
<script type="text/html" src="bower_components/xtrareportsjs/html/web-document-viewer.html"></script>
<script src="bower_components/jquery-ui/jquery-ui.min.js"></script>
<script src="bower_components/xtrareportsjs/js/dx-designer.js"></script>
<script src="bower_components/xtrareportsjs/js/web-document-viewer.js"></script>
<script src="bower_components/xtrareportsjs/js/localization/web-document-viewer.en.js"></script>
<!-- ... -->
Make sure that you meet all the requirements for deploying the control on the client. Refer to Document Viewer Requirements and Limitations for a list of necessary client resources.
Add a new View (for example, the viewer.html) to the views folder and specify the HTML template using the dxReportViewer binding using the viewerOptions parameter.
<div data-options="dxView : { name: 'viewer', title: 'HTML5 Document Viewer' } ">
    <div data-options="dxContent : { targetPlaceholder: 'content' } " class="dx-content-background">
        <div data-bind="dxReportViewer: viewerOptions"></div>
    </div>
</div>
Create a corresponding ViewModel for providing the required data to the View. Add a JavaScript file with the same name as the View’s name option (the viewer.js file in this example).
ClientSideDevExtremeProject.viewer = function (params) {
    "use strict";

    const host = 'http://localhost:54114/',
    reportUrl = ko.observable("Products"),
    viewerOptions = {
        reportUrl, // The URL of a report that is opened in the Document Viewer when the application starts.
        requestOptions: { // Options for processing requests from the Web Document Viewer.
            host, // URI of your backend project.
            invokeAction: "/WebDocumentViewer/Invoke" // The URI path of the controller action that processes requests.
        }
    }

return { viewerOptions: viewerOptions };
};
Link files created at the previous steps in the index.html file.
<script type="text/javascript" src="views/viewer.js"></script>
<link rel="dx-template" type="text/html" href="views/viewer.html" />
Add navigation to the added View in the app.config.js file:
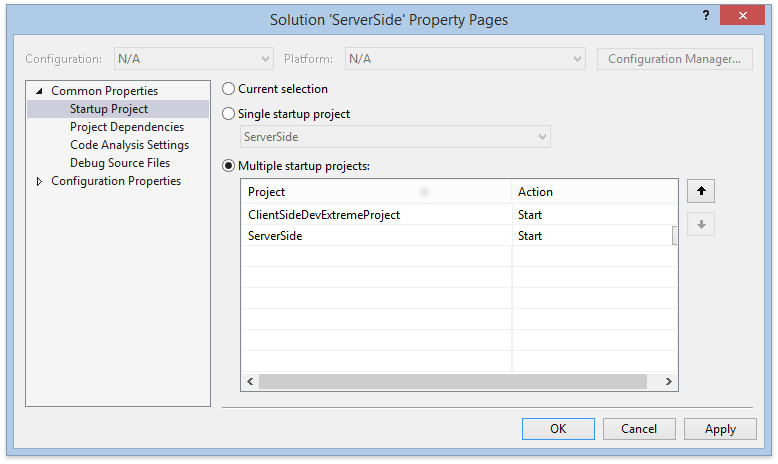
"navigation": [
  // ...
  {
    "title": " Viewer",
    "onExecute": "#viewer",
    "icon": "viewer"
  }
]
For the solution to work correctly, run both backend and frontend projects on the solution’s startup. Right-click the solution in the Solution Explorer and select Properties. In the invoked Solution Property Pages dialog, select multiple startup projects as shown below.
You can disable the DevExtreme device-simulating tool for the client project by opening the project settings and unchecking the Run in simulator option in the Debug tab.
