Connect a .NET Desktop Client to an ASP.NET Core WebAPI Service Powered by EF Core
- 20 minutes to read
Many application systems originally built as desktop applications often relied on direct database connections to access data. For example, a desktop application could originally connect directly to a Microsoft SQL Server database and handle all data-related tasks. As these systems evolved, maintaining a direct database connection became increasingly difficult. Multi-client systems require a more flexible, scalable, and secure data access model that separates the data access layer from clients (desktop, web, mobile).
This help topic contains four demo applications. Each subsequent demo application expands the capabilities of the previous demo.
- Demo 1: Connect the Grid to an ASP.NET Core Service
- Demo 2: Enable Data Editing
- Demo 3: Authenticate Users and Protect Data
- Demo 4: Authorization Code Flow
Tip
Refer to the following instructions to run the example: Getting Started.
Demo 1: Connect the Grid to a .NET Core Service
The following example sets up a simple data service using ASP.NET Core and Entity Framework Core (EF Core) to access the database. This service is a more “general purpose” service than the OData service, which has a more specific protocol to query and manipulate data. The desktop client is a .NET 8 Windows Forms application with the DevExpress Data Grid control.
Play the following animation to see how it works:
Note
The example demonstrates the fundamental principles of decoupling database access from the client UI. The example does not delve into complex scenarios where changing the service is difficult due to architectural constraints or other limitations. This approach does not dismiss the use of OData, but instead highlights a more basic service architecture that can be easily extended.
The Backend: An ASP.NET Core WebAPI Service Using Entity Framework Core
The backend project is called DataService and it was created using the standard ASP.NET Core WebAPI template. The service has two endpoint handlers: one to generate test data and the other to query data.
The second handler, at the URL /data/OrderItems, accepts several optional parameters (to support skip, take, and sort features). The code queries data from the EF Core database context and uses standard IQueryable<T> interface-based helpers to implement data shaping functionality. The TotalCount field is returned together with data and is used on the client side to determine the total amount of data available for the request.
app.MapGet("/data/OrderItems", async (
  DataServiceDbContext dbContext,
  int skip = 0, int take = 20,
  string sortField = "Id", bool sortAscending = true) =>
{
  var source =
    dbContext.OrderItems.AsQueryable()
      .OrderBy(sortField + (sortAscending ? " ascending" : " descending"));
  var items = await source.Skip(skip).Take(take).ToListAsync();

  var totalCount = await dbContext.OrderItems.CountAsync();

  return Results.Ok(new
  {
    Items = items,
    TotalCount = totalCount
  });
});
The Frontend: A Windows Forms App with a DevExpress Data Grid
In the MainForm of the Windows Forms application, the DevExpress GridControl is bound to a VirtualServerModeSource instance (a collection of OrderItem objects). To fetch data, the VirtualServerModeSource handles the following events:
ConfigurationChanged - Fires when the grid changes relevant parts of its runtime configuration in response to user interaction (for example, when a user clicks a column header to apply sort operations). This event allows you to initialize the data source and (optionally) return an initial batch of data rows.
void VirtualServerModeSource_ConfigurationChanged(object? sender, DevExpress.Data.VirtualServerModeRowsEventArgs e) {
    loader = new VirtualServerModeDataLoader(e.ConfigurationInfo);
    e.RowsTask = loader.GetRowsAsync(e);
}
MoreRows - Fires when the grid control ‘asks’ the data source for a new batch of data rows. In this instance, the grid attempts to retrieve additional data rows if and when the user scrolls to the bottom of the currently loaded data set.
void VirtualServerModeSource_MoreRows(object? sender, DevExpress.Data.VirtualServerModeRowsEventArgs e) {
    if (loader is not null) {
        e.RowsTask = loader.GetRowsAsync(e);
    }
}
In this example, the data loaded from the backend is encoded as JSON. DataFetchResult models the structure of the response provided by the backend endpoint, including the TotalCount property:
public class DataFetchResult {
  public List<OrderItem> Items { get; set; } = null!;
  public int TotalCount { get; set; }
}
The GetRowsAsync method handles retrieved data. The method is invoked during the initial load (from the ConfigurationChanged handler) and subsequent loads (from the MoreRows handler). Data is fetched using HttpClient, with skip, take, and sort properties passed as URL parameters. The results are deserialized from JSON and returned along with the moreRowsAvailable flag:
public Task<VirtualServerModeRowsTaskResult>
  GetRowsAsync(VirtualServerModeRowsEventArgs e) {
  return Task.Run(async () => {
      using var client = new HttpClient();
      var response = await client.GetAsync(
        $"{System.Configuration.ConfigurationManager.AppSettings["baseUrl"]}/data/OrderItems?skip={e.CurrentRowCount}&take={BatchSize}&sortField={SortField}&sortAscending={SortAscending}");
      response.EnsureSuccessStatusCode();
      var responseBody = await response.Content.ReadAsStringAsync();

      var dataFetchResult =
        JsonSerializer.Deserialize<DataFetchResult>(
          responseBody, new JsonSerializerOptions {
            PropertyNameCaseInsensitive = true
          });

      if (dataFetchResult is null)
        return new VirtualServerModeRowsTaskResult();

      var moreRowsAvailable =
        e.CurrentRowCount + dataFetchResult.Items.Count < dataFetchResult.TotalCount;

    return new VirtualServerModeRowsTaskResult(
      dataFetchResult.Items, moreRowsAvailable);
  }, e.CancellationToken);
}
Demo 2: Connect the Grid to a .NET Core Service and Enable Data Editing
This example extends Demo 1 (the previous example). The example activates data editing in the DevExpress WinForms Data Grid through the accessible endpoints.
POST, PUT, and DELETE Endpoints
MapPost, MapPut, and MapDelete methods manage different HTTP methods when processing incoming requests:
MapPost– Manages HTTP POST requests, which are generally used to create new data.MapPut– Processes HTTP PUT requests to update existing data.MapDelete– Handles HTTP DELETE requests to remove records.
app.MapPost("/data/OrderItem", async (DataServiceDbContext dbContext, OrderItem orderItem) => {
    dbContext.OrderItems.Add(orderItem);
    await dbContext.SaveChangesAsync();
    return Results.Created($"/data/OrderItem/{orderItem.Id}", orderItem);
});

app.MapPut("/data/OrderItem/{id}", async (DataServiceDbContext dbContext, int id, OrderItem orderItem) => {
    if (id != orderItem.Id) {
        return Results.BadRequest("Id mismatch");
    }

    dbContext.Entry(orderItem).State = EntityState.Modified;
    await dbContext.SaveChangesAsync();
    return Results.NoContent();
});

app.MapDelete("/data/OrderItem/{id}", async (DataServiceDbContext dbContext, int id) => {
    var orderItem = await dbContext.OrderItems.FindAsync(id);

    if (orderItem is null) {
        return Results.NotFound();
    }

    dbContext.OrderItems.Remove(orderItem);
    await dbContext.SaveChangesAsync();
    return Results.NoContent();
});
Data Editing Form
The example features a standalone data editing form. The edit form is used to modify existing data rows and add new rows.

The example uses the DevExpress WinForms Form Layout component to automatically arrange DevExpress Data Editors and eliminate the hassles associated with pixel-based form design.
DataServiceClient
The DataServiceClient class is an abstraction designed to simplify interaction with a data service by encapsulating common HTTP operations.
Fetch Data
The following code calls the DataServiceClient.GetOrderItemsAsync method to fetch data. The GetOrderItemsAsync method fetches a list of order items by specifying row counts, batch sizes, and sort parameters:
public Task<VirtualServerModeRowsTaskResult> GetRowsAsync(VirtualServerModeRowsEventArgs e) {
    return Task.Run(async () => {
        Debug.WriteLine($"Fetching data rows {e.CurrentRowCount} to {e.CurrentRowCount + BatchSize}, sorting by {SortField} ({(SortAscending ? "asc" : "desc")})");
        var dataFetchResult = await DataServiceClient.GetOrderItemsAsync(e.CurrentRowCount, BatchSize, SortField, SortAscending);

        if (dataFetchResult is null)
            return new VirtualServerModeRowsTaskResult();

        var moreRowsAvailable = e.CurrentRowCount + dataFetchResult.Items.Count < dataFetchResult.TotalCount;
        Debug.WriteLine($"Returning {dataFetchResult.Items.Count} items, more rows available: {moreRowsAvailable}");
        return new VirtualServerModeRowsTaskResult(dataFetchResult.Items, moreRowsAvailable);
    }, e.CancellationToken);
}
Update Data
The DataServiceClient.UpdateOrderItemAsync method encodes the transfer object as JSON and sends it to the service URL using a PUT request. The UpdateOrderItemAsync method invokes EnsureSuccessStatusCode() after the PUT request to ensure that the object is successfully updated.
public static async Task UpdateOrderItemAsync(OrderItem orderItem) {
    using var client = CreateClient();
    var response = await client.PutAsync($"{baseUrl}/data/OrderItem/{orderItem.Id}",
        new StringContent(JsonSerializer.Serialize(orderItem), Encoding.UTF8, "application/json"));
    response.EnsureSuccessStatusCode();
}
The edit form is displayed when a user double-clicks a data row:
async void gridView1_DoubleClick(object sender, EventArgs e) {
    if (sender is GridView view) {
        if (view.FocusedRowObject is OrderItem oi) {
            var editResult = EditForm.EditItem(oi);
            if (editResult.changesSaved) {
                await DataServiceClient.UpdateOrderItemAsync(editResult.item);
                view.RefreshData();
            }
        }
    }
}
Create a New Item
The DataServiceClient.CreateOrderItemAsync method creates a new OrderItem. The CreateOrderItemAsync method serializes the object, sends it to the service, and deserializes the response back into an OrderItem. This pattern supports server-generated values, such as autoincremented keys.
public static async Task<OrderItem?> CreateOrderItemAsync(OrderItem orderItem) {
    using var client = CreateClient();
    var response = await client.PostAsync($"{baseUrl}/data/OrderItem",
        new StringContent(JsonSerializer.Serialize(orderItem), Encoding.UTF8, "application/json"));
    response.EnsureSuccessStatusCode();
    var responseBody = await response.Content.ReadAsStringAsync();
    return responseBody.AsOrderItem();
}

static OrderItem? AsOrderItem(this string responseBody) {
    return JsonSerializer.Deserialize<OrderItem>(responseBody, new JsonSerializerOptions {
        PropertyNameCaseInsensitive = true
    });
}
To add a new data row, the user should click “Add Order Item” on the toolbar.
async void addItemButton_ItemClick(object sender, DevExpress.XtraBars.ItemClickEventArgs e) {
    if (gridControl.FocusedView is ColumnView view) {
        var createResult = EditForm.CreateItem();
        if (createResult.changesSaved) {
            await DataServiceClient.CreateOrderItemAsync(createResult.item!);
            view.RefreshData();
        }
    }
}
Delete an Item
The DataServiceClient.DeleteOrderItemAsync method catches exceptions and returns a Boolean value that indicates success or failure. The DeleteOrderItemAsync method logs errors using Debug.WriteLine() and returns false if an error occurs, which enables the UI or business logic to respond accordingly.
public static async Task<bool> DeleteOrderItemAsync(int id) {
    try {
        using var client = CreateClient();
        var response = await client.DeleteAsync($"{baseUrl}/data/OrderItem/{id}");
        response.EnsureSuccessStatusCode();
        return true;
    }
    catch (Exception ex) {
        Debug.WriteLine(ex);
        return false;
    }
}
To delete the focused data row, the user should click “Delete Focused Item” on the toolbar.
async void deleteItemButton_ItemClick(object sender, DevExpress.XtraBars.ItemClickEventArgs e) {
    if (gridControl.FocusedView is ColumnView view &&
        view.GetFocusedRow() is OrderItem orderItem) {
        await DataServiceClient.DeleteOrderItemAsync(orderItem.Id);
        view.RefreshData();
    }
}
Demo 3: Connect the Grid to a .NET Core Service – Authenticate Users and Protect Data
This example extends Demo 2 (the previous example). The example adds a key security feature to the application: user login and permission-based access control (uses Resource Owner Password Credentials (ROPC) for authentication).
Run and Configure Keycloak
Follow the steps below to set up and configure Keycloak, an open-source identity and access management framework. This example uses Docker to run Keycloak locally and configure roles/users:
- Install Docker.
Execute the following command to run Keycloak in a Docker Container:
docker run -p 8080:8080 -e KEYCLOAK_ADMIN=admin -e KEYCLOAK_ADMIN_PASSWORD=admin -v ./data:/opt/keycloak/data quay.io/keycloak/keycloak:latest start-dev-e KEYCLOAK_ADMIN,-e KEYCLOAK_ADMIN_PASSWORD– set the initial admin credentials.-v ./data:/opt/keycloak/data– mounts the container’s data directory to your host for persistence purposes.-p 8080:8080– exposes Keycloak on port 8080 of your host machine.
- Access Keycloak Admin Console
- Open your browser and go to
http://localhost:8080/admin. - Log in using the admin credentials set in the previous step (admin/admin).
- Open your browser and go to
Create a New Realm
- In the left navigation menu, navigate to Clients and click Create Client.
Set a Client ID (for example, app1) and click Next.

Ensure Direct access grants is enabled, then click Next and Save.

- Create a Role
- Navigate to Realm Roles in the left menu and click Create role.
- Name the role (for example, writers) and click Save.
- Adjust Login Settings
- Go to Realm Settings | Login tab.
- Disable Login with email.
- In the User Profile tab, disable the Required field for email.
Create a User
- Go to Users and click Add user.
- Set Username (for example, writer), random first/last names, and save the account.
In the Credentials tab, set a password and deselect Temporary.

Assign Role to the User
Go to Role mapping, filter by realm roles, and assign the
writersrole.
Create a Reader User
Repeat steps 7 and 8 for a second user (for example, reader), but do not assign a role.
Activate Authentication and Authorization on the Server
Configure JWT Authentication
- In your DataService app, extend service initialization to use JWT Bearer authentication.
- Add the following code to configure
TokenValidationParametersin the Startup or Program class. This ensures that incoming requests are validated using JWT tokens issued by your Keycloak server:
options.TokenValidationParameters = new TokenValidationParameters {
    ValidateIssuer = true,
    ValidIssuer = $"{builder.Configuration["Jwt:KeycloakUrl"]}/realms/{builder.Configuration["Jwt:Realm"]}",
    ValidateAudience = true,
    ValidAudience = builder.Configuration["Jwt:Audience"],
    ValidateLifetime = true,
    ValidateIssuerSigningKey = true,
    IssuerSigningKey = publicKey
};
Ensure your appsettings.json contains correct JWT settings. Adjust values to match your Keycloak configuration if necessary.
"Jwt": {
    "Issuer": "http://localhost:8080/realms/winappdemo",
    "Audience": "account",
    "KeycloakUrl": "http://localhost:8080",
    "Realm": "winappdemo"
}
Add Authorization Policies
Define a policy for the role writers in the Startup or Program class:
builder.Services.AddAuthorization(o => {
    o.AddPolicy("writers", p => p.RequireRealmRole("writers"));
});
Use the
RequireRealmRolemethod to validate the role:public static class PolicyHelpers { public static void RequireRealmRole(this AuthorizationPolicyBuilder policy, string roleName) { policy.RequireAssertion(context => { var realmAccess = context.User.FindFirst("realm_access")?.Value; if (realmAccess == null) return false; var node = JsonNode.Parse(realmAccess); if (node == null || node["roles"] == null) return false; var array = node["roles"]!.AsArray(); return array.Select(r => r?.GetValue<string>()).Contains(roleName); }); } }
Protect API Endpoints
Use the RequireAuthorization method to secure API endpoints:
- For open endpoints (for example,
/api/populateTestData), no authorization is required. - GET endpoints
/data/OrderItemsand/data/OrderItem/{id}callRequireAuthorization(), so that an authenticated user is required to successfully execute them, but no specific roles are needed. - The remaining endpoints POST to
/data/OrderItem, and PUT and DELETE to/data/OrderItem/{id}, callRequireAuthorization("writers"), so that policy writers is applied and realm role writers is required.
The example of the POST endpoint:
app.MapPost("/data/OrderItem", async (DataServiceDbContext dbContext, OrderItem orderItem) => {
    dbContext.OrderItems.Add(orderItem);
    await dbContext.SaveChangesAsync();
    return Results.Created($"/data/OrderItem/{orderItem.Id}", orderItem);
}).RequireAuthorization("writers");
Enable User Logins in the WinForms App
The LoginForm prompts users for username and password. The form contains two DevExpress TextEdit controls for username and password fields.

When a user clicks the “Log In” button, the LogIn form collects user credentials and sends a POST request to the Keycloak server to retrieve an access token:
private async void loginButton_Click(object sender, EventArgs e) {
    //...
    if (await DataServiceClient.LogIn(userNameEdit.Text, passwordEdit.Text)) {
        this.DialogResult = DialogResult.OK;
        this.Close();
    }
    else {
        XtraMessageBox.Show("Username or password are invalid, or a technical error occurred.", "Error",
            MessageBoxButtons.OK, MessageBoxIcon.Error);
    }
}
The GetTokens method parses the JSON response from Keycloak and extracts access_token, refresh_token, and expires_in fields:
static (string? access_token, string? refresh_token, int? expires_in) GetTokens(string jsonString) {
    var node = JsonNode.Parse(jsonString);
    if (node == null)
        return (null, null, null);
    else
        return (node["access_token"]?.GetValue<string>(),
            node["refresh_token"]?.GetValue<string>(),
            node["expires_in"]?.GetValue<int>());
}
A client must check the validity and expiration of an access token before its use and use the refreshToken to retrieve a new access token if the old one has expired (see the BearerTokenHandler class). The Authorization request header is configured to pass the value of the current access token to the server using a specific format:
protected override async Task<HttpResponseMessage> SendAsync(HttpRequestMessage request, CancellationToken cancellationToken) {
    if (!String.IsNullOrWhiteSpace(accessToken)) {
        //...
        request.Headers.Authorization = new AuthenticationHeaderValue("Bearer", accessToken);
    }
    return await base.SendAsync(request, cancellationToken);
}
The client application can now authenticate against the Keycloak server and send an access token to the data service (confirming permission to access data endpoints). The server determines the roles associated with a specific logged-in user account and allows/denies access to endpoints accordingly.
Configure UI Based on Access Permissions
Decode the Access Token
Once the user logs in and the accessToken is retrieved, decode the token on the client side to access the user’s roles. Add the System.IdentityModel.Tokens.Jwt NuGet package to your project to handle JWT decoding.
The GetUserDetails method extracts user details such as username and roles:
static (string? name, string?[] realmRoles) GetUserDetails(string? accessToken) {
    if (String.IsNullOrEmpty(accessToken))
        return (null, []);
    var handler = new JwtSecurityTokenHandler();
    var token = handler.ReadJwtToken(accessToken);

    var claim = (string claimType) => token.Claims.FirstOrDefault(c => c.Type == claimType)?.Value;
    var name = claim("name");
    var realmAccess = claim("realm_access");
    var node = JsonNode.Parse(realmAccess);
    if (node == null || node["roles"] == null) return (name, []);
    var array = node["roles"]!.AsArray();
    var realmRoles = array.Select(r => r?.GetValue<string>()).ToArray();

    return (name, realmRoles);
}
Evaluate User Roles
Evaluate user roles to determine which UI elements to enable/disable. The EvaluateRoles method enables/disables UI elements based on roles available to the user:
private void EvaluateRoles() {
    if (DataServiceClient.LoggedIn) {
        if (DataServiceClient.UserHasRole("writers")) {
            userIsWriter = true;
            addItemButton.Enabled = true;
            deleteItemButton.Enabled = true;
        }
        else {
            userIsWriter = false;
            addItemButton.Enabled = false;
            deleteItemButton.Enabled = false;
        }
    }
    else {
        userIsWriter = false;
        addItemButton.Enabled = false;
        deleteItemButton.Enabled = false;
    }
}

Demo 4: Connect the Grid to a Custom ASP.NET Core Service (EF Core with pure Web API) - Authorization Code Flow
The example in Demo 3 adds a user login and permission-based access control feature using Resource Owner Password Credentials (ROPC). This approach, while familiar in traditional client applications, requires the application to collect and transmit user credentials, which creates security risks.
Demo 4 improves security by replacing ROPC with the Authorization Code Flow, a method designed for applications that need to authenticate users without directly handling their credentials. Instead of sending a username and password to the server, the application redirects the user to an authorization server (for example, Keycloak, Auth0, etc.), ensuring that sensitive credentials remain protected.
Update the Keycloak Configuration
Tip
Before setting up Demo 4, configure Keycloak as described in Demo 3. Demo 4 builds on this setup and updates the Keycloak configuration to support the Authorization Code Flow.
Follow these steps to configure Keycloak for the Authorization Code Flow:
Verify the ‘openid’ Scope
- Navigate to Client scopes in
winappdemorealm settings. Check if the
openidscope is listed.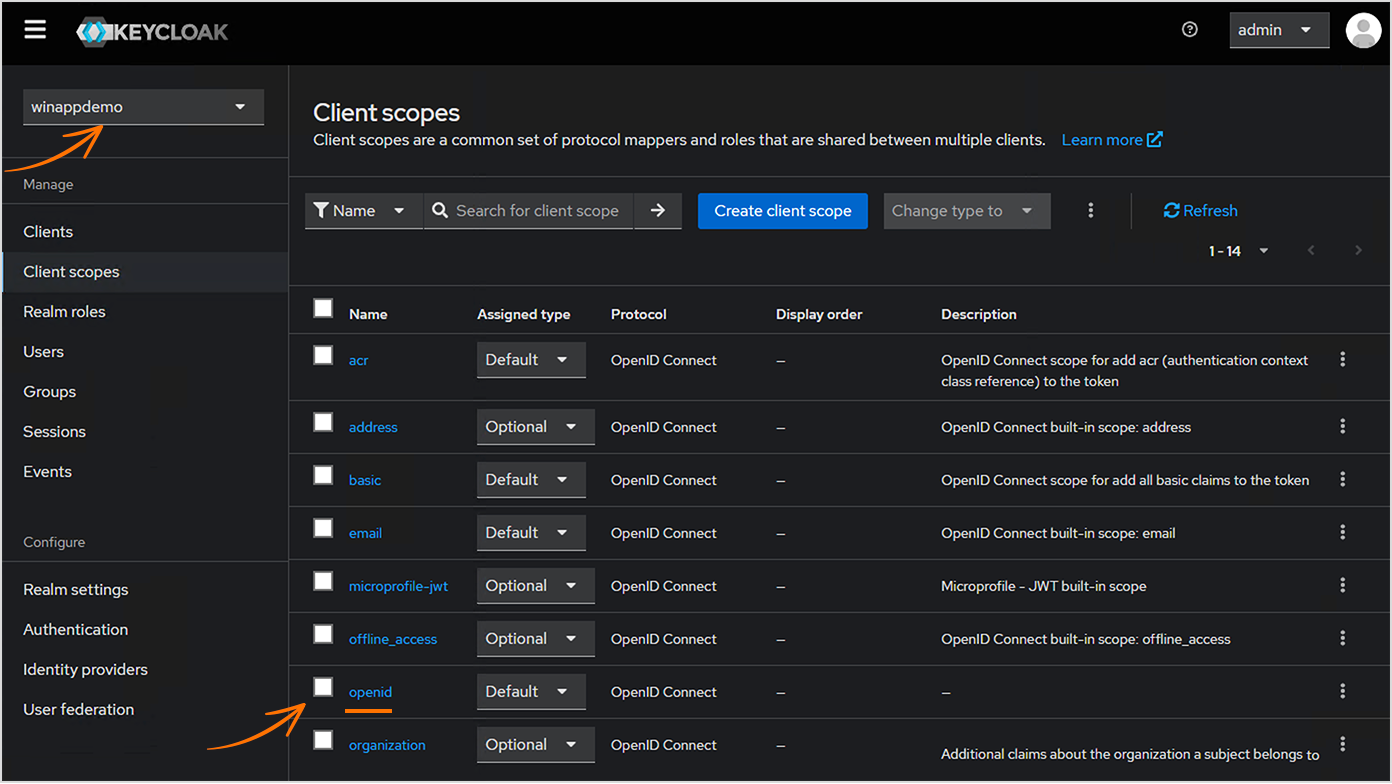
If it is missing, click Create client scope and do the following:
- Enter
openidas the name. - Select OpenID Connect as the protocol.
- Set the type to Default.
- Save the entry.
- Enter
Register a New Client
- Go to Clients and click Create client.
Select OpenID Connect as the client type and enter a Client ID (
appAuthFlow1in this example).
Configure Authentication Flow
- Open the Capability config page.
- Locate the Authentication flow section. Uncheck Direct access grant (it may be enabled by default).
- Ensure Standard flow remains checked (required for the Authorization Code Flow).

Define Redirect URIs
- Open the Login settings page.
- Add at least one valid Redirect URI (for this sample, use:
winappdemo://*).

- Save the client.
Note
Verify the openid Scope for the Client:
- Open the Client scopes tab (within the client settings, not the main menu).
- Ensure that the
openidscope is included.
Accept Redirections in WinForms Using a Protocol Handler
During authentication, the authentication service does not directly interact with the client application. Instead, the user is prompted to log in via a web page provided by the authentication service. Once the user successfully logs in, the service generates a code and returns it to the client application through an automatic redirection.
This redirection leads to a URL that the client application must be prepared to handle. The URL was previously specified by the client application during the initial authentication request, and the authentication service ensures that it matches a valid registered redirect URL.
Tip
In the Keycloak configuration, these redirect URLs are defined using a protocol prefix.
Register a Custom Protocol Handler in Windows
Register a custom protocol prefix in Windows. This allows Windows to recognize the URL format and launch your application when the redirection occurs (details that are passed through by the URL are supplied as command-line arguments):
Register your protocol in the registry (RegisterProtocol):
static void RegisterProtocol() {
  // The name of the custom protocol must correspond to your Valid URI configuration on the Keycloak side.
  string customProtocol = "winappdemo";
  string applicationPath = Application.ExecutablePath;
  var keyPath = $@"Software\Classes\{customProtocol}";
  using (var key = Registry.CurrentUser.CreateSubKey(keyPath, true)) {
    if (key == null) {
      throw new Exception($"Registry key can't be written: {keyPath}");
    }
    key.SetValue(string.Empty, "URL:" + customProtocol);
    key.SetValue("URL Protocol", string.Empty);
    using (var commandKey = key.CreateSubKey(@"shell\open\command")) {
      commandKey.SetValue(string.Empty, $"{applicationPath} %1");
    }
  }
}
This example implements a mechanism that uses a named pipe to send any incoming protocol information to an already running instance of the same application.
On startup, if no parameters are found on the command line, the application attempts to start a listener for the named pipe. The HandleProtocolMessage method passes the message to DataServiceClient.
private const string pipeName = "WinAppDemoProtocolMessagePipe";

static void StartProtocolMessageListener() {
  Task.Run(async () => {
    while (true) {
      using var server = new NamedPipeServerStream(pipeName, PipeDirection.In);
      server.WaitForConnection();
      using var reader = new StreamReader(server);
      var msg = reader.ReadToEnd();
      await HandleProtocolMessage(msg);
    }
  });
}

static async Task HandleProtocolMessage(string msg) {
  Console.WriteLine($"Handling protocol message: '{msg}'");
  await DataServiceClient.AcceptProtocolUrl(msg);
}
If a command-line parameter is detected, the application tries to pass details to an existing instance:
static void SendProtocolMessage(string msg) {
  using var client = new NamedPipeClientStream(".", pipeName, PipeDirection.Out);
  // The `Connect` call uses a short timeout. If no running instance is found, there is an error in the process.
  client.Connect(500);
  using var writer = new StreamWriter(client) { AutoFlush = true };
  writer.Write(msg);
}
Implement Authorization Code Flow
The login logic is divided into two parts:
- A login method that calls
DataServiceClient. - An event handler that listens for login status changes in
DataServiceClientand updates the UI accordingly.
The Authorization Code Flow begins in the DataServiceClient.LogIn method. This implementation uses Url.Combine from the Flurl library to construct the required URL.
The login process is initiated by calling Process.Start, which opens the default system browser and navigates to the Keycloak login page.
var url = Url.Combine(authUrl, "realms", realm, "protocol", "openid-connect", "auth")
  .SetQueryParams(
    new {
      response_type = "code",
      client_id = clientId,
      redirect_uri = redirectUri,
      scope = "openid profile email",
    }
);

Process.Start(new ProcessStartInfo(url) { UseShellExecute = true });
Once the user successfully logs in, Keycloak redirects to the registered URI, which triggers a second instance of the application. This instance calls AcceptProtocolUrl on DataServiceClient to process the authorization response.
public static async Task AcceptProtocolUrl(string protocolUrlString) {
    var protocolUrl = new Url(protocolUrlString);
    if (
        protocolUrl.QueryParams.TryGetFirst("code", out object codeObject)
        && codeObject is string code
    ) {
        CheckSettings(["authUrl", "realm", "clientId", "redirectUri"]);

        var content = new FormUrlEncodedContent(
            new Dictionary<string, string> {
                { "grant_type", "authorization_code" },
                { "client_id", clientId! },
                { "code", code },
                { "redirect_uri", redirectUri! },
            }
        );
        var url = Url.Combine(
            authUrl,
            "realms",
            realm,
            "protocol",
            "openid-connect",
            "token"
        );

        var response = await bareHttpClient.PostAsync(url, content);
        try {
            response.EnsureSuccessStatusCode();
            var responseString = response.Content.ReadAsStringAsync().Result;
            (idToken, accessToken, refreshToken, expiresIn) = GetTokens(responseString);
            if (accessToken != null) {
                lastRefreshed = DateTime.Now;
                (name, realmRoles) = GetUserDetails(accessToken);
                LogInStatusChanged?.Invoke(null, EventArgs.Empty);
            }
        }
        catch (Exception ex) {
            Debug.WriteLine(ex);
        }
    }
    else {
        idToken = null;
        accessToken = null;
        refreshToken = null;
        expiresIn = null;
        lastRefreshed = null;
        name = null;
        realmRoles = null;
        LogInStatusChanged?.Invoke(null, EventArgs.Empty);
    }
}
The DataServiceClient.GetTokens method gets the following tokens:
id_tokenaccess_tokenrefresh_tokenexpires_in
static (
    string? id_token,
    string? access_token,
    string? refresh_token,
    int? expires_in
) GetTokens(string jsonString) {
    var node = JsonNode.Parse(jsonString);
    if (node == null)
        return (null, null, null, null);
    else
        return (
            node["id_token"]?.GetValue<string>(),
            node["access_token"]?.GetValue<string>(),
            node["refresh_token"]?.GetValue<string>(),
            node["expires_in"]?.GetValue<int>()
        );
}
To log out, the application uses the LogOut method:
public static void LogOut() {
  var url = Url.Combine(authUrl, "realms", realm, "protocol", "openid-connect", "logout")
    .SetQueryParams(
      new { post_logout_redirect_uri = redirectUri, id_token_hint = idToken }
    );

  Process.Start(new ProcessStartInfo(url) { UseShellExecute = true });
}
User Login Experience
Once the login process starts, the user is redirected to the Keycloak authentication page in a browser. The demo includes two test accounts (see step 7 of the Keycloak configuration instructions in Demo 3 for information on creating user accounts):
- Username:
reader| Password:reader - Username:
writer| Password:writer
After successful authentication, Keycloak redirects the user back to the WinForms application, completing the authorization process.
Important Disclaimer
Important
These deployment recommendations do not apply to all possible configurations and should not be considered comprehensive. We offer these instructions as a getting-started reference. Steps may vary depending on your operating system, installed software, and DevExpress versions. You, the developer, are responsible for the application, database, network, and other configurations based on your client, security, environment, and other requirements. We recommend that you review these settings with your database, network, and IT infrastructure administrators and consider their recommendations tailored to your case.