How to: Customize Appointment Flyouts
- 2 minutes to read
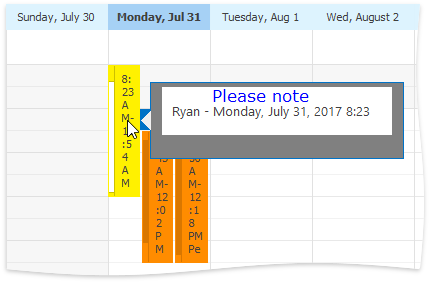
This example demonstrates how to customize the Appointment Flyout element. It handles two events - the SchedulerControl.CustomizeAppointmentFlyout event, which allows you to change flyout texts, and the SchedulerControl.CustomDrawAppointmentFlyoutSubject event, which enables you to perform custom drawing in the flyout’s subject rectangle.
Note
A complete sample project is available at https://github.com/DevExpress-Examples/winforms-schedulercontrol-api-t224044
    scheduler.ActiveViewType = SchedulerViewType.FullWeek;
    scheduler.CustomizeAppointmentFlyout += scheduler_CustomizeAppointmentFlyout;
    scheduler.CustomDrawAppointmentFlyoutSubject+= scheduler_CustomDrawAppointmentFlyoutSubject;
static Font fnt = new Font("Segoe UI", 10f);
public static void scheduler_CustomizeAppointmentFlyout(object sender, CustomizeAppointmentFlyoutEventArgs e) {
    e.ShowSubject = true;
    e.Subject = String.Format("{0} - {1:f}", e.Subject.Split()[0], e.Start);
    e.SubjectAppearance.Font = fnt;
    e.ShowReminder = false;
    e.ShowLocation = false;
    e.ShowEndDate = false;
    e.ShowStartDate = false;
    e.ShowStatus = true;
    e.Appearance.BackColor = Color.Gray;
}
static Font fnt1 = new Font("Verdana", 12f);
public static void scheduler_CustomDrawAppointmentFlyoutSubject(object sender, CustomDrawAppointmentFlyoutSubjectEventArgs e) {
    e.Cache.FillRectangle(Brushes.White, e.Bounds);
    e.DrawStatusDefault();
    e.Cache.DrawString("Please note", fnt1, Brushes.Blue,
        new Rectangle(e.Bounds.X + 50, e.Bounds.Y, e.Bounds.Width, e.Bounds.Height),
        StringFormat.GenericTypographic);
    e.Handled = true;
}