Lesson 3 - Navigation and Services
- 6 minutes to read
You already have ViewModels and related Views with ribbon items bound to commands. However, ribbon items within the main View are fake and not bound to anything, so navigation from the start View is impossible. Start by adding functionality to these buttons.
Main View Navigation
To implement the main View navigation, register the appropriate navigation service. The Lesson 2 - Creating Views lesson mentioned that the type of the chosen container affects the service you will need to use. Refer to the Control-based Services topic to see what service you should use depending on your content container.
If you used the DocumentManager component within your View, register the DocumentManagerService. You can do this either at design-time or in code.
To register the service at design-time, invoke the MvvmContext component’s smart-tag and click the ‘Edit…’ link within the Services, Behaviors & Messages group. Add the DocumentManagerService and set the TabbedView as the service’s target in the property grid to the editor’s right.
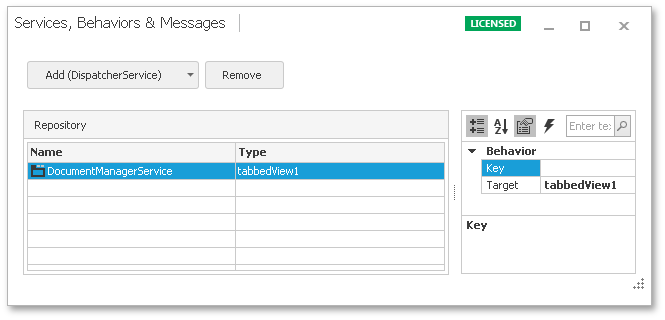
To do the same in code, add the following line to the View’s code.
Bind your ribbon items to commands that will open the specific application module. Your main ViewModel inherits the DocumentsViewModel, which is also generated by the Scaffolding Wizard. This ViewModel provides the required functionality: the Modules collection to store application modules…
…and the Show method to display them.
public void Show(TModule module) { ShowCore(module); } public IDocument ShowCore(TModule module) { if(module == null || DocumentManagerService == null) return null; IDocument document = DocumentManagerService.FindDocumentByIdOrCreate(module.DocumentType, x => CreateDocument(module)); document.Show(); return document; }So all you need to do is to bind your buttons to these parameterized commands (see the Commands topic to learn more).
var fluentAPI = mvvmContext1.OfType<MyDbContextViewModel>(); fluentAPI.BindCommand(biAccounts, (x, m) => x.Show(m), x => x.Modules[0]); fluentAPI.BindCommand(biCategories, (x, m) => x.Show(m), x => x.Modules[1]); fluentAPI.BindCommand(biTransactions, (x, m) => x.Show(m), x => x.Modules[2]);Optionally, set the module that will be initially visible as the application loads. To do so, use the Event-to-Command Behavior for the user control’s Load event.
fluentAPI.WithEvent<EventArgs>(this, "Load") .EventToCommand(x => x.OnLoaded(null), x => x.DefaultModule);By default, the DefaultModule property returns the first item of the Modules collection. Go to the property definition and change its return value to set another collection item as the default module opened at the application startup.
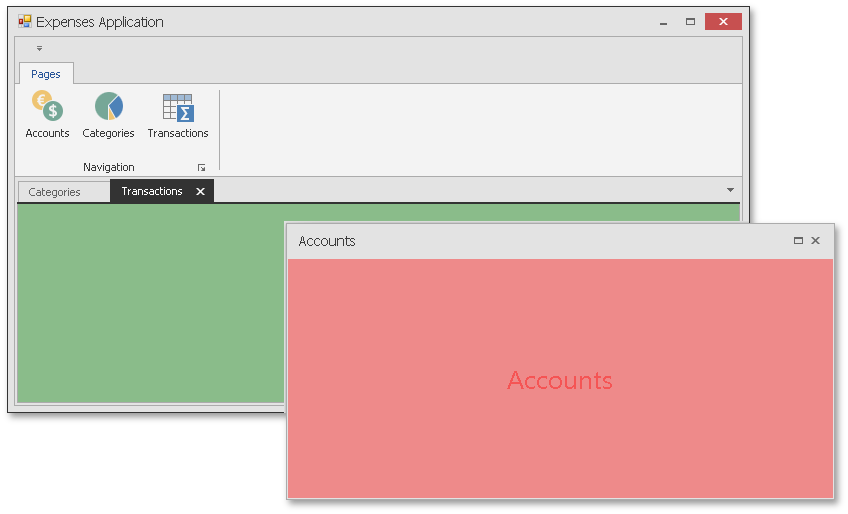
Launch the application to see the current result. Make a note that clicking ribbon items does shows blank application modules instead of your Views (see the figure below).
This happens because every View knows its related ViewModel due to the MvvmConxtext component, but ViewModels have no idea in which Views they are used. To tell the application which particular View it should use for this specific module, mark your Views with the ViewType attribute. This attribute takes a string name as a parameter. The name of your View should be the name of the related ViewModel minus the ‘Model’ word. For instance, the ‘Accounts’ View related to the ‘AccountCollectionViewModel’ should receive the ‘AccountCollectionView’ name. The following code snippet shows the code, required for all three detailed Views.
//AccountsView.cs [DevExpress.Utils.MVVM.UI.ViewType("AccountCollectionView")] //CategoriesView.cs [DevExpress.Utils.MVVM.UI.ViewType("CategoryCollectionView")] //TransactionsView.cs [DevExpress.Utils.MVVM.UI.ViewType("TransactionCollectionView")]Tip
You can use more complex approaches to navigate to Views, without using the ViewType parameter. See the View Management topic to learn more.
Lastly, merge the detailed View’s RibbonControl with the main View’s ribbon. To do so, set the DocumentManager’s DocumentManager.RibbonAndBarsMergeStyle property to Always. You can also set the RibbonControl.MdiMergeStyle for each RibbonControl in your Views to Always - this will merge your ribbons whether or not the detailed View is maximized.
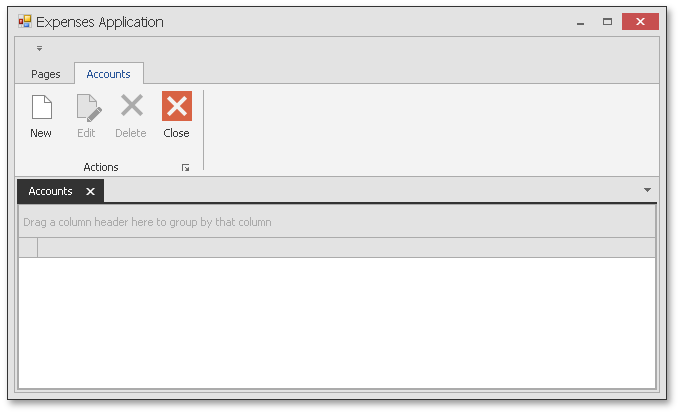
You can also set the merged ribbon page (if any) as the currently selected page for the parent ribbon. To do so, add the following code to the main View’s code.
ribbonControl1.Merge += ribbonControl1_Merge; void ribbonControl1_Merge(object sender, DevExpress.XtraBars.Ribbon.RibbonMergeEventArgs e) { ribbonControl1.SelectPage(e.MergedChild.SelectedPage); }The following figure illustrates the result - the Accounts module is opened and the child ribbon is merged to the main View’s RibbonControl.
Detailed Views Navigation
Navigation in detailed Views is implemented identically to the main View’s navigation, requiring even less effort on your behalf. All ribbon items are already functional, since they are bound to commands, generated by Scaffolding Wizard, allowing you to skip some of the previous steps.
Mark your edit form Views with required attributes to tell your ViewModels that they should use these particular Views.
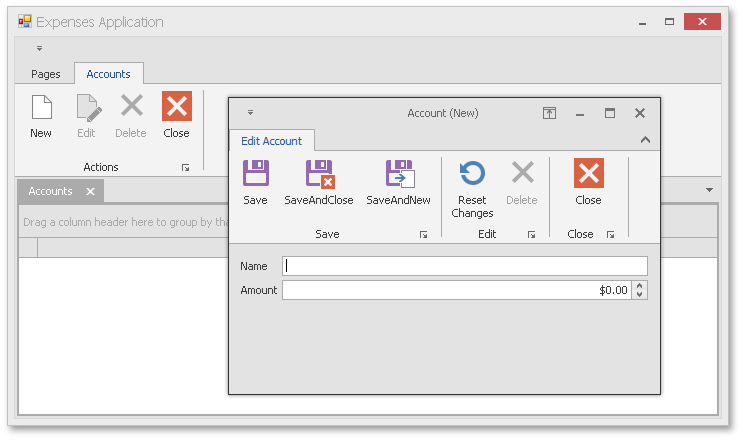
If you want to keep the navigation service used for your detailed Views - just do nothing. Even though your main View registers its services locally, this View is a parent View relative to detail Views. Thus, detail Views would be able to retrieve these services as well. Otherwise, if you need another service, register it within your detailed View (see the first step of this lesson). The following figure illustrates the Account edit View that uses the WindowedDocumentManagerService and is displayed within the separate RibbonForm, while detailed Views are opened as DocumentManager tabs.
As a minor modification, you can modify the name of the edit form View’s module. By default, it is called after the collection item’s name, plus the (New) word - the value stored within the CommonResourses file. If you want to rename your modules, search for the GetTitleForNewEntity method located in the ‘SingleObjectViewModel’ and modify its return value. The following code illustrates an example.
In this lesson, you have bound your Views and ViewModels together into a solid application. The next lesson will show you how to bind your data containers to data sources.