Lesson 1 - Creating The Project. Scaffolding Wizard.
- 5 minutes to read
In this lesson you will start creating the sample application built according the MVVM pattern and learn how to use the Scaffolding Wizard.
Create a new WinForms application. To create your project’s Data Model, add a new Model folder and use the code snippets below to create three classes – Account, Transaction and Category. These classes use Data Annotation Attributes and require the System.ComponentModel.DataAnnotations library to be included in your project.
Account Data Model
using System.ComponentModel.DataAnnotations; namespace MVVMExpenses.DataModels { public class Account { [Key, Display(AutoGenerateField = false)] public long ID { get; set; } [Required, StringLength(30, MinimumLength = 4)] [Display(Name = "ACCOUNT")] public string Name { get; set; } [DataType(DataType.Currency)] [Display(Name = "AMOUNT")] public decimal Amount { get; set; } public override string ToString() { return Name + " (" + Amount.ToString("C") + ")"; } public virtual ICollection<Transaction> Transactions { get; set; } } }Category Data Model
using System.ComponentModel.DataAnnotations; namespace MVVMExpenses.DataModels { public class Category { [Key, Display(AutoGenerateField = false)] public long ID { get; set; } [Required, StringLength(30, MinimumLength = 5)] [Display(Name = "CATEGORY")] public string Name { get; set; } [EnumDataType(typeof(TransactionType))] [Display(Name = "TRANSACTION TYPE")] public TransactionType Type { get; set; } public override string ToString() { return Name + " (" + Type.ToString() + ")"; } public virtual ICollection<Transaction> Transactions { get; set; } } }Transaction Data Model
using System.ComponentModel.DataAnnotations; namespace MVVMExpenses.DataModels { public enum TransactionType { Expense, Income } public class Transaction { [Key, Display(AutoGenerateField = false)] public long ID { get; set; } [Display(AutoGenerateField = false)] public long AccountID { get; set; } [Display(Name = "ACCOUNT")] public virtual Account Account { get; set; } [Display(AutoGenerateField = false)] public long CategoryID { get; set; } [Display(Name = "CATEGORY")] public virtual Category Category { get; set; } [DataType(DataType.Date)] [Display(Name = "DATE")] public DateTime Date { get; set; } [DataType(DataType.Currency)] [Display(Name = "AMOUNT")] public decimal Amount { get; set; } [DataType(DataType.MultilineText)] [Display(Name = "COMMENT")] public string Comment { get; set; } } }Go to the Visual Studio’s Project menu and select the Manage NuGet Packages… menu item. Search for the Entity Framework 6 package in the online storage and click ‘Install’. Note that without this NuGet package installed, you will be unable to work with entity models in this sample application.
Add the following DbContext class descendant that will serve as the context for the DevExpress Scaffolding Wizard.
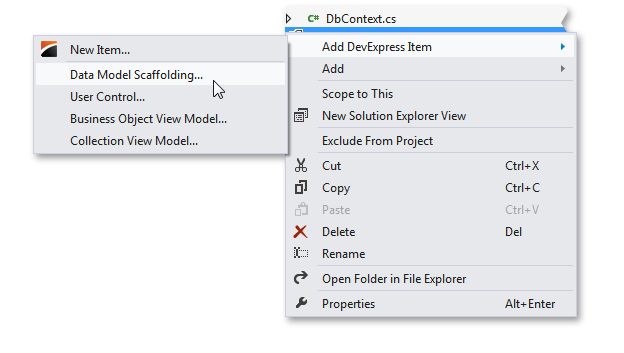
using System.Data.Entity; using MVVMExpenses.DataModels; namespace MVVMExpenses.DataBase { public class MyDbContext : System.Data.Entity.DbContext { static MyDbContext() { System.Data.Entity.Database.SetInitializer<MyDbContext>(null); } public DbSet<Account> Accounts { get; set; } public DbSet<Category> Categories { get; set; } public DbSet<Transaction> Transactions { get; set; } } }Before proceeding to the next step, build your project and make sure it compiles without errors. Then, right-click your project in the Visual Studio Solution Explorer and select Add DevExpress Item - Data Model Scaffolding… (see the figure below). This will launch the Scaffolding Wizard, which will generate the complete application hierarchy, including the MVVM-ready DataModel from your data context.
Note
If this menu item is missing, right-click your project and select the default Visual Studio Add - New Item… option. In the dialog, select the DevExpress Template Gallery and manually launch the Scaffolding Wizard - choose the Data Model Scaffolding tab (the WinForms Data Models group) and click the Run Wizard button in the bottom right corner.
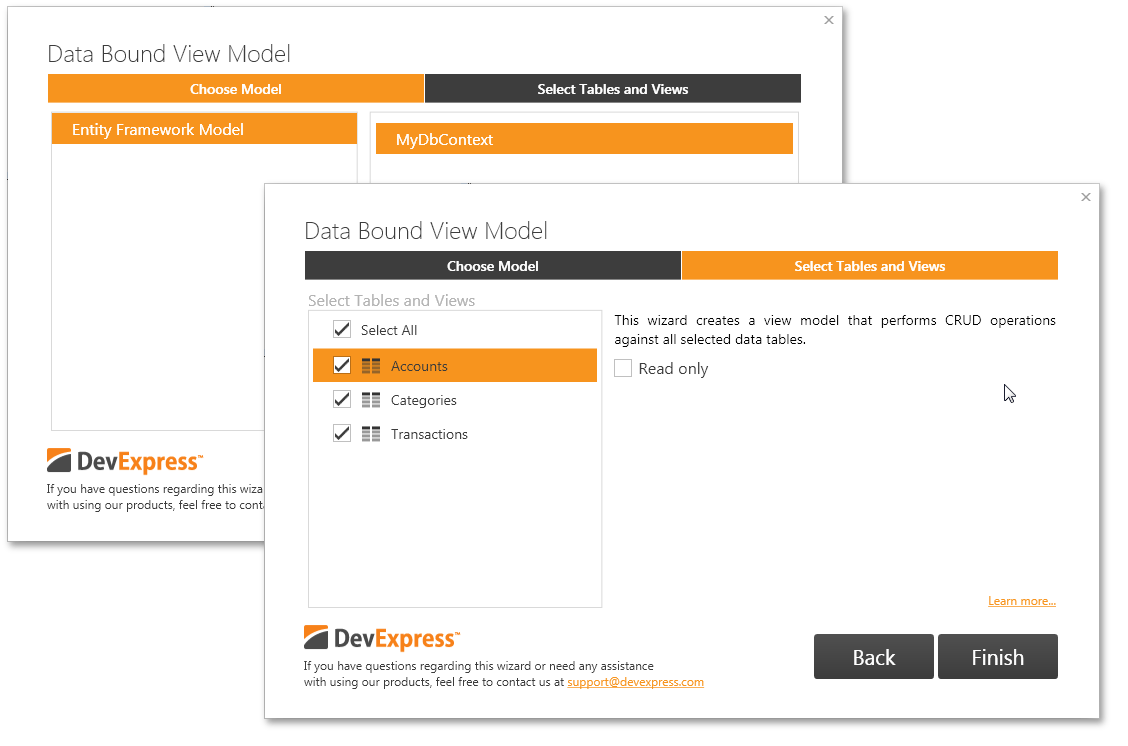
In the Wizard dialog, select the context created in the second step and click Next. Check all required tables and views, then click Finish to launch model generation.
As a result, you will see many new files, folders and classes added to your application.
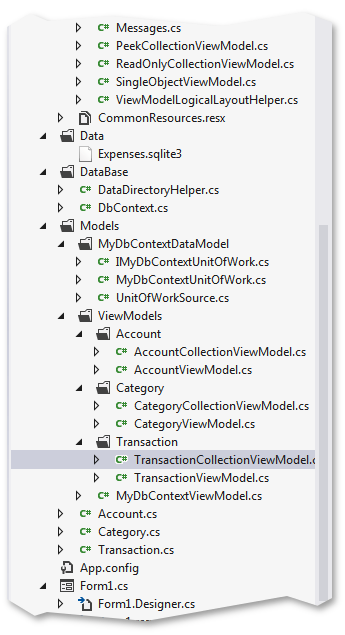
Do not panic, you will never have to touch most of these files. At this moment, only two folders generated by the Wizard are worth mentioning - the DataModel folder that contains your CRUD data model and the ViewModels folder that contains MVVM ViewModels for each table within the DbContext - Account, Category and Transaction. In the following lesson, you will learn how to create Views for these ViewModels.