Lesson 5 - Login Form
- 11 minutes to read
From this document, you will learn how to add a login form to the application. Implementing this task is discussed in this separate lesson due to its detailed description, although basically this is a part of the additional application functionality, described in the very last lesson of this tutorial series.
The way your user database is implemented may vary. For the sample application you can define the following simple class:
public class User { public string Login { get; set; } public string Password { get; set; } }…and the following class that stores user credentials.
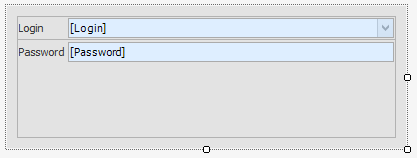
static class CredentialsSource { static System.Collections.Hashtable credentials; static CredentialsSource() { credentials = new System.Collections.Hashtable(); credentials.Add("Guest", GetHash(null)); credentials.Add("John", GetHash("qwerty")); credentials.Add("Administrator", GetHash("admin")); credentials.Add("Mary", GetHash("12345")); } internal static bool Check(string login, string pwd) { return object.Equals(credentials[login], GetHash(pwd)); } static object GetHash(string password) { return password; } internal static System.Collections.Generic.IEnumerable<string> GetUserNames() { foreach(string item in credentials.Keys) yield return item; } }Create a LoginView user control using the DataLayoutControl as you did with detail Views. Do not forget to set the DataSourceUpdateMode for your data bindings to OnPropertyChanged, or pressing the ‘Enter’ key will pass an empty password, since the editor is still focused. To improve the login form’s usability, change the type of the editor that displays user name to LookUpEdit using the editor’s smart-tag (see Lesson 2 - Creating Views tutorial for details).
For the ViewModel related to this login View, you can use the Scaffolding Wizard to generate it or implement it manually. The following code illustrates the simplest LoginViewModel implementation.
using System.Collections.Generic; using DevExpress.Mvvm.POCO; using MVVMExpenses.Models; public class LoginViewModel { public IEnumerable<string> LookUpUsers { get { return CredentialsSource.GetUserNames(); } } public virtual User CurrentUser { get; set; } public bool IsCurrentUserCredentialsValid { get; private set; } // [DevExpress.Mvvm.DataAnnotations.Command(false)] public void Init() { this.CurrentUser = new User(); } public void Update() { IsCurrentUserCredentialsValid = CredentialsSource.Check(CurrentUser.Login, CurrentUser.Password); } public static LoginViewModel Create() { return ViewModelSource.Create<LoginViewModel>(); } }In this ViewModel, two properties are defined: the CurrentUser property that stores the currently logged user and the boolean IsCurrentUserCredentialsValid property that specifies whether the entered credentials have passed verification.
You will also need to add some code to the main form’s ViewModel. Since the main form uses the auto-generated MyDbContextViewModel class, it’s not recommended to add your custom code directly into it - the model can be re-generated if you ever need to call the Scaffolding Wizard again. Instead, create a partial class that resides within a separate file. Note that you will have to move the class constructor from its original file to this partial class.
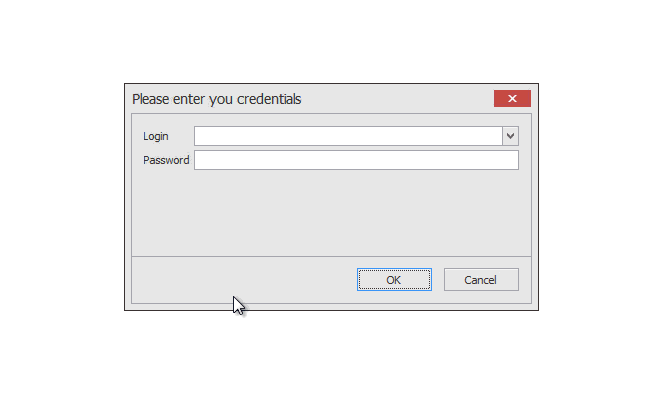
//MyDbContextViewModel.partial.cs public partial class MyDbContextViewModel { LoginViewModel loginViewModel; protected MyDbContextViewModel() : base(UnitOfWorkSource.GetUnitOfWorkFactory()) { loginViewModel = LoginViewModel.Create(); loginViewModel.SetParentViewModel(this); } protected IDialogService DialogService { get { return this.GetService<IDialogService>(); } } protected IMessageBoxService MessageService { get { return this.GetService<IMessageBoxService>(); } } public override void OnLoaded(MyDbContextModuleDescription module) { base.OnLoaded(module); Login(); } public virtual AppState State { get; set; } // Shows the Login View public void Login() { OnLogin(DialogService.ShowDialog(MessageButton.OKCancel, "Please enter you credentials", "LoginView", loginViewModel)); } //Occurs whenever the end-user clicks a dialog button void OnLogin(MessageResult result) { if(result == MessageResult.Cancel) State = AppState.ExitQueued; else { if(loginViewModel.IsCurrentUserCredentialsValid) State = AppState.Autorized; else Login(); } } protected void OnStateChanged() { this.RaiseCanExecuteChanged(x => x.Logout()); if(State == AppState.Autorized) Messenger.Default.Send<string>(loginViewModel.CurrentUser.Login); else Messenger.Default.Send<string>(string.Empty); } } public enum AppState { NotAutorized, Autorized, ExitQueued }The code for the LoginViewModel and both Views (MainView and LoginView) is listed below. When your ViewModel is ready, rebuild your project and add the MvvmContext component onto your login form. Use its smart-tag to assign the LoginViewModel as the related View Model for this View.
//LoginViewModel.cs public class LoginViewModel { public IEnumerable<string> LookUpUsers { get { return CredentialsSource.GetUserNames(); } } public virtual User CurrentUser { get; set; } public bool IsCurrentUserCredentialsValid { get; private set; } [DevExpress.Mvvm.DataAnnotations.Command(false)] public void Init() { this.CurrentUser = new User(); } public void Update() { IsCurrentUserCredentialsValid = CredentialsSource.Check(CurrentUser.Login, CurrentUser.Password); } public static LoginViewModel Create() { return ViewModelSource.Create<LoginViewModel>(); } } //MainView.cs public MainView() { InitializeComponent(); this.Opacity = 0; . . . } void InitializeNavigation() { . . . var fluentAPI = mvvmContext1.OfType<MyDbContextViewModel>(); fluentAPI.SetTrigger(x => x.State, (state) => { if(state == AppState.Autorized) Opacity = 1; /*Show Main Form*/ if(state == AppState.ExitQueued) Close(); // exit the app; }); } //LoginView.cs public partial class LoginView : DevExpress.XtraEditors.XtraUserControl { public LoginView() { InitializeComponent(); } protected override void OnLoad(System.EventArgs e) { base.OnLoad(e); var fluentAPI = mvvmContext1.OfType<LoginViewModel>(); fluentAPI.SetObjectDataSourceBinding(userBindingSource, x => x.CurrentUser, x => x.Update()); foreach(string item in mvvmContext1.GetViewModel<LoginViewModel>().LookUpUsers) LoginTextEdit.Properties.Items.Add(item); fluentAPI.ViewModel.Init(); } }This code uses the OnLoaded method overload to display a dialog using the registered DialogService. To do so, the Login method calls the service’s ShowDialog extension method. This method takes a child ViewModel as a parameter - pass a new instance of the LoginViewModel class to it. It is important to create this instance, not by using the new keyword, but by calling the ViewModelSource.Create<ViewModelType> method. See the Control-based Services topic to learn why. Optionally, you can call the SetParentViewModel method to set a parent ViewModel for this instance.
When an end-user clicks any login dialog’s button, this message result is passed to the OnLogin method, which checks exactly which button was clicked. If an end-user has clicked ‘Cancel’ or closed the dialog, the application will be closed. If the ‘OK’ button has been clicked, the application will check the IsCurrentUserCredentialsValid property, which automatically refreshes its value when the Update method is called. If the entered credentials are valid, the main form will be shown. Otherwise, the login form will be re-displayed. This is done by assigning different values to the State property. The MainView has a trigger that monitors changes in the State property value and reacts accordingly when it happens.
The previous steps are sufficient to implement a login form with minimum functionality. However, if your main view has the closing confirmation behavior assigned, you may face certain issues. For instance, if you close the login form, the main form (which is transparent since the valid credentials were not entered) will attempt to close itself as well. This will display the confirmation message and if you click the ‘Cancel’ button, the form will remain but you will not able to see it. To overcome such issues, remove the form closing behavior (if any) and add the following code.
//MainView.cs fluentAPI.WithEvent<FormClosingEventArgs>(this, "FormClosing") .EventToCommand(x => x.OnClosing(null), new Func<CancelEventArgs, object>((args) => args)); //MyDbContextViewModel.partial.cs public override void OnClosing(CancelEventArgs cancelEventArgs) { base.OnClosing(cancelEventArgs); if(!cancelEventArgs.Cancel) { if(State == AppState.Autorized && MessageService.ShowMessage("Do you really want to close the application?", "Confirm", MessageButton.YesNo) == MessageResult.No) cancelEventArgs.Cancel = true; } }This code checks the current State property value only showing the confirmation message if the authorization is passed. If an end-user has not yet logged in and decides to close the application, no confirmation will be shown. This is the reason why the State property is not boolean, but accepts values of the custom AppState enumerator. There can be three possible application states:
- Authorized - user credentials are valid. The main form is visible, and attempts to close it should display the confirmation message. End-users may click ‘No’ to keep the application running.
- NotAuthorized - user credentials were entered but did not pass the verification. The main application form remains transparent, and the login form is re-shown.
- ExitQueued - user credentials were not entered, and the login form was closed. The application should be terminated without any confirmation dialogs.
Your login form is now ready. You may decorate it by setting the specific RepositoryItemTextEdit.PasswordChar for the password editor, reflect the logged user’s name on the main form, and add the button to the main View’s grid control that will allow you to re-log etc. The code below illustrates how to do it.
//LoginView.cs PasswordTextEdit.Properties.PasswordChar = '*'; //MyDbContextViewModel.partial.cs protected void OnStateChanged() { this.RaiseCanExecuteChanged(x => x.Logout()); if(State == AppState.Authorized) Messenger.Default.Send<string>(loginViewModel.CurrentUser.Login); else Messenger.Default.Send<string>(string.Empty); } public void Logout() { State = AppState.ExitQueued; System.Diagnostics.Process.Start(System.Windows.Forms.Application.ExecutablePath); } public bool CanLogout() { return State == AppState.Authorized; } //MainView.cs Messenger.Default.Register<string>(this, OnUserNameMessage); fluentAPI.BindCommand(biLogout, x => x.Logout()); void OnUserNameMessage(string userName) { if(string.IsNullOrEmpty(userName)) this.Text = "Expenses Application"; else this.Text = "Expenses Application - (" + userName + ")"; }The following animation shows the final result.