Lesson 7 - Additional Functionality
- 9 minutes to read
There are endless minor improvements that can bring your sample application closer to a real-life application. In this section, you will learn how to implement several of them.
Double-click Editing
First, set the ColumnViewOptionsBehavior.Editable property for all your grid controls to false and add the following code to your detailed Views.
fluentAPI.WithEvent<DevExpress.XtraGrid.Views.Grid.RowCellClickEventArgs>(gridView1, "RowCellClick")
    .EventToCommand(
        x => x.Edit(null), x => x.SelectedEntity,
        args => (args.Clicks == 2) && (args.Button == MouseButtons.Left));
This will disable editing collection entities in the detailed Views. Instead, end-users will be able to double-click the desired record and make changes in the corresponding edit form (see the animation below).
Synchronizing Views
Consider the following example: your detail Views in the sample application display funds remaining on the selected account not in the detail View’s grid, but in the separate editor (see the following figure). This task implies that you need to display data from the same data source within separate Views. Moreover, changes within one View must be reflected in another. In this case, you can use the Messenger to synchronize these Views.
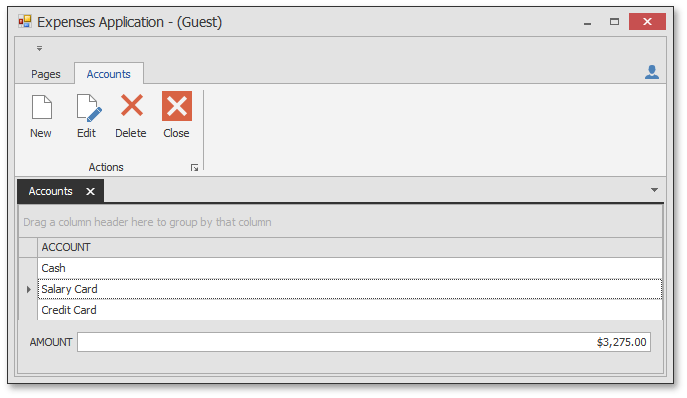
The figure below illustrates this AccountsDetailView that hosts this editor.

This View displays info about the selected record only (a single entity) and thus, can be related to the already existing AccountViewModel. In this case, you can bind the editor’s BindingSource component to the Entity object, generated by the Scaffolding Wizard.
mvvmContext1.ViewModelType = typeof(AccountViewModel);
var fluentApi = mvvmContext1.OfType<AccountViewModel>();
fluentApi.SetObjectDataSourceBinding(bindingSource1, x => x.Entity, x => x.Update());
What you need now is to update this binding when an end-user selects another grid row in the detail View. To do so, override the base OnSelectedEntityChanged method from the CollectionViewModel and send the new selected entity as a message.
protected override void OnSelectedEntityChanged()
{
    base.OnSelectedEntityChanged();
    Messenger.Default.Send<Account>(SelectedEntity);
}
Now you need to receive this message within your AccountViewModel - the View Model your AccountsDetailView View is using. The Layer Communication. Messenger topic states that once you use the Messenger.Default.Register method, the permanent channel that ‘listens’ for all incoming messages is opened. Thus, it is sufficient to call this method only once in the ViewModel’s constructor.
protected AccountViewModel(IUnitOfWorkFactory<IMyDbContextUnitOfWork> unitOfWorkFactory = null)
    : base(unitOfWorkFactory ?? UnitOfWorkSource.GetUnitOfWorkFactory(), x => x.Accounts, x => x.Name) {
        Messenger.Default.Register<Account>(this, OnSelectedAccountChangedMessage);
}
When it is done, selecting a new row within the detail View will trigger sending the account, associated with this row, as a message. The AccountsDetailView will receive this entity as a message and extract the Amount field from it.
The OnSelectedAccountChangedMessage method listed in the code snippet above is a custom method and needs to be implemented manually. This method will be retrieve the required entity each time the message is received.
private void OnSelectedAccountChangedMessage(Account message) {
    this.LoadEntityByKey(message.ID);
}
Modifying Default Confirmation Strings
The ViewModels generated by the Scaffolding Wizard already have several behaviors attached to your application. For instance, attempts to close the modified record without saving the changes will force the confirmation message to pop-up.
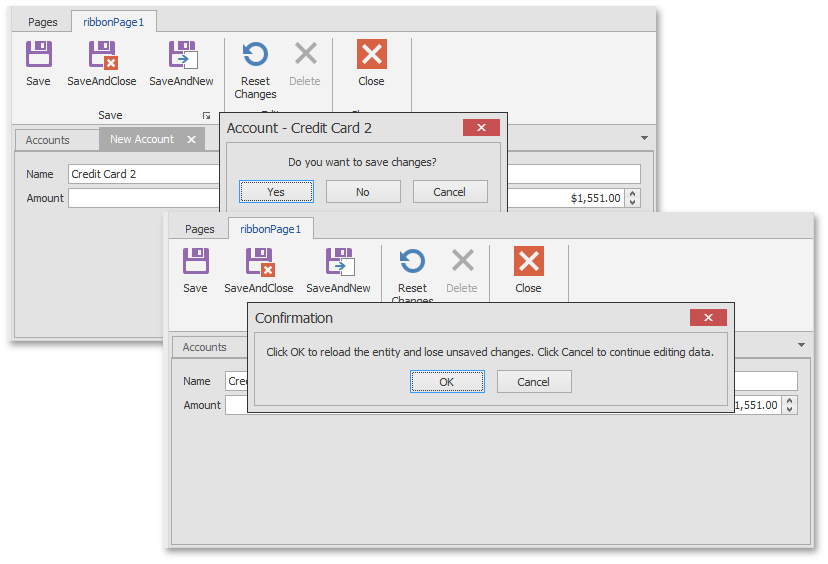
Double-click the CommonResources.resx file included in your solution to modify these confirmation texts and other strings used by default.

Adding Additional Confirmation Behaviors
You can extend the application by adding your own behaviors for certain events. For instance, the code snippet below illustrates the confirmation behavior attached to the form’s FormClosing event (refer to the Behaviors topic to learn more).
mvvmContext1.WithEvent<FormClosingEventArgs>(this, "FormClosing").Confirmation(behavior => {
     behavior.Caption = "Confirmation";
     behavior.Text = "Do you really want to close the application?";
     behavior.Buttons = DevExpress.Utils.MVVM.ConfirmationButtons.YesNo;
 });
Processing Multiple Entities Selection
In a real-life application, end-users should be able to select multiple entities at once. To do so, turn on multi-selection for your detailed Views’ grid controls as shown below.
gridView1.OptionsSelection.MultiSelect = true;
gridView1.OptionsSelection.MultiSelectMode = DevExpress.XtraGrid.Views.Grid.GridMultiSelectMode.RowSelect;
After that, you will need to update View command availability based on the number of currently selected grid rows. For instance, the ‘Edit’ command should obviously be disabled when multiple rows are selected simultaneously.
First, add the selected entities collection to the base CollectionViewModel and change the callback for this collection, which will raise each time selection is modified.
public virtual IEnumerable<TProjection> Selection { get; set; }

protected void OnSelectionChanged() {
    this.RaiseCanExecuteChanged(x => x.Edit(SelectedEntity));
}
Then, you will need to populate this collection for each detailed View. For instance, for the Accounts View, the code will look like this.
fluentAPI.WithEvent<DevExpress.Data.SelectionChangedEventArgs>(gridView1, "SelectionChanged")
    .SetBinding(x => x.Selection, e => GetSelectedAccounts());

IEnumerable<MVVMExpenses.DataModels.Account> GetSelectedAccounts() {
    return gridView1.GetSelectedRows().Select(r => gridView1.GetRow(r) as MVVMExpenses.DataModels.Account);
}
Now, when the number of the currently selected rows is reflected by the Selection collection, modify the CanEdit function accordingly.
public bool CanEdit(TProjection projectionEntity) {
     return projectionEntity != null && !IsLoading && Selection.Count() == 1;
 }
After this improvement, the ‘Edit’ command will be enabled only when one row is currently selected.
Removing Multiple Records At Once
After the previous improvement, you can easily update the Delete command. To do so, you can implement your own DeleteAll command.
public virtual void DeleteAll() {
    if(MessageBoxService.ShowMessage(string.Format(CommonResources.Confirmation_DeleteAll, typeof(TEntity).Name), CommonResources.Confirmation_Caption, MessageButton.YesNo) != MessageResult.Yes)
        return;
    foreach(TProjection account in Selection) {
        Delete(account as TProjection);
    }
}
Note
The confirmation message code should be removed from the default Delete command implementation and pasted here to the DeleteAll command. Note that this code uses the CommonResources.Confirmation_DeleteAll text - you should create a corresponding entry in common resources, as was shown above.
As your Delete ribbon item is generated and bound to the related command automatically (see Lesson 2 - Creating Views), go to the View’s designer code and bind this button to your new command.
DevExpress.Utils.MVVM.BindingExpression.CreateParameterizedCommandBinding(typeof(MVVMExpenses.Models.ViewModels.AccountCollectionViewModel), "DeleteAll", "Selection", this.bbiDelete)
As a result, you will be able to remove multiple entities at once by clicking the ‘Delete’ button.
Validating Values
The Lesson 4 - Data Binding tutorial explains how to validate edit form editors using Data Annotation Attributes and binding using the SetObjectDataSourceBinding method. In this section, you will implement validation for your login form. Let us go back to this form and see how it works.
You login ViewModel exposes public property for the current user only. Properties for user credentials (login and password) are defined in a separate class ‘User’.
public class User {
    public string Login { get; set; }
    public string Password { get; set; }
}
The login ViewModel also has the method that re-checks credentials, entered by an end-user.
public class LoginViewModel {
     public bool IsCurrentUserCredentialsValid { get; private set; }

     public void Update() {
         IsCurrentUserCredentialsValid = CredentialsSource.Check(CurrentUser.Login, CurrentUser.Password);
     }
 }
Login form’s editors are bound to corresponding fields of the Binding Source component with the userBindingSource name.
//LoginView.Designer.cs
this.PasswordTextEdit.DataBindings.Add(new System.Windows.Forms.Binding("EditValue", this.userBindingSource, "Password", true, System.Windows.Forms.DataSourceUpdateMode.OnPropertyChanged));
this.LoginTextEdit.DataBindings.Add(new System.Windows.Forms.Binding("EditValue", this.userBindingSource, "Login", true, System.Windows.Forms.DataSourceUpdateMode.OnPropertyChanged));
Finally, the Binding Source component is bound to the ViewModel’s currentUser property by using the SetObjectDataSourceBinding method. This binding syntax specifies the Update method as the method that should be raised whenever the bound entity (current user) changes.
//LoginView.cs
var fluentAPI = mvvmContext1.OfType<LoginViewModel>();
fluentAPI.SetObjectDataSourceBinding(userBindingSource,
    x => x.CurrentUser, x => x.Update());
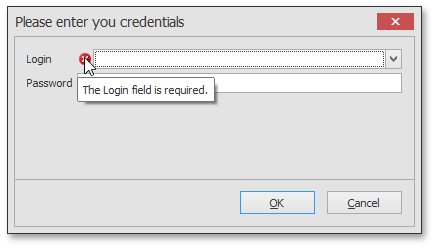
The usage of the SetObjectDataSourceBinding method makes it possible to validate end-user input by declaring required Data Annotation Attributes before properties, defined within the User class. The ‘Password’ editor should have no validation since user credentials are checked by the application itself. Ergo, the only editor appropriate for validating is the ‘Login’ editor. The code below uses the [Required] attribute to prohibit end-users from leaving this editor empty.
public class User {
    [Required]
    public string Login { get; set; }
    public string Password { get; set; }
}
The result is shown on the following figure.
This is the scenario where you need to validate an individual entity (in this case - the current user). There also can be scenarios where the entire ViewModel has to be validated. This happens when validated properties are defined within the ViewModel itself and this ViewModel should be set as the data source for the Binding Source component. In this case, you can use the shortened binding syntax, as shown below.
// ViewModel.cs
public class ViewModel {
    [Required]
    public virtual string Text { get; set; }
}

// View.Designer.cs
this.mvvmContext1.ViewModelType = typeof(ViewModels.ViewModel);
this.viewModelBindingSource.DataSource = typeof(ViewModels.ViewModel);
this.textEdit1.DataBindings.Add(new System.Windows.Forms.Binding("EditValue", this.viewModelBindingSource, "Text", true, System.Windows.Forms.DataSourceUpdateMode.OnPropertyChanged));

// View.cs
var fluentAPI = mvvmContext1.OfType<ViewModel>();
fluentAPI.SetObjectDataSourceBinding(this.viewModelBindingSource);
Note that in both cases, validation works not because you have used the SetObjectDataSourceBinding method, but because DevExpress editors used within your Views support validation. The SetObjectDataSourceBinding method simply allows these editors to retrieve Data Annotation Attributes and promptly react to end-user input.
Complete Sample
Follow this link to download the final application.