Lesson 2 - Building a Tree in Unbound Mode
- 3 minutes to read
TreeListControl can function without a data source. This mode is called - unbound mode. In this tutorial you will learn how to manually create a tree (unbound mode). It is shown how to create nodes in XAML and code.
- Run MS Visual Studio.
- Create a new WPF Application project with the “DXTreeList_Tutorial_2” name.
Create the ProjectObject class that represents data objects displayed within the TreeListControl.
public class ProjectObject { public String Name { get; set; } public string Executor { get; set; } }- Drop the TreeListControl component onto the window.
Create two columns and bind them to Name and Executor fields.
<dxg:TreeListControl Name="treeListControl1">
    <dxg:TreeListControl.Columns>
        <dxg:TreeListColumn FieldName="Name"/>
        <dxg:TreeListColumn FieldName="Executor"/>
    </dxg:TreeListControl.Columns>
    <dxg:TreeListControl.View>
        <dxg:TreeListView Name="treeListView1"/>
    </dxg:TreeListControl.View>
</dxg:TreeListControl>
Create a root node. Root nodes are contained within the TreeListView.Nodes collection.
<dxg:TreeListControl.View>
        <dxg:TreeListView Name="treeListView1">
            <dxg:TreeListView.Nodes>
                <dxg:TreeListNode>
                    <dxg:TreeListNode.Content>
                        <local:ProjectObject Name="Project: Betaron" Executor="Destiny Tabisola" />
                    </dxg:TreeListNode.Content>
                </dxg:TreeListNode>
            </dxg:TreeListView.Nodes>
        </dxg:TreeListView>
    </dxg:TreeListControl.View>
Create child nodes for the root node created above. Child nodes are stored within a node’s TreeListNode.Nodes collection.
The resulting code is shown below.
<Window x:Class="DXTreeList_Tutorial_2.MainWindow" xmlns="http://schemas.microsoft.com/winfx/2006/xaml/presentation" xmlns:x="http://schemas.microsoft.com/winfx/2006/xaml" Title="MainWindow" Height="350" Width="525" xmlns:dxg="http://schemas.devexpress.com/winfx/2008/xaml/grid" xmlns:local="clr-namespace:DXTreeList_Tutorial_2"> <Grid> <dxg:TreeListControl Name="treeListControl1"> <dxg:TreeListControl.Columns> <dxg:TreeListColumn FieldName="Name"/> <dxg:TreeListColumn FieldName="Executor"/> </dxg:TreeListControl.Columns> <dxg:TreeListControl.View> <dxg:TreeListView Name="treeListView1"> <dxg:TreeListView.Nodes> <dxg:TreeListNode> <dxg:TreeListNode.Content> <local:ProjectObject Name="Project: Betaron" Executor="Destiny Tabisola" /> </dxg:TreeListNode.Content> <dxg:TreeListNode.Nodes> <dxg:TreeListNode> <dxg:TreeListNode.Content> <local:ProjectObject Name="Development" Executor="Kairra Hogg" /> </dxg:TreeListNode.Content> <dxg:TreeListNode.Nodes> <dxg:TreeListNode> <dxg:TreeListNode.Content> <local:ProjectObject Name="Coding" Executor="Sabato Durley" /> </dxg:TreeListNode.Content> </dxg:TreeListNode> </dxg:TreeListNode.Nodes> </dxg:TreeListNode> </dxg:TreeListNode.Nodes> </dxg:TreeListNode> </dxg:TreeListView.Nodes> </dxg:TreeListView> </dxg:TreeListControl.View> </dxg:TreeListControl> </Grid> </Window>The following code shows how to create both root and child nodes in code behind.
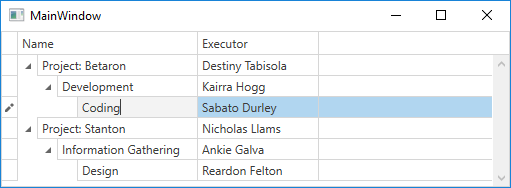
using DevExpress.Xpf.Grid;

// ...
public partial class MainWindow : Window {
    public MainWindow() {
        InitializeComponent();
        BuildTree();
    }

    private void BuildTree() {
        TreeListNode rootNode = CreateRootNode(new ProjectObject() { Name = "Project: Stanton", Executor = "Nicholas Llams" });
        TreeListNode childNode = CreateChildNode(rootNode, new ProjectObject() { Name = "Information Gathering", Executor = "Ankie Galva" });
        CreateChildNode(childNode, new ProjectObject() { Name = "Design", Executor = "Reardon Felton" });
    }

    private TreeListNode CreateRootNode(object dataObject) {
        TreeListNode rootNode = new TreeListNode(dataObject);
        treeListView1.Nodes.Add(rootNode);
        return rootNode;
    }

    private TreeListNode CreateChildNode(TreeListNode parentNode, object dataObject) {
        TreeListNode childNode = new TreeListNode(dataObject);
        parentNode.Nodes.Add(childNode);
        return childNode;
    }
}
Run the application. The image below shows the result: