Lesson 1 - Binding to Data
- 5 minutes to read
This tutorial demonstrates how to add a TreeListControl to your project and bind the control to your data source.
Add a Data Model
The TreeList control cannot operate without a data source. It can be bound to data from a database, from an XML file or to any data created at runtime. The TreeList control can be bound to any object that implements the System.Collections.IEnumerable interface or its descendant (e.g., IList, ICollection). To bind a tree list, assign a data source to the ItemsSource property.
To build a tree, data source objects must contain the following fields.
- Key Field: This field must contain unique values used to identify nodes.
- Parent Field: This field must contain values that indicate parent nodes.
The code sample below demonstrates a simple data model (the Employee class) that is used in this tutorial.
Model code:
using System.Collections.Generic;

namespace treelist {
    public class Employee {
        public int ID { get; set; }
        public int ParentID { get; set; }
        public string Name { get; set; }
        public string Position { get; set; }
        public string Department { get; set; }

        public static List<Employee> GetEmployees() {
            List<Employee> employees = new List<Employee>();
            employees.Add(new Employee() { ID = 1, ParentID = 0, Name = "Gregory S. Price", Department = "", Position = "President" });
            employees.Add(new Employee() { ID = 2, ParentID = 1, Name = "Irma R. Marshall", Department = "Marketing", Position = "Vice President" });
            employees.Add(new Employee() { ID = 3, ParentID = 1, Name = "John C. Powell", Department = "Operations", Position = "Vice President" });
            employees.Add(new Employee() { ID = 4, ParentID = 1, Name = "Christian P. Laclair", Department = "Production", Position = "Vice President" });
            employees.Add(new Employee() { ID = 5, ParentID = 1, Name = "Karen J. Kelly", Department = "Finance", Position = "Vice President" });
            employees.Add(new Employee() { ID = 6, ParentID = 2, Name = "Brian C. Cowling", Department = "Marketing", Position = "Manager" });
            employees.Add(new Employee() { ID = 7, ParentID = 2, Name = "Thomas C. Dawson", Department = "Marketing", Position = "Manager" });
            employees.Add(new Employee() { ID = 8, ParentID = 2, Name = "Angel M. Wilson", Department = "Marketing", Position = "Manager" });
            employees.Add(new Employee() { ID = 9, ParentID = 2, Name = "Bryan R. Henderson", Department = "Marketing", Position = "Manager" });
            employees.Add(new Employee() { ID = 10, ParentID = 3, Name = "Harold S. Brandes", Department = "Operations", Position = "Manager" });
            employees.Add(new Employee() { ID = 11, ParentID = 3, Name = "Michael S. Blevins", Department = "Operations", Position = "Manager" });
            employees.Add(new Employee() { ID = 12, ParentID = 3, Name = "Jan K. Sisk", Department = "Operations", Position = "Manager" });
            employees.Add(new Employee() { ID = 13, ParentID = 3, Name = "Sidney L. Holder", Department = "Operations", Position = "Manager" });
            employees.Add(new Employee() { ID = 14, ParentID = 4, Name = "James L. Kelsey", Department = "Production", Position = "Manager" });
            employees.Add(new Employee() { ID = 15, ParentID = 4, Name = "Howard M. Carpenter", Department = "Production", Position = "Manager" });
            employees.Add(new Employee() { ID = 16, ParentID = 4, Name = "Jennifer T. Tapia", Department = "Production", Position = "Manager" });
            employees.Add(new Employee() { ID = 17, ParentID = 5, Name = "Judith P. Underhill", Department = "Finance", Position = "Manager" });
            employees.Add(new Employee() { ID = 18, ParentID = 5, Name = "Russell E. Belton", Department = "Finance", Position = "Manager" });
            return employees;
        }
    }
}
Add a ViewModel
Create a ViewModel class that will expose the Employees field of the List<Employee> type.
ViewModel code:
using System.Collections.Generic;

namespace treelist {
    class ViewModel {
        public ViewModel() {
            Employees = Employee.GetEmployees();
        }
        public List<Employee> Employees { get; set; }
    }
}
Build the solution. Invoke the main window smart tag and define its data context like it is shown in the image below.

Add TreeListControl to the View
Add the TreeListControl to the main window of your project.
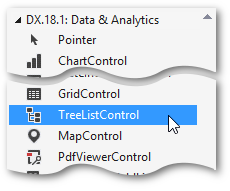
To do this, open the Visual Studio toolbox, find the DX.19.1: Data & Analytics tab, and drag the TreeListControl toolbox item to the window.
Right-click the TreeListControl and select Layout - Reset All to fill the entire window.

The following code will be generated.
<Window
        xmlns="http://schemas.microsoft.com/winfx/2006/xaml/presentation"
        xmlns:x="http://schemas.microsoft.com/winfx/2006/xaml"
        xmlns:d="http://schemas.microsoft.com/expression/blend/2008"
        xmlns:mc="http://schemas.openxmlformats.org/markup-compatibility/2006"
        xmlns:local="clr-namespace:treelist"
        xmlns:dxg="http://schemas.devexpress.com/winfx/2008/xaml/grid" x:Class="treelist.MainWindow"
        mc:Ignorable="d"
        Title="MainWindow" Height="350" Width="525">
    <Window.DataContext>
        <local:ViewModel/>
    </Window.DataContext>
    <Grid>
        <dxg:TreeListControl AutoGenerateColumns="AddNew" EnableSmartColumnsGeneration="True">
            <dxg:TreeListControl.View>
                <dxg:TreeListView AllowPerPixelScrolling="True" ShowTotalSummary="True"/>
            </dxg:TreeListControl.View>
        </dxg:TreeListControl>
    </Grid>
</Window>
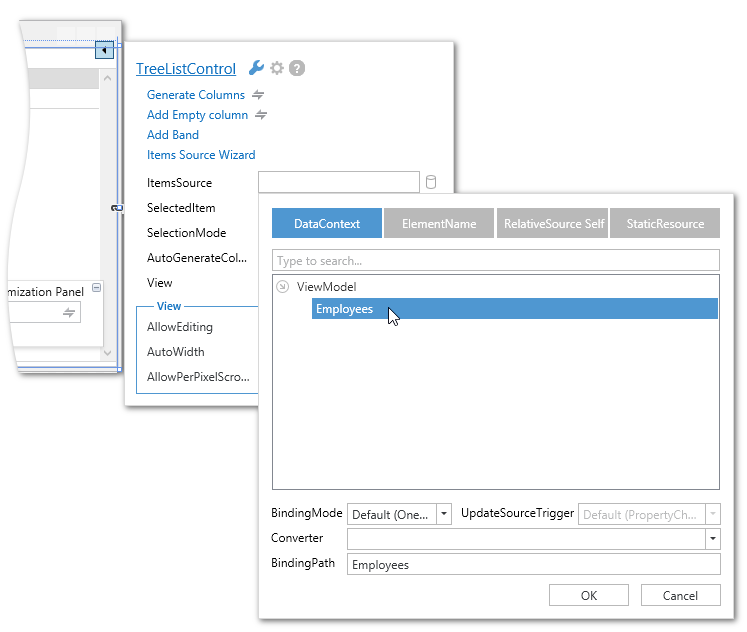
To bind the tree list to data, invoke the TreeListControl‘s smart tag, and define the ItemsSource field like it is shown in the image below.
Use the TreeListView.KeyFieldName and TreeListView.ParentFieldName properties to specify the service columns like it is shown in the sample below.
<Window
        xmlns="http://schemas.microsoft.com/winfx/2006/xaml/presentation"
        xmlns:x="http://schemas.microsoft.com/winfx/2006/xaml"
        xmlns:d="http://schemas.microsoft.com/expression/blend/2008"
        xmlns:mc="http://schemas.openxmlformats.org/markup-compatibility/2006"
        xmlns:local="clr-namespace:treelist"
        xmlns:dxg="http://schemas.devexpress.com/winfx/2008/xaml/grid" x:Class="treelist.MainWindow"
        mc:Ignorable="d"
        Title="MainWindow" Height="350" Width="525">
    <Window.DataContext>
        <local:ViewModel/>
    </Window.DataContext>
    <Grid>
        <dxg:TreeListControl AutoGenerateColumns="AddNew" EnableSmartColumnsGeneration="True" ItemsSource="{Binding Employees}">
            <dxg:TreeListControl.View>
                <dxg:TreeListView AllowPerPixelScrolling="True" ShowTotalSummary="True"  KeyFieldName="ID" ParentFieldName="ParentID"/>
            </dxg:TreeListControl.View>
        </dxg:TreeListControl>
    </Grid>
</Window>
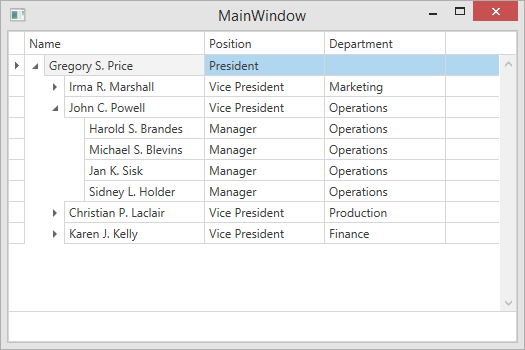
Get the Result
Run the solution. The image below demonstrates the result.