DialogService
- 12 minutes to read
The DialogService class allows you to show a modal dialog window from a View Model.
Related services:
- WinUIDialogService - displays a modal window that matches Windows 8/10 style.
- DXMessageBoxService - displays a message box.
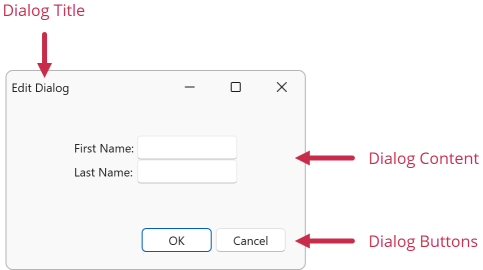
Show a Dialog
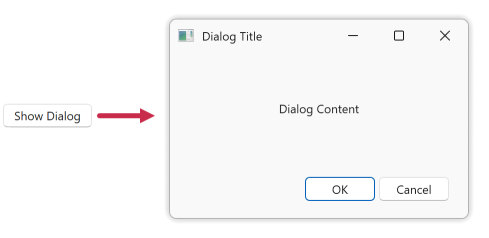
Follow the steps below to define a simple dialog window and show it from the View Model:
Assign a
DialogServiceservice to your View in any of the following ways:- Use the Quick Actions menu to attach a
DialogServiceto the View. - Declare a
DialogServicein XAML.
<Window ... xmlns:dxmvvm="http://schemas.devexpress.com/winfx/2008/xaml/mvvm" xmlns:dx="http://schemas.devexpress.com/winfx/2008/xaml/core"> <dxmvvm:Interaction.Behaviors> <dx:DialogService/> </dxmvvm:Interaction.Behaviors> <!-- ... --> </Window>- Use the Quick Actions menu to attach a
Define dialog content. The following code sample creates a data template and assigns it to the ViewTemplate property:
<dx:DialogService>
    <dx:DialogService.ViewTemplate>
        <DataTemplate>
            <Border>
                <TextBlock Text="Dialog Content"
                           HorizontalAlignment="Center"
                           VerticalAlignment="Center"/>
            </Border>
        </DataTemplate>
    </dx:DialogService.ViewTemplate>
</dx:DialogService>
You can also use the following techniques to specify dialog content:
- Create multiple dialog view templates and use the ViewTemplateSelector property to select a template based on a condition.
Create a XAML class with dialog content and pass the class name to the ShowDialog method’s
documentTypeparameter.Refer to the following help topic for more information on how to pass a View to the
ShowDialogmethod: ViewLocator.
Use the DialogStyle and DialogWindowStartupLocation properties to specify the dialog window’s startup location and additional settings:
<dx:DialogService DialogWindowStartupLocation="CenterOwner">
    <dx:DialogService.ViewTemplate>
        <DataTemplate>
            <Border>
                <TextBlock Text="Dialog Content"
                           HorizontalAlignment="Center"
                           VerticalAlignment="Center"/>
            </Border>
        </DataTemplate>
    </dx:DialogService.ViewTemplate>
    <dx:DialogService.DialogStyle>
        <Style TargetType="Window">
            <Setter Property="Height" Value="200"/>
            <Setter Property="Width" Value="300"/>
        </Style>
    </dx:DialogService.DialogStyle>
</dx:DialogService>
Access the service from the View Model. The following code sample demonstrates how to access the service from a ViewModelBase descendant View Model:
using DevExpress.Mvvm; namespace DialogServiceExample { public class ViewModel : ViewModelBase { protected IDialogService DialogService { get { return GetService<IDialogService>(); } } } }Refer to the following help topics for more information on how to access services from different View Model types:
Create a View Model command that calls the
DialogService.ShowDialogmethod to invoke the dialog window:using DevExpress.Mvvm; using DevExpress.Mvvm.DataAnnotations; namespace DialogServiceExample { public class ViewModel : ViewModelBase { protected IDialogService DialogService { get { return GetService<IDialogService>(); } } [Command] public void ShowDialog() { DialogService.ShowDialog( dialogButtons: MessageButton.OKCancel, title: "Dialog Title", viewModel: this ); } } }Refer to the following help topic for a complete list of the
ShowDialogmethod overloads: DialogServiceExtensions.ShowDialog.Bind the button’s
Commandproperty to the created command:<Window ... > <Window.DataContext> <local:ViewModel/> </Window.DataContext> <dxmvvm:Interaction.Behaviors> <dx:DialogService> <!-- ... --> </dx:DialogService> </dxmvvm:Interaction.Behaviors> <Grid> <Button Content="Show Dialog" Command="{Binding ShowDialogCommand}"/> </Grid> </Window>
Bind Dialog Content to Data
Follow the steps in this section to create a dialog with two data-bound editors (First Name and Last Name). The code binds editor values to properties in your View Model:
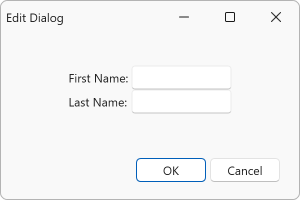
Use the ViewTemplate property to define the dialog layout:
<dx:DialogService.ViewTemplate> <DataTemplate> <local:DialogView/> </DataTemplate> </dx:DialogService.ViewTemplate><UserControl ... x:Class="DialogServiceExample.DialogView" xmlns:dxe="http://schemas.devexpress.com/winfx/2008/xaml/editors"> <Grid.RowDefinitions> <RowDefinition /> <RowDefinition Height="Auto"/> </Grid.RowDefinitions> <StackPanel Orientation="Vertical" VerticalAlignment="Center" HorizontalAlignment="Center"> <StackPanel Orientation="Horizontal"> <TextBlock Text="First Name: " VerticalAlignment="Center"/> <dxe:TextEdit Text="{Binding FirstName}" Width="100"/> </StackPanel> <StackPanel Orientation="Horizontal" > <TextBlock Text="Last Name: " VerticalAlignment="Center"/> <dxe:TextEdit Text="{Binding LastName}" Width="100"/> </StackPanel> </StackPanel> </UserControl>Create a dialog View Model:
public class DialogViewModel : ViewModelBase { public string FirstName { get { return GetValue<string>(); } set { SetValue(value); } } public string LastName { get { return GetValue<string>(); } set { SetValue(value); } }Editors from the DialogView are bound to the properties above.
Create a new instance of the
DialogViewModelclass and pass this instance to theDialogService.ShowDialogmethod when a user invokes the dialog:public class MainViewModel : ViewModelBase { public string FirstName { get { return GetValue<string>(); } set { SetValue(value); } } public string LastName { get { return GetValue<string>(); } set { SetValue(value); } } protected IDialogService DialogService { get { return GetService<IDialogService>(); } } [Command] public void ShowDialog() { var dialogViewModel = new DialogViewModel() { FirstName = this.FirstName, LastName = this.LastName }; MessageResult result; result = DialogService.ShowDialog( dialogButtons: MessageButton.OKCancel, title: "Edit Dialog", viewModel: dialogViewModel ); if (result == MessageResult.OK) { // ... } } }
Define Dialog Buttons
You can use one of the following techniques to define dialog buttons.
Predefined Buttons
Pass a MessageButton enumeration value to the ShowDialog method.
In this case, the dialog returns the result of the MessageResult type.
[Command]
public void ShowDialog() {
    MessageResult result;
    result = DialogService.ShowDialog(
        dialogButtons: MessageButton.OKCancel,
        title: "Edit Dialog",
        viewModel: this
    );
    if (result == MessageResult.OK) {
        // ...
    }
}
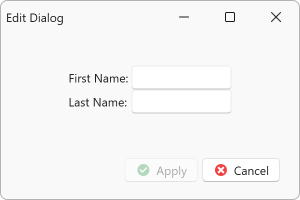
UICommand Buttons
Pass a collection of the UICommand objects to the ShowDialog method. In this case, the dialog returns a result of the UICommand type.
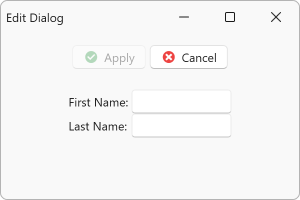
[Command]
public void ShowDialog() {
    // Specify the Apply button:
    var buttonApply = new UICommand() {
        Id = "apply",
        Caption = "Apply",
        Command = new DelegateCommand<CancelEventArgs>(
            cancelArgs => {
                try {
                    // Your "Apply" method
                }
                catch (Exception e) {
                    // Process errors
                    // ...
                    cancelArgs.Cancel = true;
                }
            },
            // Disable the button if one of the fields is empty:
            cancelArgs => !string.IsNullOrEmpty(dialogViewModel.FirstName) && !string.IsNullOrEmpty(dialogViewModel.LastName)
        ),
        Glyph = new Uri("pack://application:,,,/DevExpress.Images.v26.1;component/SvgImages/Icon Builder/Actions_CheckCircled.svg"),
        IsDefault = true,
        IsCancel = false
    };
    // Specify the Cancel button:
    var buttonCancel = new UICommand() {
        Id = "cancel",
        Caption = "Cancel",
        Command = new DelegateCommand(() => { /* Your "Cancel" method */ }),
        Glyph = new Uri("pack://application:,,,/DevExpress.Images.v26.1;component/SvgImages/Icon Builder/Actions_DeleteCircled.svg"),
        IsDefault = false,
        IsCancel = true
    };

    UICommand result;
    result = DialogService.ShowDialog(
        dialogCommands: new UICommand[] { buttonApply, buttonCancel },
        title: "Edit Dialog",
        viewModel: this
    );

    if (result == buttonApply) {
        // ...
    }
}
Asynchronous Buttons
The DialogService can display asynchronous buttons. These buttons indicate whether the associated asynchronous operation is in progress.
To display an asynchronous button, you can follow the same steps as in the previous section, with two adjustments:
- Assign an asynchronous command to the UICommand.Command property.
- Set the UICommand.AsyncDisplayMode property to
WaitorWaitCancelto display the wait indicator.

var buttonApplyAsync = new UICommand(
    id: "applyAsync",
    caption: "Apply Async",
    command: new AsyncCommand<CancelEventArgs>(
        async cancelArgs => {
            try {
                await // Your asynchronous "Apply" method
            }
            catch (Exception e) {
                // Process errors
                // ...
                cancelArgs.Cancel = true;
            }
        },
        // Disable the button if one of the fields is empty:
        cancelArgs => !string.IsNullOrEmpty(dialogViewModel.FirstName) && !string.IsNullOrEmpty(dialogViewModel.LastName)
    ),
    asyncDisplayMode: AsyncDisplayMode.Wait,
    isDefault: false,
    isCancel: false
);
Refer to the following help topic for more information: Asynchronous Commands.
Use Custom Dialog Buttons
Use Any Control as a Dialog Button
You can define custom buttons in the dialog View and use these buttons instead of standard dialog buttons:

Define custom buttons in the DialogView:
<dx:DialogService.ViewTemplate> <DataTemplate> <local:DialogView/> </DataTemplate> </dx:DialogService.ViewTemplate><Grid> <Grid.RowDefinitions> <RowDefinition /> <RowDefinition Height="Auto"/> </Grid.RowDefinitions> <StackPanel Orientation="Vertical" VerticalAlignment="Center" HorizontalAlignment="Center"> <StackPanel Orientation="Horizontal"> <TextBlock Text="First Name: " VerticalAlignment="Center"/> <dxe:TextEdit Text="{Binding FirstName}" Width="100"/> </StackPanel> <StackPanel Orientation="Horizontal" > <TextBlock Text="First Name: " VerticalAlignment="Center"/> <dxe:TextEdit Text="{Binding LastName}" Width="100"/> </StackPanel> </StackPanel> <StackPanel Orientation="Horizontal" HorizontalAlignment="Center" Margin="5" Grid.Row="1"> <dx:SimpleButton Glyph="{dx:DXImage 'SvgImages/Icon Builder/Actions_CheckCircled.svg'}" GlyphHeight="50" GlyphWidth="50" Command="{Binding ApplyCommand}"/> <dx:SimpleButton Glyph="{dx:DXImage 'SvgImages/Icon Builder/Actions_DeleteCircled.svg'}" GlyphHeight="50" GlyphWidth="50" Command="{Binding CancelCommand}"/> </StackPanel> </Grid>Attach the CurrentDialogService to the DialogView to access the dialog window from its View Model:
<UserControl ...
            x:Class="DialogServiceExample.DialogView"
            xmlns:dx="http://schemas.devexpress.com/winfx/2008/xaml/core"
            xmlns:dxmvvm="http://schemas.devexpress.com/winfx/2008/xaml/mvvm">
    <dxmvvm:Interaction.Behaviors>
        <dx:CurrentDialogService/>
    </dxmvvm:Interaction.Behaviors>
Create commands that use the
CurrentDialogService.Closemethod to close the dialog window and specify the dialog result:public class DialogViewModel : ViewModelBase { // ... protected ICurrentDialogService CurrentDialogService { get { return GetService<ICurrentDialogService>(); } } [Command] public void Apply() { CurrentDialogService.Close(MessageResult.OK); } [Command] public void Cancel() { CurrentDialogService.Close(MessageResult.Cancel); } }Refer to the following help topic for more information on the
CurrentDialogService.Closemethod overloads: CurrentDialogService.Hide the standard dialog buttons:
xmlns:dxi="http://schemas.devexpress.com/winfx/2008/xaml/core/internal"

<dx:DialogService.DialogStyle>
    <Style TargetType="Window">
        <Setter Property="Height" Value="200"/>
        <Setter Property="Width" Value="300"/>
        <Setter Property="dxi:ThemedWindowOptions.UseCustomDialogFooter" Value="True"/>
    </Style>
</dx:DialogService.DialogStyle>
Use the Built-in Dialog Button Type to Create Customized Buttons
Dialog buttons are objects of the ThemedWindowDialogButton class. You can add these elements to the dialog View and specify their position and appearance:
Create ThemedWindowDialogButton objects, specify their properties, and place these buttons in the
ThemedWindowDialogButtonsControlcontainer:<Grid> <Grid.RowDefinitions> <RowDefinition Height="Auto"/> <RowDefinition /> </Grid.RowDefinitions> <StackPanel Grid.Row="1" Orientation="Vertical" VerticalAlignment="Center" HorizontalAlignment="Center"> <StackPanel Orientation="Horizontal"> <TextBlock Text="First Name: " VerticalAlignment="Center"/> <dxe:TextEdit Text="{Binding FirstName, UpdateSourceTrigger=PropertyChanged}" Width="100"/> </StackPanel> <StackPanel Orientation="Horizontal" > <TextBlock Text="Last Name: " VerticalAlignment="Center"/> <dxe:TextEdit Text="{Binding LastName, UpdateSourceTrigger=PropertyChanged}" Width="100" Margin="1,0,0,0"/> </StackPanel> </StackPanel> <dx:ThemedWindowDialogButtonsControl Grid.Row="1" HorizontalAlignment="Center" VerticalAlignment="Top"> <dx:ThemedWindowDialogButton UICommand="{Binding UICommandApply}" Content="{Binding UICommand.Caption, RelativeSource={RelativeSource Self}}" Glyph="{Binding UICommand.Glyph, RelativeSource={RelativeSource Self}}" Command="{Binding UICommand.Command, RelativeSource={RelativeSource Self}}"/> <dx:ThemedWindowDialogButton UICommand="{Binding UICommandCancel}" Content="{Binding UICommand.Caption, RelativeSource={RelativeSource Self}}" Glyph="{Binding UICommand.Glyph, RelativeSource={RelativeSource Self}}" Command="{Binding UICommand.Command, RelativeSource={RelativeSource Self}}"/> </dx:ThemedWindowDialogButtonsControl> </Grid>The ThemedWindowDialogButton class contains DialogResult and UICommand properties. These properties allow you to specify the value returned by the
ShowDialogmethod when a user clicks the button.Hide the standard dialog buttons:
xmlns:dxi="http://schemas.devexpress.com/winfx/2008/xaml/core/internal"

<dx:DialogService.DialogStyle>
    <Style TargetType="Window">
        <Setter Property="Height" Value="200"/>
        <Setter Property="Width" Value="300"/>
        <Setter Property="dxi:ThemedWindowOptions.UseCustomDialogFooter" Value="True"/>
    </Style>
</dx:DialogService.DialogStyle>
Execute an Action when a User Closes the Dialog
You can use the CurrentDialogService.ClosingCommand property to process the close dialog operation.
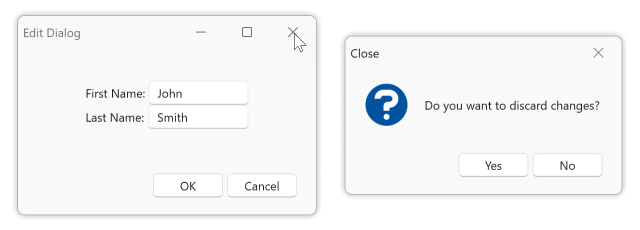
Create a command that is executed when a user closes the dialog. The following code sample displays a confirmation message when a user clicks the dialog window’s Close button (
X):public class DialogViewModel : ViewModelBase { // ... protected ICurrentDialogService CurrentDialogService { get { return GetService<ICurrentDialogService>(); } } protected IMessageBoxService MessageBoxService { get { return GetService<IMessageBoxService>(); } } [Command] public void DialogClosing(CancelEventArgs args) { var dialogResult = (CurrentDialogService as CurrentDialogService).ActualWindow.DialogResult; if (dialogResult != null) return; var result = MessageBoxService.ShowMessage( caption: "Close", messageBoxText: "Do you want to discard changes?", button: MessageButton.YesNo, defaultResult: MessageResult.No, icon: MessageIcon.Question ); if (result == MessageResult.Yes) { CurrentDialogService.Close(MessageResult.Cancel); } else { args.Cancel = true; } } }The
ActualWindow.DialogResultproperty returns the following values based on the MessageResult enumeration:trueif theShowDialogmethod returnsOKandYesvalues.falseif theShowDialogmethod returnsCancel,No, andNonevalues or if the dialog result is of the UICommand type.nullif the dialog window is closed without parameters (for example, a user clicks the window’s Close button).
Bind the CurrentDialogService.ClosingCommand property to the created command:
<dxmvvm:Interaction.Behaviors>
    <dx:CurrentDialogService ClosingCommand="{Binding DialogClosingCommand}"/>
    <dx:DXMessageBoxService/>
</dxmvvm:Interaction.Behaviors>